 Photo 1
Reframed small etching by Don Swann, "Foaming Along". (Photo courtesy of MH Corrado)
Tiered matting is not the style a mat design is cut or assembled, but rather the arrangement of layers within a single mat to create stripes and bands within the bevel itself, that are traditionally dry mounted together. Since the 1990's using dry mount equipment for building tiered mats—Surface Tiering, Under Tiering, Pin-striping, and Bevel Banding—has been thought of as a creative application using heat activated clear film adhesives, matboard and pigmented neutral pH papers; but it is also a very practical way to fill potential voids in inventory when necessary. Solid core, 4-ply conservation, and museum matboards are frequently on-hand and often a staple for framers, but because of their cost, high end 8-ply museum boards are generally ordered only when needed.
Surface Tiered Solution
A client brought in a framed family heirloom etching by Don Swann, "Foaming Along", with an 8-ply water damaged mat. All she needed was the frame cleaned up, the glass upgraded to UV, and a new cream 8-ply blackcore mat. She wanted it all to match the current aged version of the original mat, including any color shift, but the problem was there was no cream 8-ply blackcore that color matched available, so a facsimile needed to be created. (photo 1 & 2)
Photo 1
Reframed small etching by Don Swann, "Foaming Along". (Photo courtesy of MH Corrado)
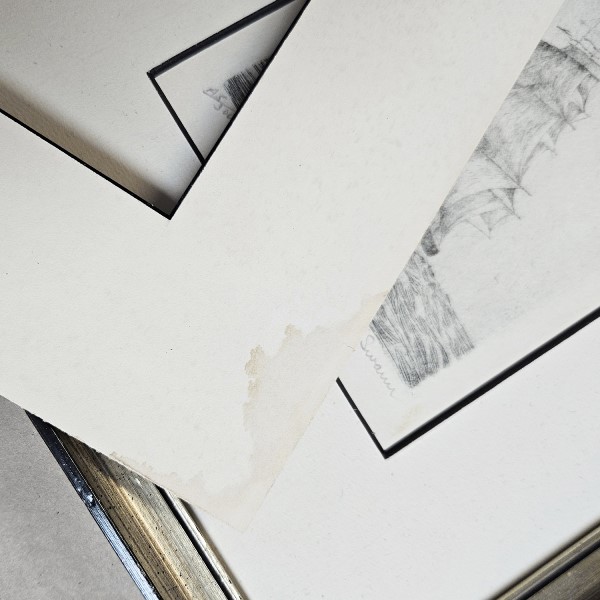 Photo 2
Detail of Surface Tiered 8-ply replacement mat and original damaged mat. (May be an inset of Photo 1)
A sheet of mouldmade Gutenburg Laid paper by Hahnemuhle from Germany was selected as the best match. It is a beautiful art paper of pale sand color with small darker specks throughout used for pastels, letterpress, calligraphy, drawing, bookarts and conservation work. This sheet was mounted as a surface tier to two sheets of 4-ply black ragboard, all layers being mounted with pure film adhesive. (photo 3)
 Photo 3
Gutenburg Laid paper is cream colored with small light and dark speckles, textured on one side smoother on the verso side, sold at Talas.
The new top paper and both black mats were layered with a sheet of pure film adhesive between each, and the whole unit was placed in a 200˚F mechanical press for 5 minutes. Typical temperature and time for film adhesive is 180°F for 2 minutes, but since no artwork was being mounted all layers may be placed in a slightly hotter press for a longer period without ever doing any harm to the mat being created. If however all layers do not reach at least 190°F for the desired duration, bond failure could occur because of not fully activating and melting the adhesive. Once reaching activation time, remove from the press and cool under an even weight to bond. Once cool, the new 8-ply surface tiered mat was sized and the project was completed. It matched perfectly.
Banded Solution
Another client brought in a broken 15 x 20" metal frame with no glass and water damaged single 8-ply rag mat, housing a high end collectable etching by Toko Shinoda. (photo 4) Having restored previous pieces from this collection it was to be upgraded to a new 8-ply single mat that matched the original aged color of the damaged mat, UV glass, and Studio Poems II Black, Asian influenced profile. (photo 5 & 6)
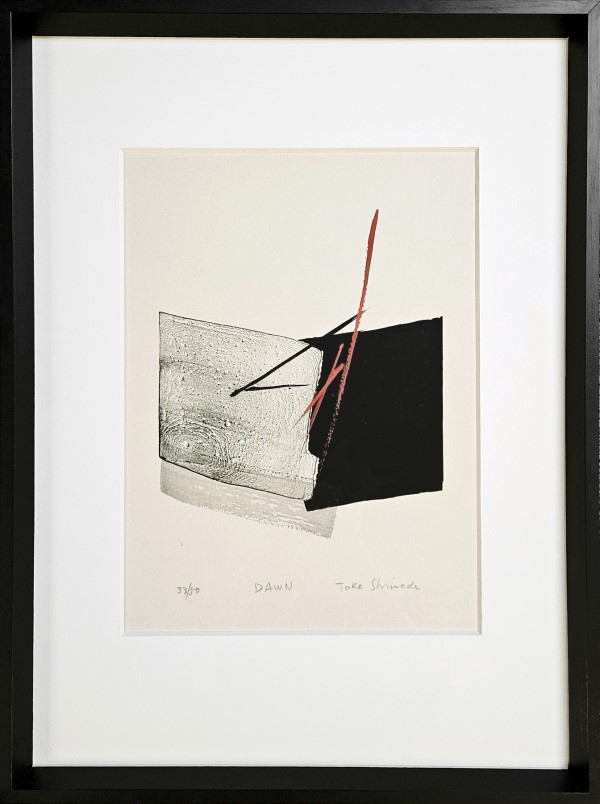 Photo 4
Water damaged 8-ply on original Shinoda.
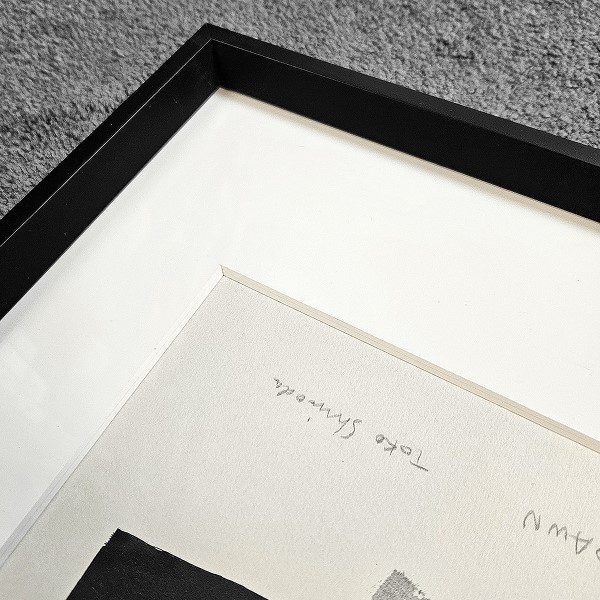 Photo 5
Reframed Toko Shinoda, "Dawn" etching. (Photo courtesy of L Pearce)
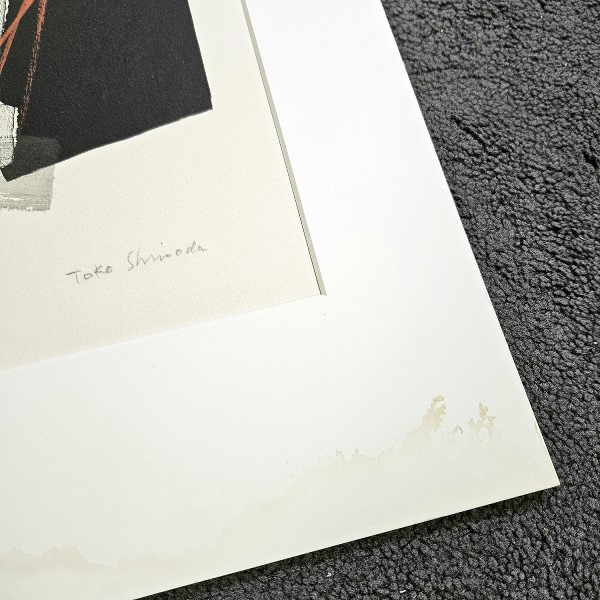 Photo 6
Detail of replacement mat and frame.
Since my framing distributors are all three hours away and shipping can take up to two weeks, the quicker solution was to create a basic 8-ply mat by bonding two sheets of Antique White 4-ply rag with clear pure film adhesive to match the damaged original 8-ply mat. The two small 16 x 21" 4-ply boards were simply mounted together with a single sheet of film adhesive at 200˚F for 2 minutes in a mechanical press. It is advised to cut the boards a little larger both directions so once mounted and trimmed to size they are cleanly blunt cut as a mat should be. The damaged mat was replicated using the modified Asian proportions of the original design framed in Japan decades ago with 2½" narrower sides, 3" wider top and 3½" widest bottom. The client was thrilled.
Tiered Mats
The above samples are solutions for discontinued, out of stock, or unavailable materials, but then there are the creative design venues for tiered mats, which opens a whole other door. The basics of tiered mats came about back in the early 1980's prior to the launch of textural or decorative papers on matboard, and out of a personal search for upgrading matboards for my original calligraphic art. I began spray mounting beautiful handmade papers to museum boards which I named Surface Tiering. Back in 1972 my father was taught spray mounting as the technique of choice by Paul Frederick when he studied framing with him and when dry mounting had not fully reached picture framers yet.
Clients loved the concept and sales flourished for years until the day I noticed the spray adhesive was failing and the papers were lifting from my corner samples. In 1986 I bought my hot vacuum press and the rest is history. Tiered mats are now dry mounted using pure film adhesive for bond and clarity. In time additions to the tiered concept—Under, Pin-striping, and Bevel Banding—have evolved, each as a solution to a mat design problem or challenge. Surface tiering became both a design tool to introduce handmade and imported papers to mats, and also to allow your equipment to create another revenue source.
Though surface tiered mats have always been a personal design favorite, under tiering is a visual tool most often used to help create a visual break between mats or to introduce an accent color narrower than an ⅛" mat reveal. Surface tiering, Under tiering and Pin-striping all involve mounting sheets of colored machine-made papers—such as Canson Mi-Teintes—to the face, back, or between boards to alter the look of the bevel. Photo 7 shows a Pin-striped tiered top mat of two 4-ply rag solid core boards with three sheets of Black Canson paper between. The bottom mat is a sheet of textural Canson used to pick up the texture of the shadowed trees in the photo; surface tiered to a 4-ply rag. (photo 7)
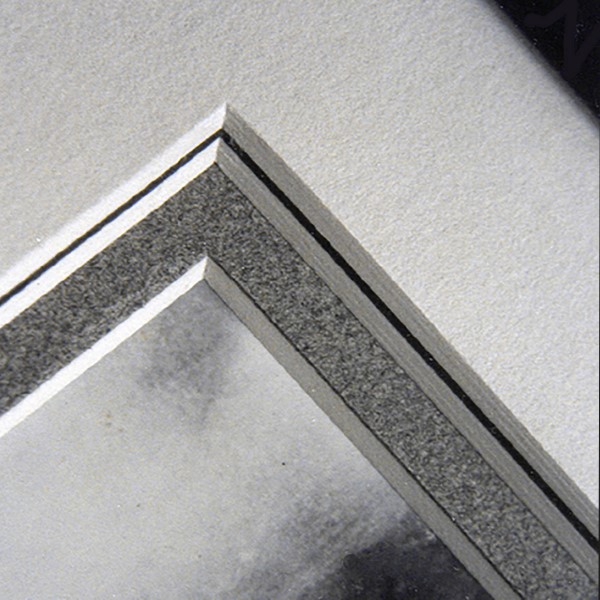 Photo 7
Top mat is a Pin-striped tiered mat of two 4-ply with three sheets of Canson between. The bottom mat is a sheet of Canson Surface tiered to a 4-ply rag.
Tiered Sampler
And then there is a showcase sampler, often a showstopper. Many sales are stimulated by what a client sees on the wall. An elaborate tiered mat was created as a shop sample of tiered matting showing surface, under, pin-striped, and bevel banded tiering all in one mat. (photo 8) All layers are stacked together for a single mounting in the press at 200˚F for 5 minutes, they include bottom to top: 1 sheet Canson Black, Film 4000, 1 sheet Antique White 4-ply rag, Film 4000, 3 sheets Canson Sky Gray with Film between each, 1 sheet Canson Cream, Film 4000, 1 4-ply blackcore decorative mat. (photo 9)
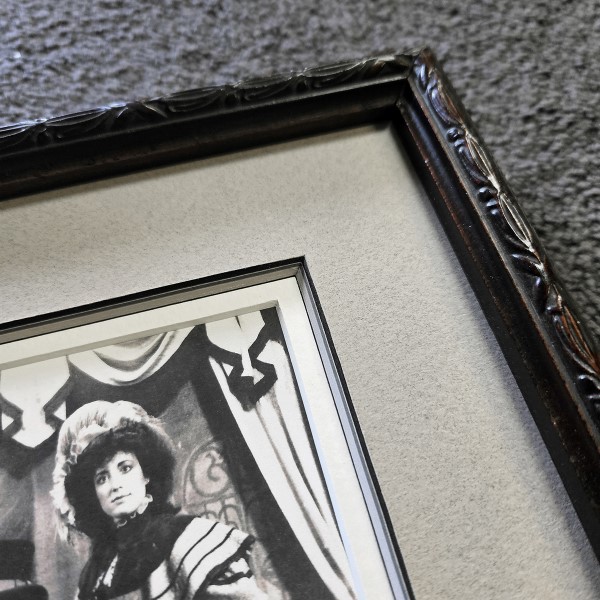 Photo 8
Sampler showcasing Surface, Under, Pinstriped, Banded tiered package.
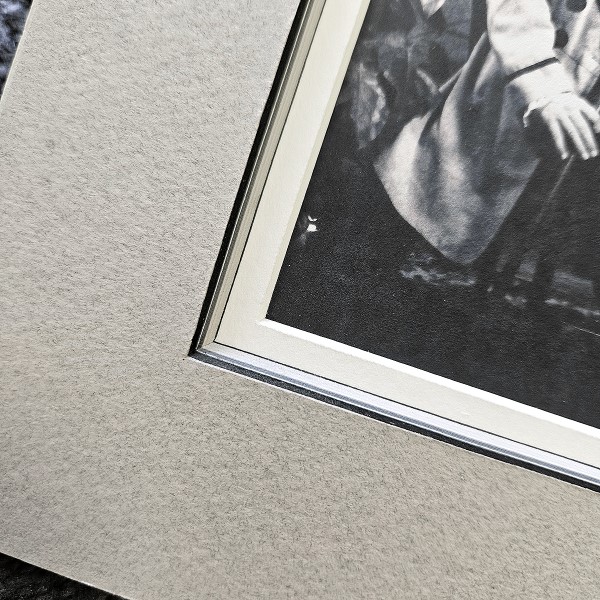 Photo 9
(bottom to top) 1 sheet Canson Black, Film 4000, 1 sheet Antique White 4-ply rag, Film 4000, 3 sheets Canson Sky Gray with Film between each, 1 sheet Canson Cream, Film 4000, and 1 Bainbridge 4-ply decorative blackcore.
This would likely be overkill in a single design, but then again if a client loved the design concept it could take a 9 x 12" 4-ply rag top mat from $30.00 to a 12-ply tiered top mat for $115.00. The tiered mat price breakdown includes two 4-ply rag mats ($30+30), 5 sheets of Canson pigmented art paper at $5.00 each ($25) and a single mounting charge ($30), equaling $115.
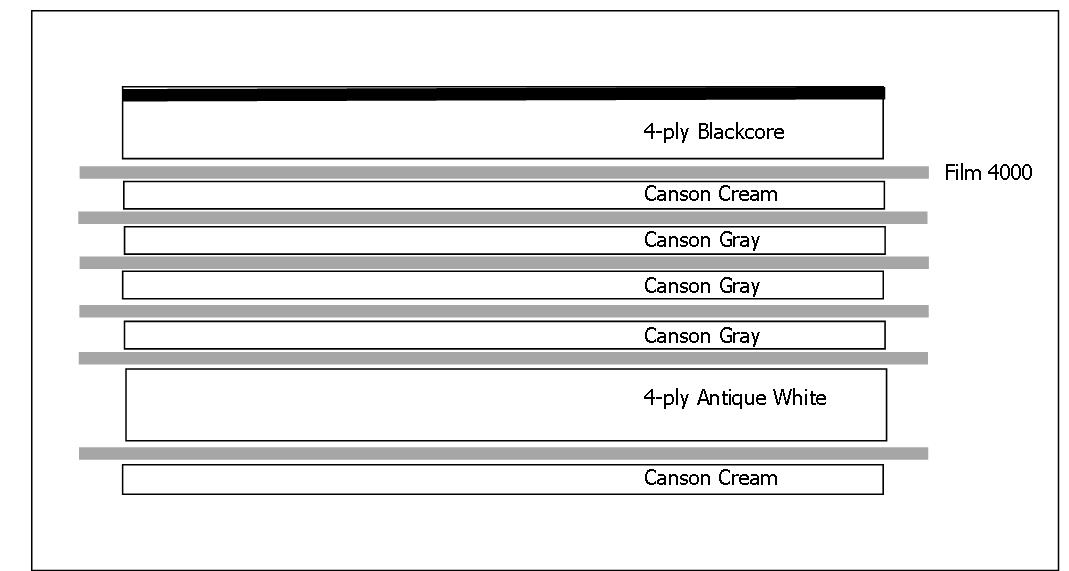 Diagram 1
Tiered Stack Sampler
Manual Mat Cutting
Though CMCs are capable of cutting thicker 8-ply mats sometimes tiered mats can end up 12 to 16-ply, meaning a manual mat cutter remains a mandatory cutting tool. A 12-ply mat with 6 layers of film adhesive is very dense. A double-sided 1200 blade is likely to twist during intense cutting, so use single-sided 1500 blades to prevent blade torque when cutting, and extend your blade depth to accommodate the thicker board before beginning. Though you are taught to score through a window mat side once to prevent slivering, these thicker boards require additional scores to execute a clean straight cut with no corner hooks.
Use a clean un-scored slip sheet, stand squarely at the end of the mat cutter, and make certain your cutting arm remains parallel to the cutting bar at all time which keeps a constant, even pressure on the cutting head. For a 12-ply mat you will need to make at least 3 passes each side of the window mat to score through, which would be the equivalent of three 4-ply cuts. Undercutting the corners—which is better than overcuts—is often common since you are not be used to estimating the corner of a 12-ply board. Once cut, remove and pop the corners out from the top with a 1200 blade making sure the blade remains flush against the bevel into the corner. (photo 10)
 Photo 10
Pop the corners out from the top with a 1200 blade making sure the bevel is followed smoothly to the corner.
Film 4000™
Over the years film adhesives have included Flobond and Fusion 4000, but in recent years films have not been available. But for the past year I have been actively searching for European sources and have come up with one, so a replacement of our well-loved dry mount film will be available in the United States from me, called Film 4000 (also called, Dry Mount Film 4000™ or DMF 4000™).
Today tiered matting remains the creation of mounting multiples of fine art papers and matboards together to create a custom mat with assorted stripes, depth and color when the bevel is cut. Each mat is so unique you will not have corner samples for every color or design idea, so wall samples are a must.
Additional Reading
Paschke, Chris A., "Mounted Mat Accents", Picture Framing Magazine, April 2012.
Paschke, Chris A., "Tiered Matting", Picture Framing Magazine, February 1991.
END
Copyright © 2024 Chris A Paschke
For more articles on mounting basics look under the mounting section in Articles by Subject.
Additional information on all types of mounting is found in:
The Mounting and Laminating Handbook, Second Edition, 2002,
The Mounting And Laminating Handbook, Third Edition, 2008 and
Creative Mounting, Wrapping, And Laminating, 2000 will teach you everything you need to know about getting the most from your dry mount equipment and materials as an innovative frame designer.
All books are available from Designs Ink Publishing through this website.
Chris A Paschke, CPF GCF
Designs Ink
Designs Ink Publishing
840 Tucker Road, Suite H-190
Tehachapi, CA 93561
P 661-821-2188
chris@designsinkart.com