 Photo 1
Original 10x10" watercolor on Fabriano 140# rough painted in a sumi-e style
Original watercolors may end up flat or cockled, deckle edged or blunt cut. They may be placed behind a single white window mat with all edges covered, or floated with no mat and Artspacers allowing all deckle edges to show. As a second generation professional picture framer and watercolor artist I have worked hard to master the art of framing original watercolors regardless of their value or condition of the original. The point of framing any art for display is to enhance and protect it. To a framer, a child's heavily cockled kindergarten finger-painting is every bit as valuable as art from a high end gallery collection.
Framing can add to, or detract from, any fine art original depending upon the selected frame, matting, mounting and glazing choices. A frame should never be selected just because it is the only one in the storage closet or is on sale at the local discount store. Good design choices will enhance the art making it even more beautiful, while a frame that does not match the period or style of the art may feel awkward or mismatched. Framing choices should be every bit as much a part of the process of creating the art as selecting a 140# hot press over a cold press sheet.
The framed sample Moon Gold II (photo 1) is a simple Asian influenced still life watercolor wash that has been enhanced with a contemporary version of a double mat with ³⁄₁₆" paper wrapped spacer between (photo 2). It has been hinged and is glazed with UV-Conservation Clear glass and a dark gray wood grain stem moulding frame.
Photo 1
Original 10x10" watercolor on Fabriano 140# rough painted in a sumi-e style
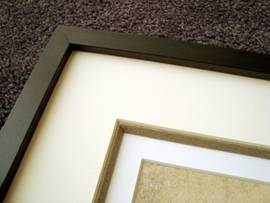 Photo 2
2" antique white top mat, ³⁄₁₆" deep bevel spacer, 3" white bottom mat, UV-Conservation Clear glass, dark gray wood flat sided stem frame.
Enhance and Protect
Enhancing a watercolor with good design is only half the project…protecting it is the rest of the story. Protecting a watercolor means never doing anything to it during the framing process that cannot be undone. Most damage to art occurs from bad storage practices, by pressing glass directly against it, low grade mat boards, or use of pressure-sensitive tapes. There are many high quality products that will protect your masterpiece, and a properly constructed basic frame package should include:
Even when watercolors have been correctly handled and museum mounted, it is important to check them at least every five years for damage caused by light, humidity, bugs and pollution.
Mats
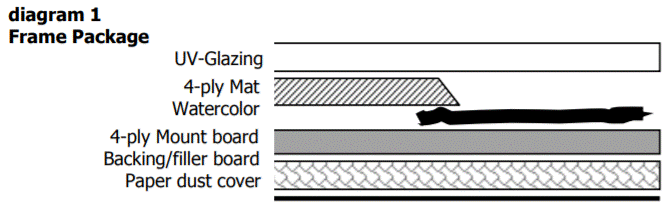
Mats are cut from 4- or 8-ply boards with a window opening cut into them to display the art. All mats should consist of buffered rag or conservation mat board materials that are buffered with 2-3% calcium carbonate to guard against acid migration. And a pH of 8.5 helps resist fading, discoloration and embrittlement. Mats are designed as edge protection for the art, as a spacer allowing for air circulation within the frame, and to keep the glazing from touching the surface of the art. Though an 8-ply is highly suggested for a single mat, a double mat with spacers would also create the required depth to accommodate any watercolor that is warped or cockled.
The window mat should be book hinged to the 4-ply mount board backing on the longest side using a linen framing tape (diagram 2). Always use a bone burnisher to activate maximum adhesion of any p-s tape (photo 3). Finger pressure rarely activates tapes more than 50%.
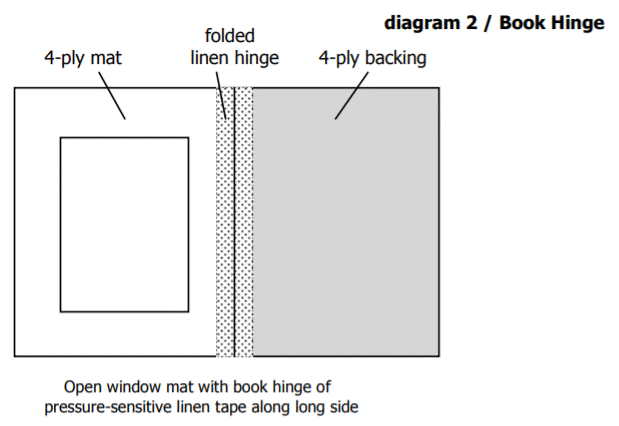
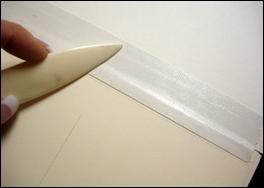 Photo 3
A linen book hinge should attach the window mat to the mount board along the longest side. Always reinforce pressure-sensitive tapes with a bone burnisher for maximum activation.
Mounting Options
There are permanent, removable and reversible mounting adhesives. All permanent adhesives and mounting methods should be avoided for any watercolor, and fully mounting any original art to a backing board using spray adhesive, wet glue, pressure-sensitive boards or dry mounting is never acceptable. All of these methods are considered permanent and these types of adhesives require solvents for removal which saturate into the painting leaving residue for the life of the art. Removable adhesives may be reactivated by introducing heat that softens adhesive for separation of art from backing, but there will always remain some level of adhesive saturation in the art once removed. Only reversible adhesives and mounting methods—called museum mounting—should be used for original art. These allow for future removal of the art from the framing package with no residue or adhesive damage.
The recommended method of attaching watercolors to mount boards is to use pendant or T-hinges (diagram 3) with starch paste and/or Japanese rice paper or commercially acceptable pre-pasted starch hinges.
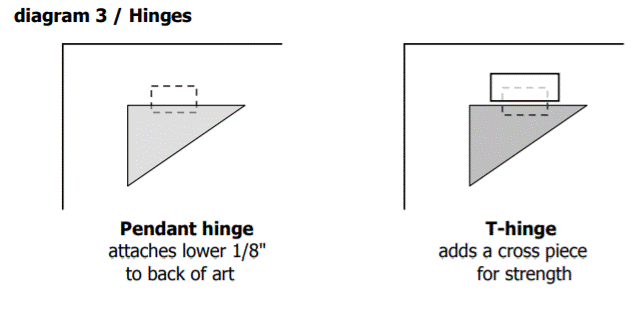
Pendant hinges are used when a window mat will be covering and supporting the hinged art around all four sides. Hinge placement varies depending on the size and weight of the image, but the outermost hinges should begin a little more than one width (not length) of the hinge from the edge of the art. Additional hinges may be needed at 12"- 15" intervals . Attach pendent hinges with a small amount of cooked starch paste to the top ⅛" of the back of the art, weight and dry (photo 4). Then glue the hinges to the mount board and close the hinged window mat down over it. Pendent hinges are fine for small lightweight watercolors, but heavier papers require more support.
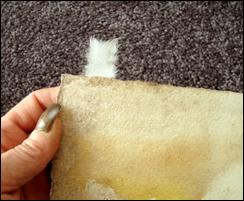 Photo 4
The feathered edges help prevent any indent showing through to the front of the watercolor when using starch paste. Only ⅛" of hinge has been pasted to the back of the art.
A T-hinge is a reinforced pendant hinge, that are the strongest hinges giving the most support (photo 5). The bottom ⅛" of the T-hinge comes in contact with the top edge of the back side of art like the pendant as in the above description, but a reinforcement piece is then applied horizontally across the face of the first hinge piece. T-hinge cross pieces are only there for additional support and shall never actually come in contact with the art. There are commercial p-s hinging products such as Lineco Hayaku and museum mounting kits with wheat starch and Japanese paper available from most fine art suppliers.
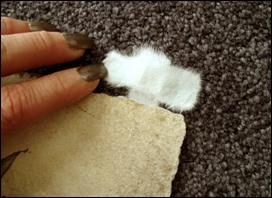 Photo 5
When a horizontal cross piece is added to for reinforcement it is called a T-hinge.
Never allow masking tape, linen tape, or double sided tape come into direct contact with any watercolor paintings. And NEVER attach the art to the back of the window mat. A very common mounting mistake is taping the entire perimeter of the art to the back of the window in an attempt to prevent them from shifting or buckling in the frame. This restricts the paper from expansion and buckling is more likely to occur. The watercolor should be hinged to the back mount board with the book hinged window then closed over the edges of the art. If properly applied, the long book hinge and the inner edges of the frame will keep everything in alignment once fully assembled.
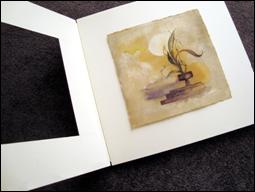 Photo 6
The window mats are book hinged to mount board.
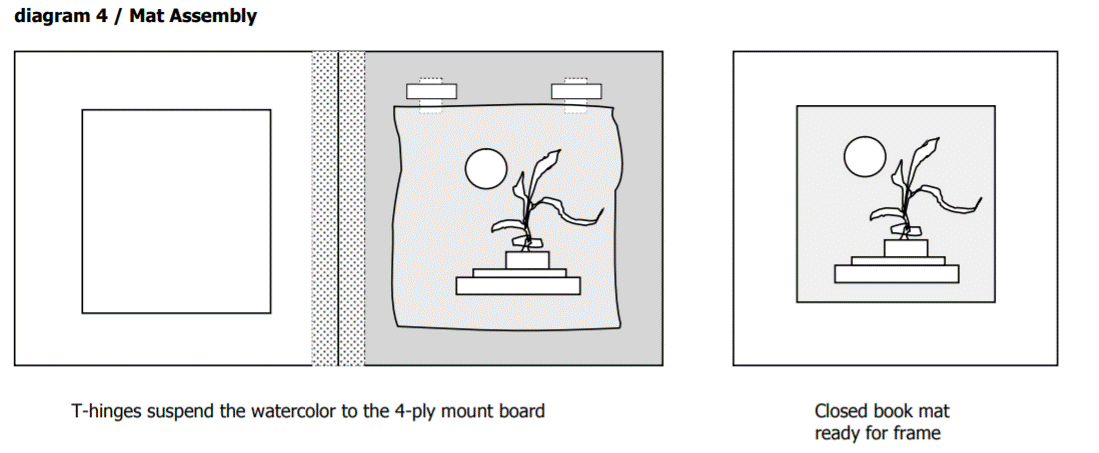
Attach the pendant hinge to the back top edge, align art onto book unit backing (photo 6). Close hinged mat over art to verify alignment, open and apply horizontal cross piece (photo 7). When finished mat unit is ready for glass and frame (diagram 4).
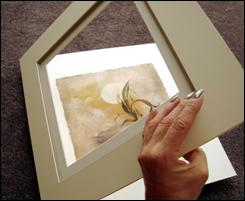 Photo 7
Close mat to check alignment and mark corners for placement.
Glazing
All watercolors require the protection of either glass or acrylic glazing. Glass products are available as premium clear, reflection control, UV-filtering (clear and reflection control), and acrylic sheeting in regular and UV-filtering. Reflection control glazing has an etched surface that shatters the reflection as the light is passed through the glass to light the art eliminating much of the glare. The problem is this also can affect the crispness and clarity of the art beneath. Whether clear or reflection control glass or acrylic is selected, UV-filtering glazing is required on all watercolor paintings because of the unknown properties and light sensitivities possible with many water based pigments. UV-glazing blocks 97% of all harmful UV rays.
It should also be clarified that UV-glazing does not protect pigments that are sensitive to visible light fading, as many water based felt pens have been over the years. These would be colors that are faded by the very light waves that make them appear the color they are. If a blue or red pigment is being faded by visible light waves, the blocking of UV rays will not stop the fading but will slow down further UV damage.
Fitting
Always select buffered rag or conservation quality mat and board products. When assembling the final package do not compress the mats and filler boards from the back when pinning into the frame. Excess pressure will restrict the watercolor from being allowed to freely expand and contract which is why hinges were used in the first place. A tight package will encourage buckling and warping when the art cannot move.
A sheet of paper—called a dust cover—should be used to seal or close the back of the frame package to help deter bugs and protect the art from exterior humidity and pollutants. Line the edge of the frame with double-stick tape and stretch the paper across, trim and wire to hang (photo 8). Brown Kraft paper is OK; blue/gray acid-free, buffered backing paper is perfect; but the black Kraft paper will leave a carbon ghost on white walls and should be avoided.
 Photo 8
Attach dust cover, D-rings, wire, bumpers on lower corners. Add business card and information.
Finishing
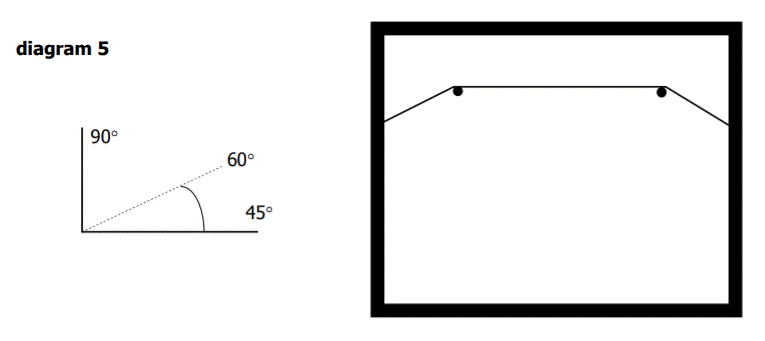
Wires and hardware should not be an afterthought. If a wood frame has been chosen then D-rings should be used with screws as the hanging hardware of choice. Screw eyes are weak and may snap at wood line or pull out of the wood altogether. D-rings should be set at ⅓ down from the top of the frame and the wire should make a 60° angle to the side of the frame to relieve stress (photo 9). The wire needs to be strong enough to accommodate the frame but not overkill. A 110# wire on a small 5# framed piece will not prevent the screw eyes from pulling out of the wood. Hang the art with two wall nails or framer hooks, never one (diagram 5). This not only helps keep the frame level but will lessen the stress on the point at which the D-ring is screwed into the frame at each side.
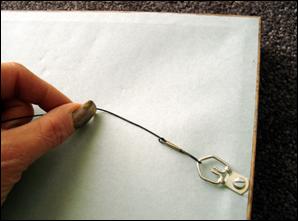 Photo 9
Wire should be loose enough to allow for two hangers.
Sawtooth hangers should not be used for most framing. They create undue stress on the top leg of the frame, stressing the top corners and encouraging warp and damage.
END
Copyright © 2010 Chris A Paschke
Original watercolor Moon Gold II and framing courtesy of Chris A Paschke.
Forward questions or comments via email to chris@designsinkart.com.
For more articles on mounting basics look under the mounting section in Articles by Subject.
Additional information on all types of mounting is found in:
The Mounting and Laminating Handbook, Second Edition, 2002,
The Mounting And Laminating Handbook, Third Edition, 2008 and
Creative Mounting, Wrapping, And Laminating, 2000 will teach you everything you need to know about getting the most from your dry mount equipment and materials as an innovative frame designer.
All books are available from Designs Ink Publishing through this website.
Chris A Paschke, CPF GCF
Designs Ink
Designs Ink Publishing
840 Tucker Road, Suite H-190
Tehachapi, CA 93561
P 661-821-2188
chris@designsinkart.com