 Photo 1
Everyone has an opinion and online forums are fabulous for gathering information from other experienced framers—but sometimes the questions may not be asked correctly, or the problem may not be fully understood. And if the details are even slightly incorrect the answers and/or assumptions could be devastating. Such was the case over orange peel, FujiFlex and Metallic photos.
Orange Peel
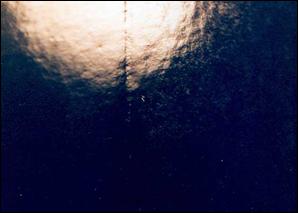
The lumpy nature of the surface of a mounted gloss image is often the result of an unsmooth substrate; commercial release board; too much pressure during mounting; or a combination of these (photo 1). When a glossy photograph is bonded to any board the image will contour to replicate its surface. If the surface is smooth—as with aluminum composite material (ACM)—the image may bond with little or no orange peel. If it is lumpy or uneven—as with thick grey chipboard or illustration board—the image will contour to replicate it. Commercial release boards are made of chipboard with release paper applied to both sides allowing for orange peel, so their use should be limited.
Photo 1
The only time a release board is required is when bonding using multiple bites in a mechanical press. A release board is a convenience, but is never required when using a vacuum press. The best way to avoid orange peel if using a release board is to create your own in-house version with rag board, permanent adhesive and single sided release paper. Then you have total control over the smoothness of the board. The full article is available at https://www.designsinkart.com/library/M-InHouseBoards200803.htm
Digital images are on thinner paper than traditional RC photos which also allows them to contour when under required mounting pressures. When an adhesive or HA board is properly mounted for the designated amount of time, at the correct temperature, under the proper pressure, and has been predried—if in a mechanical press—it will fuse to the substrate with no issues. Traditional fiber base photos were so thick they would absorb any unevenness of the substrate and appeared smooth regardless of the substrate surface (photo 2). Digital fiber base paper is not thick and will often display orange peel when mounted (photo 3). Lightening the pressure or reducing the dwell time outside of manufacturer's recommendations may allow for bond failure so never compromise the required time and temperature in an attempt to avoid orange peel.
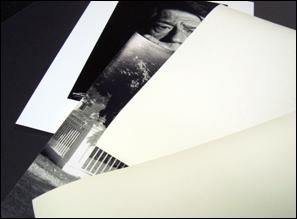 Photo 2
Digital fiber base (top) traditional dark room fiber base (below)
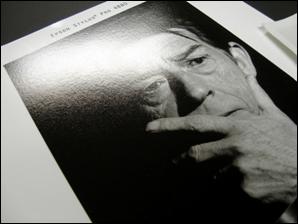 Photo 3
A traditional fiber base shows no orange peel after developing, not after mounting.
A digital fiber base begins with the orange peel of the paper it has been printed on which may only become more pronounced after mounting.
Kodak Endura Metallic Paper Then and Now
Kodak Professional Endura Color Metallic Paper (photo 4) was officially discontinued in 2009 having been replaced by Kodak Professional Endura Metallic VC Digital Paper. The new paper is easily distinguished from the original by its unique watermark on the back. ENDURA Metallic Paper has a single gray dot under "PAPER", while Color Metallic Paper has two dots separating "PAPER", "PAPIER" and "PAPEL".
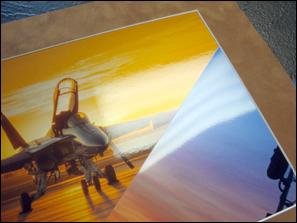 Photo 4
Kodak Professional Endura Color Metallic Paper
Endura prints may be dry mounted as any RC photo up to 200ºF, but fortunately lower temperatures are available. Temperatures above 200ºF and excessive moisture can cause color shift. Kodak recommends mounting at the lowest temperature with shortest dwell time, so MountCor at 130ºF for 30 seconds is perfect. They also warn that colors may shift towards pink if exposed to excessive temperatures, but will return after cooled to room temperature. They also suggest using only tungsten light and UV glazing between the light source and the print.
FujiFlex vs. Fuji Crystal Archive Pearl Paper
There continues to be much confusion over the difference between FujiFlex Crystal Archive Printing Material and Fuji Crystal Archive Digital Pearl Paper (photo 5). They are two distinctly different products with very specific mounting techniques. Fuji Pearl is the Fuji version of the updated Kodak Professional Endura Metallic VC Digital Paper. Fuji Pearl has a pearly appearance while Endura Metallic has a layer of mica in the paper coating which makes it appear more silvery metallic. These may both be successfully dry mounted—best at the lowest temperatures possible—but Fuji Pearl is more sensitive to orange peel and scratching than previous RC high gloss Endura Metallic photos.
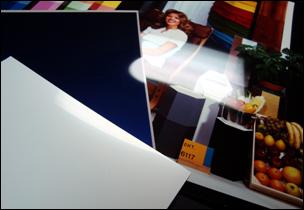 Photo 5
FujiFlex Crystal Archive Printing Material and Fuji Crystal Archive Digital Pearl Paper (left)
Ilfochrome Classic (right) is the original cibachrome.
FujiFlex Crystal Archive Printing Material is the Fuji version of the Ilford Ilfochrome Classic (cibachrome) which is printed to an opaque white 100% polyester media base. These may both be static mounted, but paper base photos including Fuji Pearl and Endura Metallic may not because paper does not create the same static energy. The full article on static mount is available at https://www.designsinkart.com/library/P-StaticMountingPhotosAndSilk200610.htm
These are indeed apples and oranges, so please pay close attention to what the photo actually is. Generally photos may be hinged; pocketed; edge stripped; pressure-sensitive or dry mounted; but not all photos mount alike. And polyester film media doesn't hinge well.
Is It Temperature or Something Else?
On another note, I frequently receive calls from framers and photographers with problems and questions. Sometimes it's what to do, sometimes its why didn't it work? My questioning always goes back to the basics of TTPM. How long was it in the press? What temperature? What type of press? Was the press properly adjusted for pressure? Did it need to be pre-dried? Sometimes the solution is as simple as registering what you have in the first place, such as the following issue.
A photo with a finish top coat was mounted to MountCor, though it was not known if the finish would have a reaction to heat. After asking what seemed to be all of the right questions, both the customer and the printer has both given permission for the framer to proceed with mounting. The prints seemed to mount fine, but there was blotchiness to the surface coating, and it seemed there was separation.
We needed to research the exact products in order to best determine what might be going on. A Roland VersaCAMM Eco-solvent printer using Ecosol Max 2 ink printed the image onto 3M IJ35, an opaque white vinyl matte digital film media designed for exterior signage using eco-solvent inks that do not require surface coating. The selected film media had a permanent pressure-sensitive adhesive already applied to the back. After printing it was then coated with Arlon Matte Laminate, a 3-mil permanent P-S vinyl overlaminate film by the printer.
Since the media had a P-S on the back and the additional overlaminate was applied also as a P-S, the project should have been mounted using only P-S in a cold roll laminator to a high density, rigid substrate. Instead it was dry mounted to HA board. Vinyl laminate mounted in a press requires a sponge overlay to prevent the vinyl surface from reacting to the silicone coated release paper. If there is surface blotching it's most likely the lack of an overlay sponge. The failed bond is as simple as the applied heat may have reactivated the P-S adhesive, releasing it. Bottom line, the wrong methods were implemented. Know what you have before deciding what to do with it. This photo was able to be replaced, but another time it may not.
END
Copyright © 2015 Chris A Paschke
For more articles on mounting basics look under the mounting section in Articles by Subject.
Additional information on all types of mounting is found in:
The Mounting and Laminating Handbook, Second Edition, 2002,
The Mounting And Laminating Handbook, Third Edition, 2008 and
Creative Mounting, Wrapping, And Laminating, 2000 will teach you everything you need to know about getting the most from your dry mount equipment and materials as an innovative frame designer.
All books are available from Designs Ink Publishing through this website.
Chris A Paschke, CPF GCF
Designs Ink
Designs Ink Publishing
840 Tucker Road, Suite H-190
Tehachapi, CA 93561
P 661-821-2188
chris@designsinkart.com