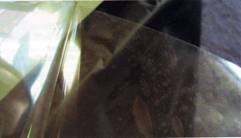
 Photo 1: Air Bubbles
The adhesive is very high tack and the polyester liners are very thin, if the peeled liner is allowed to fall back in contact with the adhesive it will create air bubbles. Liner removal creates static which attracts dust.
Go to any online framing blog and discussions surround business, preservation, and mounting. This year's common mounting queries include photos on a wider variety of both flexible and rigid substrates, digitals of all kinds, and many more textile questions than in past years. There have also been numerous calls and emails to me directly over how to mount to aluminum, face mount to plexi (PMMA—poly(methyl methacrylate), and wanting more about the problems surrounding gallery wrapping. So here is a sampling of the most popular topics and questions from this past year.
Since so many things that can go wrong...should I refuse all gallery wrap jobs?
Of course not. I just recently framed a $1000 limited edition giclée, 20x30" gallery wrap that had been stretched by the artist. It had been surface coated with a liquid laminate so there were no issues over ink flaking or cracking at the edges and it could have been hung with no frame, but the customer—an avid art collector of everything from LE prints to originals—fully believes all art should be framed. The point is that not all digital canvases have cracking issues, but during this particular gallery wrap's two week stay in my frame shop it went from taught to saggy to taught again, more than once. The customer was very happy with the final framed image regardless of the slight sag it had the day it was installed for her.
If the canvas is unstretched and uncoated be careful of the inks, which could scuff or chip. If the surface has been liquid laminated it will probably stretch with no ink damage. If the stretched canvas is to be placed in a traditional frame rather than a float frame, any cracking at the corners would be covered by the frame, though the damage will still be there. More and more I am hearing and reading that framers are opting to turn down gallery wrapping of digital canvases because of problems. It is up to each individual framer whether or not to stretch digital canvases.
In August PFM the Phase One - Stretching report of my ongoing study of digital canvases was released. PFM printed an abridged article on that study with the full report and spreadsheets available on the PFM website. Hugh Phibbs and I have been brainstorming over possible preservation mounting options for limited edition giclée canvases aside form traditional stretching. I will begin testing Phase Two - Mounting during 2009 and report those results.
Face mounting has become very popular with collectors and artists, how is optically clear face mount adhesive different from clear dry mount film?
Dry mount film adhesives activate under the heat of a mechanical or hot vacuum press and are removable, translucent, thermoplastic films with no carrier, that bond as they cool under a weight. Optically clear adhesives—designed for face mounting—are permanent double-sided, high tack P-S films designed to be applied with cold rollers.
A 1 mil polyester carrier is flanked on either side with 1 mil of solvent acrylic adhesive protected by thin polyester release liners, such as Drytac Facemount UV, Neschen Gudy 909, or Seal Optimount. The adhesive is very high tack and the polyester liners are very thin, if the peeled liner is allowed to fall back in contact with the adhesive it will create air bubbles, it is difficult to separate the liner a second time (photo 1). Removal of the liner also creates much static which attracts dust and particles.
Photo 1: Air Bubbles
The adhesive is very high tack and the polyester liners are very thin, if the peeled liner is allowed to fall back in contact with the adhesive it will create air bubbles. Liner removal creates static which attracts dust.
 Photo 2: Mount First to Acrylic
Apply film first to the acrylic, then mount the image to the acrylic/adhesive unit. Trimming excess liner/adhesive edges helps prevent sticking to rollers.
It is recommended to apply the adhesive to the glass or acrylic first, making it easier to see flaws, dirt and bubbles prior to permanently mounting the image (photo 2). All excess adhesive edges were trimmed so no adhesive could come in contact with the rollers. The thin remaining liner must be peeled back to expose the clear P-S adhesive (photo 3). Actually a leader strip of scrap acrylic should be secured to the top edge prior to feeding through the rollers to prevent bubbles. All air must be compressed from between the layers during the feeding of the substrate through the rollers to produce a smooth face mount. You only get one shot at getting it6 right. The Kodak Professional Day/Night Digital Display Material has been smoothly applied to the acrylic sheet in photo 4, while the Kodak Duratrans film (R) clearly shows trapped air bubbles in the manually applied sample.
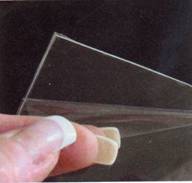 Photo 3: Release Liners
The release liner is pulled back to expose adhesive. The image will be mounted face down against this adhesive.
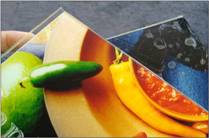 Photo 4: Face Mounted Samples
The properly face mounted Kodak Day/Night Transparency Display Material (L) is clear and shows no bubbles. The manually applied Kodak Duratrans™ sample (R) clearly shows trapped air between film and acrylic.
See October PFM "Face Mounting Photos" and the manufacturer of your selected face mount product for additional information. Face mounting is a very sensitive, permanent, and tricky process with a huge learning curve. Don't turn down this job...rather subcontract it to a photo lab who is familiar with the procedure.
What types of images can be face mounted?
Any high gloss image, photo, digital photo, opaque film, or translucent film for backlit display are ideal for face mounting (photo 5). The photo shows a cibachrome (L) and the back side of an advertising photo using Kodak Day/Night Transparency display film (lower R). Upper right is a cut sheet of acrylic with its blue plastic liners still in tact.
 Photo 5: Raw Samples
An Ilfochrome Classic (L) and back side of translucent Kodak Day/Night Transparency Film (bottom) are shown with the sized sheet of acrylic complete with blue liners still intact.
Duratrans—meaning durable transparency— is a translucent plastic base with photographic emulsion, currently trademarked as Kodak Enduratrans™. Though Duratrans refers to a specific photographic process and product it has become the general reference to any backlit imagery whether photographically or digitally produced. Kodak Day/Night film has been replaced by their Endura line of Day/Night Display Material. In fact, the entire updated Endura line of photo media—films and papers—feature brighter colors with better detailing, more intense blacks, cleaner whites, and greater image stability, all using Process RA-4 developing.
Can Kodak Endura Metallic Paper tolerate dry mounting?
Endura Metallic Photo Paper was added the Kodak line in 2003 and recent inquiries show they are becoming quite common (photo 6). It has a glossy finish with a very distinctive metallic appearance, though the metallic look is accomplished by micro voids in the base rather than actual metallic particles. Image stability and lightfastness is excellent at 100 years in typical home display and 200 years in dark storage, but only 1-5 years in commercial display.
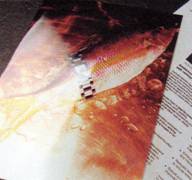 Photo 6: Endura Metallic
The high gloss metallic appearance is accomplished by micro voids in the base rather than actual metallic particles. The flier from Kodak's website gives specific info on Endura Metallic finish.
Endura Metallic shares the same emulsion as the Kodak Supra Endura Paper and performs in similar fashion for both traditional and digital printing. And aside from their 21st century appearance they should be treated and respected as any other RC photograph and are subject to the same orange peel issues as any other glossy image. These photos are used in all aspects of commercial, portraiture, and special events of all kinds.
What substrate would be best for a super high gloss photo?
Alcan Composites Gatorplast is a sheet of extruded polystyrene foam board between two sheets of high impact polystyrene surface layers, designed for display, exhibits and indoor signage. It is lightweight, water resistant and is available in 48"x96" sheets in white or black, ³⁄₁₆" or ½" thick. Though it is not recommended for framing enclosures it would be perfect for flat or flush mounting large wide format prints not to be glazed.
In an attempt to find a smooth substrate as an alternative to aluminum or face mounting of photos, an Endura Metallic photo was mounted to Gatorplast using a Drytac JetMounter roller and high tack P-S adhesive film with wonderful results (photo 7). Because of its nonporous outer layers, Gatorplast it is not a good candidate for use in heat presses, but with roller laminators and manual application of photos it is fabulous. Do not set rollers too tight because it will compress the substrate and cause unnecessary warping of the board (photo 8).
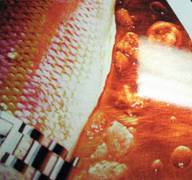 Photo 7: Mounted to Gatorplast
The rectangular reflection (R) shows the smooth finish with essentially no orange peel when mounted to Gatorplast using P-S adhesive and a cold roller laminator.
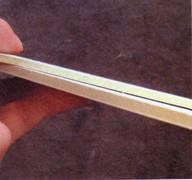 Photo 8: Rollers Too Tight
The bottom sample is an unmounted sheet of 3/16" Gatorplast, while the top sample is been run through a JetMounter set too tight resulting in a compressed 1/8" thick substrate. Do not set rollers too tight.
What is a C-print?
A Type C-print or aka C-print is an Eastman Kodak trademark for its color paper designed for printing positive images from negatives, and refers specifically to the Kodak C-41 developing process. A traditional C-print is a cibachrome photo printed on negative-type color photo paper with at least three emulsion layers of light-sensitive silver salts. Any print from inkjet (giclee), dye transfer, pigment transfer, Polaroid, nor any Ilfochrome process may be called a C-print.
In digital lingo the 21st century C-print has nothing to do with how the paper is exposed to light and would include anything from a color negative manually developed in trays to a digital image developed in a minilab on Fuji Crystal Archive paper. The RA-4 process which prints both from film and digital has become the most common form of C-print available today. It doesn't matter what machine the photo was printed on, they all use the same types of paper to make C type prints from either scanned film or digital files. The term Type C or C-print are both correct when describing images printed onto Fujicolor Professional Paper or Crystal Archive using Lambda, LightJet or Chromira printers, but cibachromes are still not C-prints. And the more correct name for these C-print photos would be digital C-prints to eliminate confusion.
Final Thoughts
As with many issues surrounding digital photography the difficulty behind deciding how to best mount it is in first identifying it. In olden days—just last decade—RC photos and Ilfochrome Classics/cibachromes were the typical photos being framed. Today there are RC, cibachrome, RA-4, inkjet, thermal transfer (dye sublimation) and C-prints just to name a few.
Perhaps if a customer wants a digital photograph to look and last like the silver halide images from previous generations it may need to be a real silver halide image. It is wonderful we are capable of restoring old, yellowed, water stained photos from half a century ago, but a digital replica remains a replica no matter how good it looks. And sometimes it's the very worn torn, oil stained, lived in the wallet look that is more endearing than a perfect duplicate of the original.
END
Copyright © 2008 Chris A Paschke
For more articles on mounting basics look under the mounting section in Articles by Subject.
Additional information on all types of mounting is found in:
The Mounting and Laminating Handbook, Second Edition, 2002,
The Mounting And Laminating Handbook, Third Edition, 2008 and
Creative Mounting, Wrapping, And Laminating, 2000 will teach you everything you need to know about getting the most from your dry mount equipment and materials as an innovative frame designer.
All books are available from Designs Ink Publishing through this website.
Chris A Paschke, CPF GCF
Designs Ink
Designs Ink Publishing
840 Tucker Road, Suite H-190
Tehachapi, CA 93561
P 661-821-2188
chris@designsinkart.com