 Photo 1
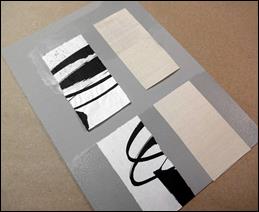
Unwanted adhesive absorption is shown in the upper left rice paper and upper right sheer silk. Lower samples were wet/dry mounted preventing any chance of bleed absorption.
Dry mounting currently shares the spotlight with roller machines for handling digital imagery, but old school techniques are still very much practiced and necessary for a full service framer to offer. Dry mount presses have not changed much in the past 20 years but new products have been launched, adhesives modified and temperatures lowered to better protect art. Traditional wet mounting with PVA remains a routine technique for fabric applications practiced by many custom framers, but wet/dry mounting is a modified mount process involving both techniques that is often overlooked.
Wet Mounting
Wet mounting is the oldest method of adhering paper or fabric to a rigid backing using a wet adhesive or cooked starch paste. Commercial wet glues bond items together using liquid vinyl resin called polyvinyl acetate (PVA) which is a thermosetting adhesive that once dry does not reactivate with water. Glues may be applied by brush, roller, or spray gun, and when used in conjunction with a vacuum frame or roller system have more immediate bond.
Successful wet mounting requires an even, moist layer of adhesive; proper open time; and weighting as it fully dries and cures. Manual wet mounting—with no vacuum frame or rollers—requires little financial investment and is a good alternative for mounting oversized items when equipment size limitations are an issue. Use of a cold vacuum frame or roller may increase long term permanency of a wet mount by creating a stronger initial bond over manual weighting.
Wet Glues and Pastes
Wet glue is a thick paste or commercial liquid adhesive which must be evenly applied to the substrate before positioning the art. Commercial pastes are available from major manufacturers that are starch based, neutral pH, nontoxic, buffered and water soluble for removal. A basic PVA wet glue is repositionable while wet, nontoxic, nonstaining with age, dries clear, and has long term bonding ability.
As far as PVA goes, Jade 403 sets the standard for bookbinding as a general purpose, pH neutral, acid free, resin based, thermoplastic adhesive which is fast drying, water-soluble when wet, and permanent when dry. It is sought after for its strength, flexibility, and long term stability to not yellow or become brittle over time. It is commonly used for book and box making applications; and adhering paper to paper, cloth, wood or leather; making it the likely choice for fabric wrapping to matboard, honeycomb panels, or Gatorboard.
On the other hand, ethylene vinyl acetate (EVA) is a water reversible formulation of modified PVA copolymer. It maintains softness and flexibility, clarity and gloss, barrier properties, low-temperature toughness, and resistance to UV radiation. Jade R is a reversible EVA that is an acid free, archival adhesive which provides a very strong bond similar to Jade 403 making it ideal for conservation work where reversibility is a concern.
Though YES! Paste is a starch paste made of corn dextrin, corn syrup, preservative and water used by artisans and bookbinders, with a pH of 6.0-6.5 it is not embraced as extended-term (archival), reversible, nor acid free.
Wet Variations
One of the big advantages of wet mounting is the ability to make minor repairs—such as replacing torn off pieces of an image, or corrections—such as flattening folds in the print, during mounting, assuming the damaged art is water tolerant. That said, the wet adhesive of choice could be anything from PVA to starch, or starch to EVA depending on the project and materials requiring mounting. The three elements of mounting to be controlled during wet mounting are time, pressure, and moisture. Temperature only becomes a notable issue when attempting to apply adhesives in an extremely hot, humid, or cold, frozen environment, which could affect the flow, and/or drying time of the selected adhesive.
Basic wet mounting supplies include thick glue or paste, spray water bottle, soft 4-5" rubber or sponge roller, and a piece of scrap glass or acrylic. When using liquid fabric glue it is best to use a roller tray or a resealable plastic container.
Dry Mounting
By the end of the 19th century a demand for an easy, reliable, repeatable, moisture reduced, chemically safe mounting method was raised, and in 1901 the first dry mount tissue patent was issued to the Derepas Brothers in France. A thin carrier was developed using a thermoplastic adhesive coated on either side which was activated by heat. The term dry mount was originally selected to distinguish between this new dry technique from traditional damp and wet techniques of mounting.
Over the years adhesives have been modified to meet industry safety standards, temperatures lowered to better accommodate digital art tolerances, and new products launched for efficiency, but technically dry mounting has remained the same since its development.
Why Wet/Dry Mount?
One of the bonding requirements of wet mounting is adhesive absorption which occurs during the process, but there are times that adhesive must be prevented from saturating, as when wrapping a sheer, delicate fabric; thin, translucent paper; or other absorbent material (photo 1). In the craft world, felt is notorious for soaking up thin white glues leaving hard spots of glue saturation. When using polyester felt as padding or color toner behind a lightweight textile, that support layer may be either pinned or wet/dry mounted to prevent saturation.
Photo 1
Unwanted adhesive absorption is shown in the upper left rice paper and upper right sheer silk. Lower samples were wet/dry mounted preventing any chance of bleed absorption.
The wet/dry technique applies wet PVA, which is allowed to dry, which is then reactivated in a dry mount press to adhere the layers. A perfect example for this technique was when sheer Eden Natural 100% silk from Frank's Fabrics was selected as the fabric match for a bevel wrapped liner in the featured Grayson Sayre framing job (photo 2). The most efficient, dependable and foolproof mount technique for this scenario was the wet/dry method.
 Photo 2
Sheer Eden Natural 100% silk from Frank's Fabrics is the perfect example of a sheet fabric which needed to be wet/dry mounted. The sample is used on gray rag 8-ply for ease of viewing.
Unlike standard wet mounting no spray bottle misting is allowed, in fact no moisture ever comes in contact with fabric or paper being mounted. Unlike using a soft rubber roller with wet glue application above, a 4" ultra-smooth, high density sponge foam roller for even glue application and plastic storage tub are the two major tools. Disposable 2" natural bristle and ½" glue brushes are also good for small area application like the surface of the raw bevel (photo 3).
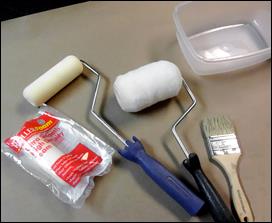 Photo 3
(L-R) Ultra-smooth high density foam roller replacement, foam roller, fiber roller, 2" disposable natural bristle brush and plastic storage tub.
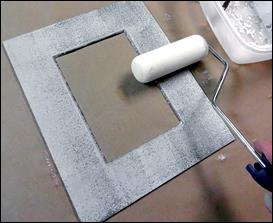 Photo 4
Sponge rollers apply smoother, more even layers of adhesive than brushes. Apply layer, let dry, apply second layer in opposite direction then let fully dry.
Wet/Dry Technique
Sponge rollers apply smoother, more even layers of adhesive than brushes and sheer fabrics require the smoothest base possible.
Align the fabric and press to hold in place.
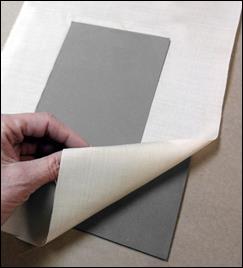 Photo 5
Align the fabric and press to hold in place. If wrapping a window mat refit the fallout into the mat. Insert the board with dried adhesive and fabric into the heated press.
When the mount is removed from the press it will be fully surface mounted including the bevels. All that needs to complete the wrap is cut the inner rectangle and wrap the edges to the back to prevent raveling (photo 6).
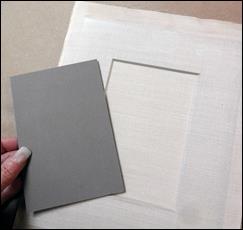 Photo 6
When the mount is removed from the press it will be fully surface mounted including the bevels. All that needs to complete the wrap is cut the inner rectangle and wrap the edges to the back to prevent raveling.
Grayson Sayre
To equate this procedure into practical application, I had a client who already had a beautifully period framed Grayson Sayre serigraph (photo 9) and had just acquired another of the same size. She wanted her original gold leaf, closed corner frame to be replicated down to the gold leaf fillet and sheer silk wrapped liner. The original was unframed for inspection and reglazing, so the original 8-½" x 14-¼" frame and fillet were shipped to Goldleaf Framemakers of Santa Fe to create an exact replica of frame and fillet (photo 7).
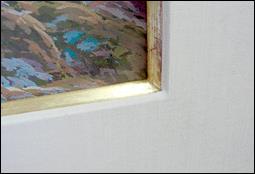 Photo 7
Original gold leaf, closed corner frame to be replicated down to the gold leaf fillet and sheer silk wrapped liner.
The warm white 8-ply rag window mat liner required a wet/dry mount method to prevent bleeding through the Eden Natural silk. As the sample above shows, mounting any sheer translucent paper of fabric to a darker matboard would alter the color of the silk resulting from color ghosting so always match your board to the sheer being mounted to it. The completed replica matched the original perfectly and both were glazed with museum glass to complete the preservation packages(photo 8).
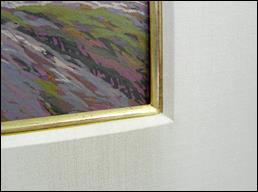 Photo 8
The replicated wrapped mat wet/dry mounted Eden Natural silk to a warm white 8-ply rag window mat. As sample photos show, mounting to a darker mat would discolor the silk.
The completed replica framing matches the original Grayson Sayre serigraph perfectly and both were glazed with museum glass to complete the preservation packages. (photo 9) (masthead photo)
 Photo 9
The completed replica framing matches the original Grayson Sayre serigraph perfectly and both were glazed with museum glass to complete the preservation packages.
Final Wrap
Wet/dry mounting is a valuable technique that should be a part of every custom framer's repertoire as it offers the permanence of neutral pH wet methods as well as the control and predictability of dry mounting, thus receiving benefit from both techniques. The best thing about wet/dry mounting is that it may be used for wrapped mats, shadowbox backing boards, bulletin boards, and any type of fabric from silk to ultra-suede.
END
Copyright © 2019 Chris A Paschke
Resources—Items
http://franksfabrics.com/—Frank's Fabric Adhesives, fabrics
http://raphaelsap.com/miracle-muck/—Miracle Muck
https:/nnigroup.com/framingfabrics/—Fabrimount Adhesive
https://www.goldleafpictureframes.com/—GoldLeaf Framemakers of Santa Fe
https://www.talasonline.com/—Jade 403, Jade R
PFM/PPFA Bookstores—
http://www.pictureframingmagazine.net/—The Mounting And Laminating Handbook, 3rd Ed, Paschke
https://ppfa.z2systems.com/np/clients/ppfa/—Creative Mounting, Wrapping and Laminating, Paschke
For more articles on mounting basics look under the mounting section in Articles by Subject.
Additional information on all types of mounting is found in:
The Mounting and Laminating Handbook, Second Edition, 2002,
The Mounting And Laminating Handbook, Third Edition, 2008 and
Creative Mounting, Wrapping, And Laminating, 2000 will teach you everything you need to know about getting the most from your dry mount equipment and materials as an innovative frame designer.
All books are available from Designs Ink Publishing through this website.
Chris A Paschke, CPF GCF
Designs Ink
Designs Ink Publishing
840 Tucker Road, Suite H-190
Tehachapi, CA 93561
P 661-821-2188
chris@designsinkart.com