 Photo 1: Assorted Preservation Materials
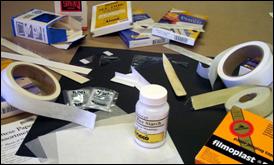
Art may be attached to a substrate using a number of assorted methods as seen here: edge strips, corner pockets, linen and paper p-s tapes, starch and premixed starch packets and tissues.
As I glance back through my article index in search of a new mounting topic I realize it has been six years since we visited the basics of mounting. Though I have targeted specifics like traditional Japanese hinging ("Hinge Basics", November 2004); heat activated boards ("Preadhesive Boards", May 2002); and assorted techniques such as Flush mounting ("Flush Mounted Autos", February 2005), it has been a long time since I have reviewed the general issues. Over the years some names have changed; a few beliefs and ideas have been challenged; and a few more items have been added to the "what is mountable" list, but all that aside...the basics remain constant.
What is Mounting?
Mounting is the action of affixing a paper image, photograph, or fabric to a stiffer support, backing, or substrate with an adhesive. An adhesive is a substance capable of holding two surfaces together in a strong bond. This close bond is between the surface molecules of the material being adhered and the substrate. The closer the two surfaces fit together, the stronger the bond. Therefore a thin adhesive bond is often stronger than a thick one.
Photo 1: Assorted Preservation Materials
Art may be attached to a substrate using a number of assorted methods as seen here: edge strips, corner pockets, linen and paper p-s tapes, starch and premixed starch packets and tissues.
Art may be attached to a substrate using a number of assorted methods from conservation hinging (photo 1) to the more invasive procedures of wet (photo 2), spray, pressure-sensitive (photo 3), cold vacuum or heat mounting. Though mounting methods may make the art flat and smooth, it may not be the best way to present that piece of art.
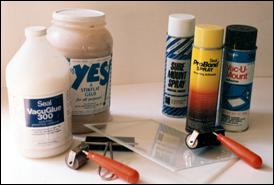 Photo 2: Wet Glues and Spray Adhesives
The gallon of VacuGlue 300 has a very long shelf life since I have had it 10 years. YES is a bookbinder's favorite and the sprays to the right have been long time standards. The brayers and glass sheet in front are necessary for the application of this pastes such as YES.
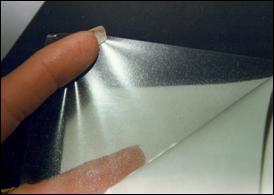 Photo 3: Pressure —Sensitive Film
Pressure-sensitive adhesives are available on boards, foam and as rolled films. This is a sample of PerfectMount film which is an adhesive with a carrier in between two layers. Other films include Neschen Gudy 870, Gudy 831, and 3M Positionable Mounting Adhesive (PMA) is a sheet of 100% adhesive with no carrier, like ATG tape.
When to Mount and When Not To Mount
It is generally not a question of whether a piece of art can be safely mounted, but rather, should it be mounted at all. Knowing when NOT to mount an item is every bit as important as knowing how to mount it safely and successfully. Traditionally, the list of what not to mount has included signed limited editions, vellum and parchment, diplomas, documents with notations on the back, Ilfochrome Classics (Cibachromes), original art of any kind, and irreplaceable heirlooms.
They cannot be considered preservation mounted unless the mounting method used is totally reversible, not just removeable. Reversible methods always allow for the art to return to its original state if ever removed from the mounting substrate.
The batch of special even t tickets to the left are all heat sensitive. The p-s mounted tickets on the sampler board to the right shows a blackened area on the left of the Mystere ticket at top left from the tacking iron.
Suggested Mounting Limitations
Heat mounting limitations include heat sensitive thermographics such as special event tickets (photo 4), embossed plastic lettering, and color copies which could respectively turn black, melt, or surface damage when subjected to dry mount temperatures. Digital prints on swellable receptor coatings and some laser prints may also be heat sensitive, particularly if the inks have not been allowed to dry down a few weeks. If there is any question concerning heat sensitivity or the intrinsic value of the artwork, do not mount it using any invasive method.
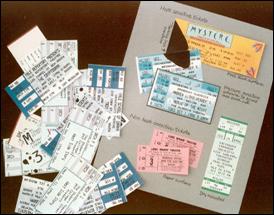 Photo 4: Thermographics
Pressure-sensitive adhesives are available on boards, foam and as rolled films. This is a sample of PerfectMount film which is an adhesive with a carrier in between two layers. Other films include Neschen Gudy 870, Gudy 831, and 3M Positionable Mounting Adhesive (PMA) is a sheet of 100% adhesive with no carrier, like ATG tape.
It is the framer's job to preserve the integrity of the art by advising and educating the customer to do everything possible to enhance and protect it. Maintaining that integrity often means allowing the art to look the way it should. A vellum diploma or sheepskin may look better on an attorney's wall if it is dry mounted absolutely flat, but if it is authentic vellum, then it is the nature of the beast for it to have the life of an animal skin (photo 5). An original watercolor may look better to the customer when mounted flat, but it will have lost the dynamics and life of an original painting (photo 6).
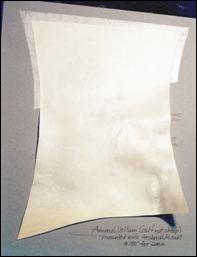 Photo 5: Vellum
The vellum sampler has been dry mounted across the top third with a low temperature tissue showing it could tolerate flat dry mounting. But the lower half has been wet with a damp sponge to encourage maximum cockling to show potential customers the nature of the beast.
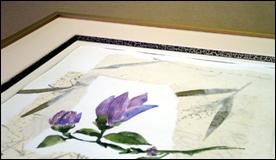 Photo 6: Cockled Watercolor Collage
This original watercolor collage shows mild waves at the edges of the image under the mat when not mounted. Though it would tolerate mounting to Restore it will have lost the life of an original.
Disposable or decorative art includes any inexpensive poster, offset print, or digital image to be used as short term wall decor. Posters, RC photographs, and fabrics are all readily mountable and at least 90% of all decorative art being framed should be mounted. There is no perfect answer to the mounting question and no single solution to any given mounting project.
Bond Failure
The basic concept of mounting believes the physical attachment of artwork to a substrate is permanent and will flatten and hold that artwork preventing it from bubbling, cockling, or warping...forever. Nice theory. Bond failure is when the physical attachment between the art and the substrate lets go. If all wet, spray, pressure-sensitive and dry mounting has been achieved using correct mounting techniques and suggested manufacturer procedures, the bonds will hold indefinitely, or at least until they have lived out their life expectancy and just don't hold anymore.
Though all mounting needs might be met by a single mounting process there will always be more than one solution to every problem, and each project will have a mounting technique best suited to it. There are many reasons for bond failure. Expansion and contraction of individual paper and substrate layers during normal humidity and temperature changes are an integral part of what causes bond failure over time.
Bond failure is expected and routine at some point with all wet, spray and pressure-sensitive adhesives. If, however, any properly spray mounted poster is hung in the bathroom and subjected to daily extremes of humidity and temperature changes, the life expectancy of that mounting will be drastically shortened. In all fairness to spray adhesives, this would also be the scenario with a low tack, repositionable pressure-sensitive adhesive as opposed to a high tack, touch and grab pressure-sensitive. When an adhesive cannot be absorbed into the art (i.e. RC photograph) or substrate it cannot be expected to create a maximum tear strength bond either.
Another reason for failure is the choice of materials. Matching paper art (open edition print) to paper substrate (mat board), or plastic (RC photo) to plastic core (foam board) helps match the expansion quotient. Also the type of adhesive to the art increases the success rate. A high tack pressure-sensitive adhesive to a nonporous photo is potentially far more successful than spray which cannot be absorbed by the resin coating on the back of the photo.
TTPM
Though premature bond failure is most often the result of bad choices, bad mounting technique can also be the reason for bond failure. In the early 1990s I coined the term "TTPM" which stands for time, temperature, pressure and moisture, the four controllable variables found in mounting. Though I did not invent these variables, I did shuffle them around and give them a catchy title (TTPM) making the them easier to remember.
These early variables have become the four major elements I use to determine a bond success or failure. I first wrote about TTPM in Picture Framing Magazine in 1992, and there is an entire chapter on these elements in my mounting books. All successful mounting methods are dictated by these elements, and in turn failures may be defined by them.
Time
Mounting time is measured in many ways. Tack time is the workable time allowed by an adhesive to position the print as the solvent evaporates in preparation for final set-up, this is also known as open time or work time. More correctly, open time is the time required for a spray adhesive to allow solvents to dissipate so that it may become tacky. Not allowing adequate open time could effect the long term bonding nature of a potentially successful spray mounting.
Application time is taken into account with wet and spray adhesives in that a good uniform coat of adhesive must be applied in order to guarantee good adhesion. Any areas that have begun to dry prior to mounting will not create a lasting bond. The basic bond will be created within the first hour, while the more permanent bond will take 4-24 hours to cure in an undisturbed area under pressure.
The time it takes to dry mount a project will also vary depending upon the adhesive, substrate, mounting size, selected temperature and item being mounted. Draw time is the length of time it takes for all of the air to be sucked out from between the heating platen and lower diaphragm within a sealed vacuum press. Dwell time is the time remaining in the press to adequately heat all inert materials, activate the adhesive, and create the bond. So, how long should a mounting project remain in a dry mount press? Long enough to raise all the layers to required temperature and press them together.
Temperature
Recommended storage and room temperatures are suggested on all bottles and cans. Temperature extremes and cold tend to stiffen and solidify flow and encourage glues to clump. Beyond that, temperature is the only element that lends itself more to dry mounting than the rest. There is not a standard, ideal temperature when dry mounting as adhesives range from 150ºF to 215ºF.
Pressure
Pressure is the force that squeezes air from between the substrate, adhesive and artwork and holds it while the bond is created. Whether wet, spray, or dry mounting, the practice of weighting needs to be applied in all mounting cases. A piece of ¼" plate glass makes a perfect manual weight. Pressure-sensitive adhesives are activated by the manual pressure applied by a squeegee, rubber roller, or roller machine to activate the adhesive creating the initial bond, while maximum cure underweight 24 hours.
Both hot and cold vacuum presses are self-adjusting in relation to the substrate or mount board being used. The rubber diaphragm or bladder, which forms the bottom of the unit, naturally conforms to the thickness of each individual substrate during the draw of the vacuum, adjusting for pressure automatically. Mechanical presses must be manually set for proper pressure (photo 7). Too little might allow air bubbles to remain within the center of a mounting, while too much could create indentations in a foam board substrate.
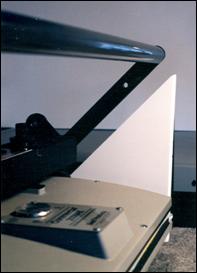 Photo 7: Pressure Adjustment
Proper adjustment of a mechanical press is when the handle is 45 degrees to the table in the closed position with all the intended layers held within the press.
Moisture
Moisture is an element that varies with the process. All wet and spray adhesives contain water, so moisture is good. When working with wet adhesives, moisture is an integral part of the adhesive, and selected mounting materials must be allowed their natural expansion of when moisture is applied to dry paper or substrate. Pressure-sensitive adhesives begin dry form, so materials used during mounting must also begin dry.
Any moisture that is present in the materials during dry mounting can become a condensed liquid or steam at temperatures of 212-215ºF, which is bad. During dry mounting all the materials used must begin, bond, and remain dry throughout the process. Mechanical presses require predrying to insure all the moisture is removed from mounting materials before bonding. If a damp print is applied to a damp substrate it will not adhere as it should (photo 8). All vacuum presses automatically remove all moisture from within the press during the draw time when the air is pulled from within the unit and the pressure is created.
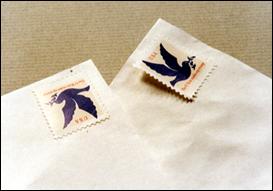 Photo 8: Moisture Control
A moisture activated postage stamp sticks nicely to a dry envelope (left), but will not hold when applied to a dampened envelope.
The Checklist
When a mounting fails, look at the elements of time, temperature, pressure and moisture. If proper open time was allowed for the spray solvent to evaporate; it was mounted at room temperature; all layers were dry when bonded; and it cured 24 hours under a glass weight...the mount should be perfect.
But if the open time was rushed, or a weight was not placed on it overnight air bubbles the next day would be an indicator that either Time or Pressure were neglected. Anytime a bond fails go down the element checklist. Was the time (application, dwell, draw, open, tack...) correct for the selected mounting method? Was the temperature too hot, too cold or just right for the room, spray booth, or dry mount press? Was the mounted art placed under a weight, through rollers, or a correctly adjusted mechanical press to cure? Was the print and substrate predried before dry mounting or moistened to equalize all layers? It's a process of elimination.
Biggest Difference in 2006
Even with the emergence of pressure-sensitive roller machines to accommodate longer, wide format images the concept of TTPM will apply. The duration time between the hot or cold rollers; the most desirable room or roller temperature for maximum tack; proper adjustment of roller depth for the selected substrate; and mounting only fully dry materials.
Nothing has really changed. If your mounting techniques are grounded by understanding the basics and in always doing it right, instead of just doing it fast, mountings should not fail. And if they do...you can always figure out why. And then there are digitals.
END
Copyright © 2006 Chris A Paschke
For more articles on mounting basics look under the mounting section in Articles by Subject.
Additional information on all types of mounting is found in:
The Mounting and Laminating Handbook, Second Edition, 2002,
The Mounting And Laminating Handbook, Third Edition, 2008 and
Creative Mounting, Wrapping, And Laminating, 2000 will teach you everything you need to know about getting the most from your dry mount equipment and materials as an innovative frame designer.
All books are available from Designs Ink Publishing through this website.
Chris A Paschke, CPF GCF
Designs Ink
Designs Ink Publishing
785 Tucker Road, Suite G-183
Tehachapi, CA 93561
P 661-821-2188
chris@designsinkart.com