Paschke Online
Designs Ink Publishing Article Archive and Reference Library
Articles by Chris A. Paschke, CPF GCF
"Retiring Your Release Paper"
November 1992
Now that the four elements of mounting have been addressed (April and May PFM), there is no excuse for an imperfectly mounted project, or is there? Wouldn't it be nice to be able to lay blame on faulty equipment, tissues or the manufacturer's lack of quality control? Only then could we successfully avoid wearing the responsibility of problem mountings.
Unfortunately, quite often it is our very own inconsistencies or inattention to details which gets us into trouble. Once you've paid close attention to the issues of time, temperature, pressure and moisture, don't overlook the issues of clean, un-abused materials. Overused or wrinkled release papers, foam rubber with divots torn out, and transferring hairline strips of adhesive to the face of a newly mounted print are often key offenders in the graveyard of unsuccessful mountings. These may all be tracked back to "operator error".
Types and Styles
Release papers come in a variety of sizes and are available in both one-sided and two-sided. "Two-sided release paper" is a slick, lightweight white paper with a silicone coating on either side. "One-sided release paper" is made of a heavier base paper, the silicone coating has a pale blue appearance and the opposite side is a matte, uncoated white paper.
"Release boards" are composed of one-sided release paper, bonded to a thin substrate board. Release boards are commercially available up to 32" x 40" in size, or you can make them yourself using a base board (i.e' Crescent X-board, Bainbridge 2U) and a permanent and breathable adhesive (i.e. ColorMount or TM-2), one that bonds under heat in the press. For obvious reasons a removable adhesive would attempt to remove itself each time it was introduced to the heat mounting process.
Troubleshooting
The thin two-sided release paper looks very similar to ColorMount tissue and it comes in many similar sizes. Horror stories of bonding a large poster face up, directly to the platen surface, have been reported. Two suggestions for preventing this scenario are to store rolls of release paper away from the tissue supply, and to perhaps work with a release paper envelope (photo 1) as opposed to a single top cover sheet. By regularly using a folded envelope of release paper you might not readily grab a large flat sheet to cover your poster. If, however, you carefully create a newly folded envelope out of ColorMount, you're still in big trouble!
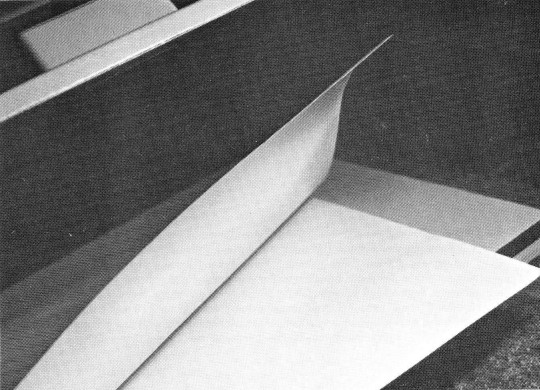 Photo 1
A release paper envelope (paper folded in the center), rather than a single cover sheet, is one option for preventing mishaps of grabbing mounting tissue rather than release paper. This is one-sided paper. Note how nicely the corner stays up without flopping over; even though it is more rigid, it too will indent quite easily, leaving deadly impressions of "mountings post."
During these days of recession and controlled spending, in an attempt to be overly conservative and economical, release papers are often stretched well beyond their reasonable lifetime. A good suggestion for sensible and systematic use of materials is to mount projects using a release envelope close to the size of the desired end product. In this way, the possibility of abusing a 24" x36" envelope by embedding smaller 8" x 10" impressions into it (photo 2) may indeed be later transferred or alternately imbedded into the foam board substrate of a following project and can be readily avoided.
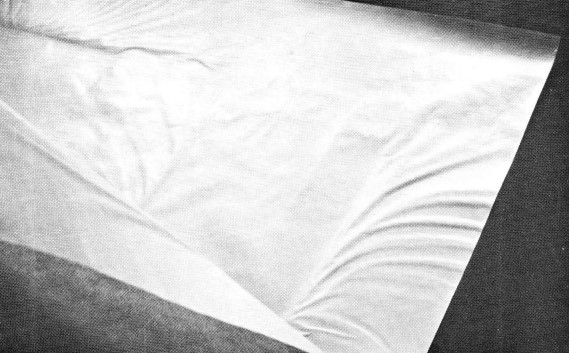 Photo 2
Numerous envelopes of varying sizes will limit the wear and tear an oversized envelopes. Often, deep lines and wrinkles in the release paper can be readily transferred to the foam board substrate of projects to follow. Note the large, deep wrinkles embedded into the 21" x36" release envelope by repeatedly using it for smaller 8" x 10" projects. This sample was created in a 21O-MX mechanical press' While the poundage in a vacuum press is greater, damage to paper can be done much more rapidly. Be penny wise, not pound foolish.
Similarly, you need to consider any alien lines, wrinkles or blemishes anywhere within your mounting package. Check newly created or manufactured release boards for character flaws, dents or scratches prior to your initial use. Also, constantly watch for transferred lines of adhesive remaining on the board or paper from previous mountings. Once adhesives have cooled, they can easily be dusted away by using a soft cloth diaper as a duster rag to ensure a clean release paper surface.
Selection
It's all a matter of preference when it comes to your specific choice of release paper, but it most definitely should be used when dry mounting. Brown kraft paper is not a reasonable substitute for release paper, although it is necessary for pre-drying when using a mechanical press.
The price structure and flexibility of using either side of the two-sided paper makes it a big seller. The base (or inner core) paper of two-sided paper is lighter weight and is a little more resistant to cooperating when dealing with an oversized mounting; it is prone to folding over and is quite limp.
One-sided release paper, being of heavier base paper weight, is more rigid and not as slippery. One-sided paper works extremely well as a wrap for the sponge pad of a mechanical press, where two-sided can't be used well because of its slick nature. Cut the paper to the size of either the length or width of the pad, fold the excess release paper around the ends of the pad and luck between (not under) the pad and the masonite (photo 3). Now the pad will remain protected from ambitious new mounters who may forget about that critical "release paper" bottom sheet.
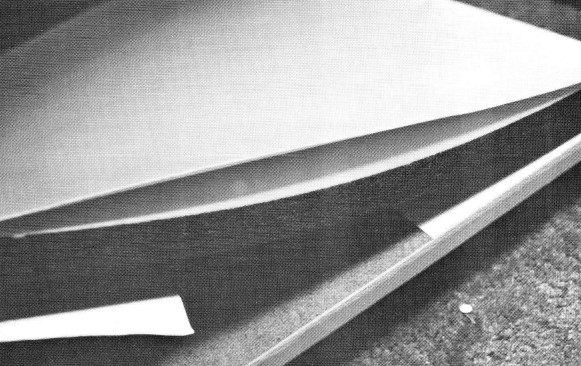 Photo 3
One-sided release paper is folded around the sponge pad to protect the felt from adhesive mishaps. Note that the paper is folded around the pad, between the pad and the masonite board, not under the masonite. This is important if you plan to use shims (under the masonite) rather than readjusting the press for substrate thickness.
By initiating use of a release board on the top (rather than paper) the handling of the top sheet with one hand while inserting the project to be mounted with the other is easily accomplished. As previously mentioned (Pressure, PFM May), the release board can play an integral part of pressure control when using a mechanical press, as it both protects the platen and helps dissipate the pressure at the outer edge of the press plates.
As wonderful as release boards are (they don't easily indent, wrinkle or fold over), I must warn against using them, both top and bottom, in either a mechanical or vacuum system. In a mechanical press, the project needs to nest down into the sponge pad to ensure a constant, even pressure against the heat source (platen). Likewise, in a vacuum press the bladder or diaphragm must be allowed to contour up around the substrate in order to automatically adjust its pressure to the platen. If a board is used both top and bottom, excess pressure can occur at the outer edges as the sponge or diaphragm attempts to conform to the shape of the desired inner project, thus bowing the board and possibly creating uneven mounting pressure in the project center (diagram).
 Diagram 1
Just as there are generally exceptions to every rule, so there are here. When mounting an oversized project in bites and pre-mounting with no substrate (i.e. adhesives and laminates to prints or photos) or simply mounting very thin projects (i.e. photo transfer to CanvasMount or maps to Chartex), many times adding a bottom release board will prevent the transference of wrinkles from the felt or release paper into that thin project. Remember, in the case of a bottom release board the release board is actually more of a substitute for the non-existant substrate material normally used.
Regardless of your choice of release materials, it is always best to work in a clean, well lit area in which you are able to clearly see any potential problems long before they occur. Papers and boards will let you know when they are too tired to work any longer and need to be retired. The silicone surface will last much longer than the paper itself. A board will begin to brown slightly with extended use, and its lifetime is approximately fifty hours of production time. Once again, papers will only produce smooth, clean end results if they are not attempting to transfer their own wrinkles of age. Unfortunately, by stretching the use of these materials we often create our own problems.
Preventative maintenance and troubleshooting can often guarantee predictable mountings time after time.
END
Copyright © 1992 Chris A Paschke
For more articles on mounting basics look under the mounting section in Articles by Subject.
Additional information on all types of mounting is found in:
The Mounting and Laminating Handbook, Second Edition, 2002,
The Mounting And Laminating Handbook, Third Edition, 2008 and
Creative Mounting, Wrapping, And Laminating, 2000 will teach you everything you need to know about getting the most from your dry mount equipment and materials as an innovative frame designer.
All books are available from Designs Ink Publishing through this website.
Chris A Paschke, CPF GCF
Designs Ink
Designs Ink Publishing
840 Tucker Road, Suite H-190
Tehachapi, CA 93561
P 661-821-2188
chris@designsinkart.com