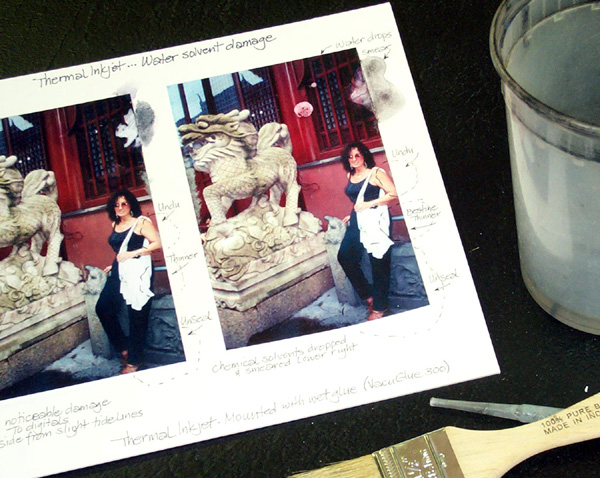
 Photo 1: Water Damage
Drops of water were applied to the upper right corners, allowed to set 15 seconds, then smeared. Notice the difference between the Kodak paper left and the HP Photo paper right. Both damaged, but very differently.
Last month I discussed the difference between a mistake, being something that is repairable, and a disaster, which you might as well just kiss goodbye. I also snapped the chain over a mistake as a lack of skill or attention to the mounting, so this month comes the praise over making the attempt to correct the error and the promise to try not to do it wrong again.
Correcting the error encompasses removal techniques, which are processes of reactivating or attempting to separate bonded items. Whether silicone adhesive, masking tape residue, or heat activated dry mount tissue, there is generally a way to get the pieces apart once mounted...but not always. And not always safely enough to remount the item.
Types of Solvents
The idea behind removal is breaking the adhesive bond between a mount board and its mounting. Liquids that breakdown or dissolve other substances are known as solvents. There are numerous techniques for adhesive removal involving water, evaporative, and chemical solvents as well as the reapplication of heat to create bond failure (thermal solvent). In the case of the later, the very heat that was applied to create the initial bond is used to break that bond, so heat is the solvent. The most common solvent is water, though chemical solvents are generally the ones thought of first when the term solvent is used.
When a water solvent is used to remove an item, it often involves starch pastes. Since water seems noninvasive, water solvents may give a feeling of safety and security when mounting. There are wet glues and sprays that are water soluble though may not be totally reversible in. And remember sometimes water can damage the art, as with a digital (photo 1). Check manufacturer guidelines for additional information. Evaporative and chemical solvents are those used in paints, varnishes, and plastic coatings to keep them liquid. Once those solvents evaporate or dissipate, the liquid solution becomes a tough solid. These are the type used that allow a spray adhesive to be shot from the nozzle of a can in the first place. Many of these are indeed chemical in nature. I will discuss more chemical solvents with the removal of permanent adhesives and dry mounting tissues a little later.
Photo 1: Water Damage
Drops of water were applied to the upper right corners, allowed to set 15 seconds, then smeared. Notice the difference between the Kodak paper left and the HP Photo paper right. Both damaged, but very differently.
Heat as a thermal solvent may be used with many adhesives though we are most familiar with it during dry mounting. Heat may appear to be the safest of all solvents, but a false sense of security follows this form of removal. It is the heat sensitivity of digitals and thermographics that can create irreparable damage to many images today.
Solvents for Tape
Some tapes are water soluble, some require chemical solvents, and some dry up and fall off in time. Check with individual manufacturers for removal techniques. Two additional methods for tape removal include applying heat as a thermal solvent using a tacking iron to reliquify the adhesive, or lighter fluid (as a chemical solvent) brushed on in a small amount, to dissolve adhesives.
Rubber based adhesives used in masking and cellophane tapes are prone to yellowing. Acid-free products claim to remain nonstaining and non-damaging over the test of time, but it may take years to accurately verify that claim. Accelerated testing is achieved by the raising of heat in a given test. Though it is a good indicator it is never the same as the test of time itself. There are low temperature, removable, tissue adhesives that claim to be non-yellowing and acid-free have actually proven to yellow over actual time. See The Permanence and Care of Photographs, Henry Wilhelm, 1993.
Solvents for Wet Glues and Sprays
As sprays age, the bonding agents holding them to the substrate dry out and may begin to peel from the substrate. If a partially peeled or bubbled poster has been returned for remounting the bond may be weakened by placing the partially mounted image into a 180°F press for a few minutes. That will often slightly activate the old spray adhesive enough to allow it to be peeled from the backing board.
As with dry mount tissues and some tapes many adhesives used for manual mounting and cold vacuum frames fall into similar removable and acid-free categories. Some water soluble wet glues, as well as removable heat activated adhesives may be softened for easier removal by heating with a hair dryer or shrink-wrap gun to reactivate its thermoplastic adhesive.
Chemical Solvents for Permanent Adhesives
Permanent dry mount tissues bond under heat as they reach bonding temperature and are not heat removable after bonding. They may be removed by using specially formulated strong, hazardous, chemical solvents that evaporate quickly when exposed to open air. These chemicals dissolve most dry mount, spray, and pressure-sensitive adhesives allowing for removal and possible remounting. There are commercial adhesive release formulations including Unseal, Undo, and Bestine Thinner as well as mineral spirits, toluene, and acetone.
Fumes are present when using these solvents, so they should only be used in well-ventilated areas. Some chemical solvents may also be used as surface cleaner for traditional photographs to remove fingerprint oils and to clean press platens of alien adhesives (photo 2).
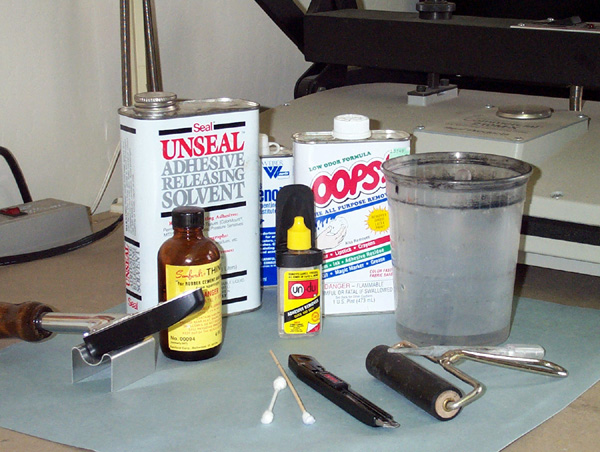 Photo 2: Solvents
The chemical solvents Unseal, Undu, Rubber Cement Thinner are flanked by water solvent and eyedropper right and heat solvent tacking iron and 210 press in back. Test all images for solvent sensitivity before using.
Chemical Tissue Removal
Prior to contacting any artwork with a solvent, tests must be done to ensure ink permanence. Saturate a Q-tip with the solvent and touch it to all the various colors on a print as you would test threads of needleart for color permanence. Small images may then be submerged into the solvent for about 5 minutes to dissolve the adhesive (photo 3). Once the adhesive has dissolved the photo will float above the separated adhesive and substrate in the dish (photo 4). Once removed from the dish the chemical solvent evaporates rather quickly limiting the mess factor and cleanup.
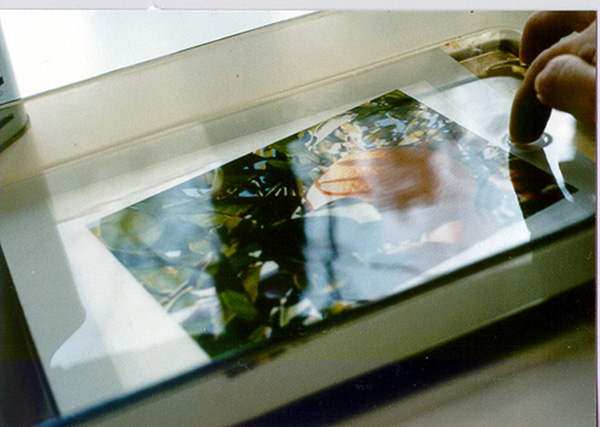 Photo 3: Submerged Photo
Totally submerge small tested images into solvent for about 5 minutes to dissolve the adhesive. This is an 8x10" traditional photo in a Pyrex glass baking dish, but a photo developing tray is also perfect.
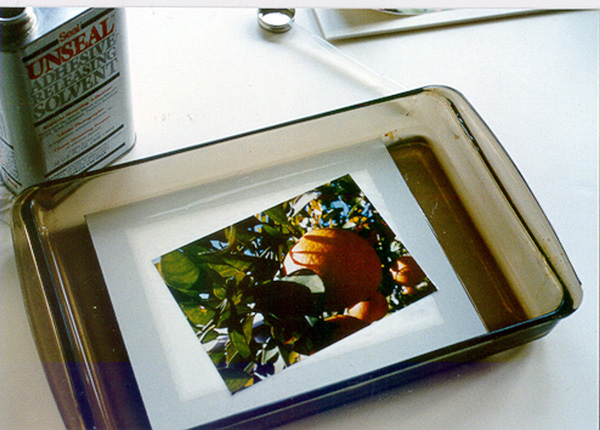 Photo 4: Floating Photo
After about five minutes under the solvent the 8x10" photo has begun to float to the surface as shown in this photo above the still mounted and squared up adhesive/board beneath.
The photo may curl some from surface tension but will flatten when remounted with no problem (photo 5). Discard used adhesive tissue. After removal the solvent may be poured back into the can for future use. Be sure to mark the contaminated can not to be used for cleaning the platen or photo surfaces as it will have a degree of adhesive mixed with it.
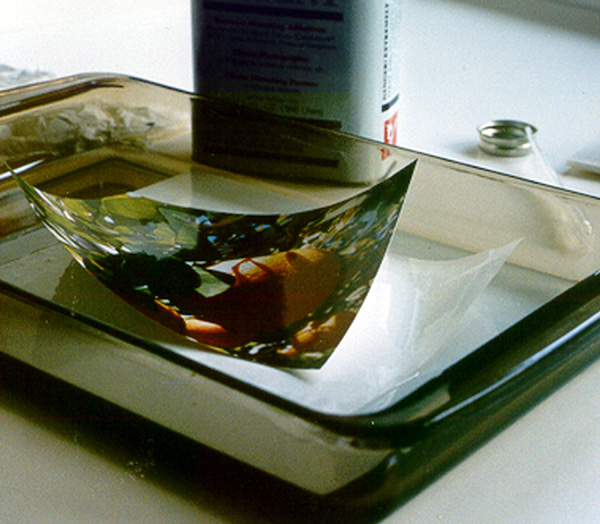 Photo 5: Dried and Curled
Once release from their bond, the separate layers begin to curl and dry in the open air. Discard the adhesive and probably the substrate, the photo will flatten again when remounted.
Oversized Images
A larger image may be removed through the same process with a slight higher degree of difficulty just for the size. Since small glass or metal developing dishes are not available, makeshift trays may be constructed with a wood frame and plastic garbage bag (diagram 1). These then can be made any size to accommodate the image for removal, then discarded.
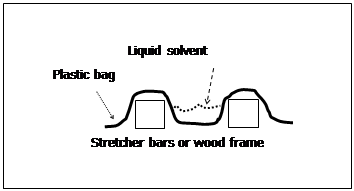 Diagram 1
Another option for oversized images is the eyedropper method. Though this method is safest when removing images that could be solvent sensitive, it is extremely time intensive. Saturate the corner of the photo to release the image then lift it away from the tissue and substrate as it releases (photo 6). Continue to flow additional solvent with the dropper under the lifted image as you separate it from the backing. It might be better all-around just to replace the open edition print or photo than using valuable shop time.
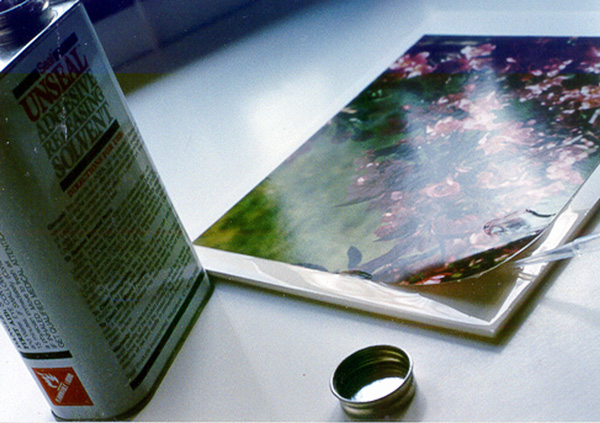 Photo 6: Eyedropper Method
Though not the most efficient and time effective method for removal, chemical solvents may be applied under a lifted image edge and pulled up a little at a time.
Liquid Solvent Damage
As already mentioned, solvent chemicals, heat, or in the case of digitals...water, can all aggravate and damage the very artwork attempting to be salvaged. Lithographic inks and dyes may be solvent sensitive and testing is mandatory before submerging or utilizing any liquid solvent. The key is to use common sense. Simple common sense should indicate not to mount any image with water soluble adhesive wet glue that is to be hung in a bathroom. Also, heavily applied wet or spray adhesives can saturate a thin rice paper or sheer fabric . Any liquid will smear a digital regardless of water or chemical.
Thermal Solvent for Removable Adhesives
Bond failure will occur when a thermoplastic XE "thermoplastic" adhesive is rewarmed in a press allowing for removal. This is the action of using heat as a solvent. The reapplication of heat may also break the bond of dried out, long time bonded pressure-sensitive tapes and spray adhesives. The heat reactivates (softens) the adhesive returning it to a liquid allowing for easy separation, though adhesive residue remains soaked into both surfaces.
Thermal Tissue Removal
Removable tissues bond away from the heat source as they cool underweight. Removable tissues and films are reactivated by putting them back into the heat of the press. When adequate time (5 minutes longer) and temperature (10°F hotter) have been met to reliquary the adhesive, remove the project from the press and separate the artwork from the adhesive leaving the adhesive tissue still mounted to the substrate.
After removal, there will be adhesive residue remaining on the back of the artwork, which may be removed with liquid solvents, but additional heat applications might be safest. To remove the maximum amount of adhesive without the use of solvents, continue to remount and remove the art until it will no longer hold to a new clean substrate.
Thermal Solvent Damage
Heat damage will occur if the original mounting is on thermographic paper. This image will turn black when placed in a press or heated for removal. So although heat may be applied to wet, spray, and p-s adhesives to help break their bond, if the art or item to be removed is heat sensitive, there still will be damage (photo 7).
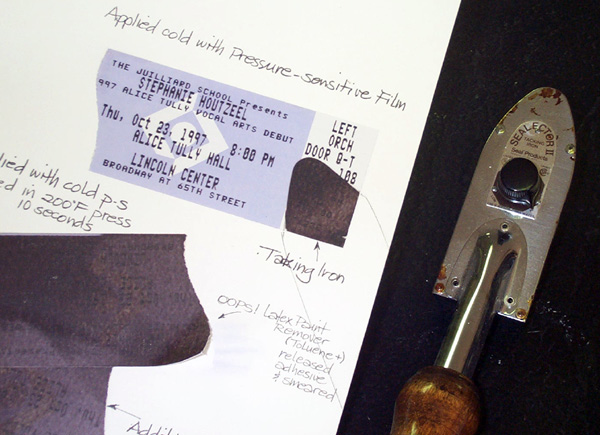 Photo 7: Thermographic Damage
There would be little more frustrating than remembering to use a cold technique to mount thermographic tickets, only to ruin it by attempting to remove it from the mount using heat. The tickets lower left were mounted with p-s adhesive film, then placed in a heat press for removal. The tacking iron mark at right shows the heat damage.
Another source of thermal damage would be placing a removable tissue in a press too hot, too long. The adhesive then excessively absorbs into the substrate and artwork making it extremely difficult to separate the remaining tissue from the back of the art (photo 8). Essentially the art and mount board have become one. This would fall into the disaster category if mounted in error.
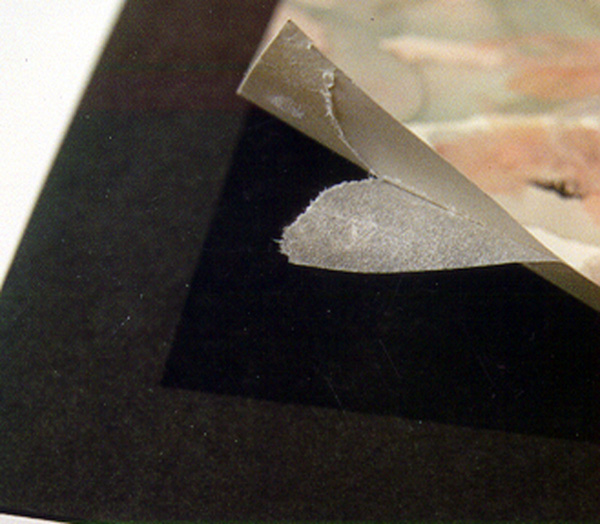 Photo 8: Too Hot, Too Long
Leaving a paper image in a press too hot, too long will essentially fuse it permanently to the back of the image making it somewhere between difficult to impossible to remove. This heated removable tissue is fighting removal because of saturation.
Since dry mount adhesives saturate and travel toward the heat source as they bond a possible precaution during removal might be to reheat the project face down. The adhesive will then be more likely to pull into the disposable substrate than the print attempting to be salvaged.
Print vs. Photo Removal
As already discussed, photos and paper may both be removed in a number of different ways depending on the adhesive and sensitivities. The physical difference in the paper they are printed on will also react in different ways. Slick paper stock and RC photos resist adhesive absorption so removal is much easier, but textured and rag paper stocks may cling aggressively to removable tissue (photo 9).
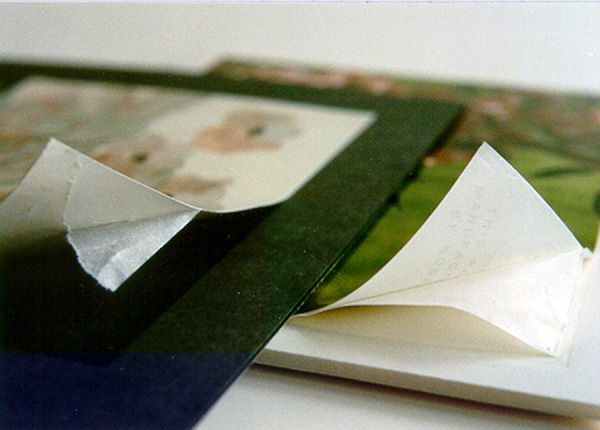 Photo 9: Print VS. Photo
Better titled absorbent paper vs. coated paper the paper image left holds aggressively on to the removable tissue adhesive while the removable tissue right easily has begun to peel from the photo.
It is important to remove the image from the tissue/substrate unit rather than the image and adhesive together. Trying to separate the tissue adhesive from the image once removed from a rigid substrate is more difficult because of the quickness of the cooling. A mat or mount board substrate holds the heat longer while pulling the removable layers apart.
Correcting Mistakes
No one revels in correcting mistakes but at least there are situations when things be rectified. Solvents are there to dissolve or soften adhesive bonds allowing us to ward off mistakes and prevention from becoming true disasters. There may not be glory in admitting there is a problem, but knowing there are possible solutions can help ease the agony and terror. And then there are digitals.
END
Copyright © 2003 Chris A Paschke
For more articles on mounting basics look under the mounting section in Articles by Subject.
Additional information on all types of mounting is found in:
The Mounting and Laminating Handbook, Second Edition, 2002,
The Mounting And Laminating Handbook, Third Edition, 2008 and
Creative Mounting, Wrapping, And Laminating, 2000 will teach you everything you need to know about getting the most from your dry mount equipment and materials as an innovative frame designer.
All books are available from Designs Ink Publishing through this website.
Chris A Paschke, CPF GCF
Designs Ink
Designs Ink Publishing
840 Tucker Road, Suite H-190
Tehachapi, CA 93561
P 661-821-2188
chris@designsinkart.com