As written in the December column "Hinges and Floated Art", there are many ways to create the illusion of art floating within a space. V-hinges, s-hinges, and pedestal hinges all utilize paste and rice paper, the floated illusion may also be created by way of wet, spray, p-s or dry mounting techniques.
Float Mounting
Many people believe that float mounting, flush mounting, flat mounting, and plain mounting are all different words to describe the same mounting technique, but they are not actually the same. Float mounting is the securing of artwork to a rigid substrate within the opening of the window mat so that all of its edges are visible when viewing. This is a common choice when the edges are irregular, deckled, decorative, or when the art has been bled to the outermost edges of its borders. And it usually has the art extending beyond the support surface.
PREMOUNTING
Often used for photography and in formal photo competitions premounting is a method of first applying the adhesive to the verso side of the photo, trimming the image to exact size and shape, then mounting the preadhesieved image to the selected substrate. It should be no surprise this method of applying adhesive first to the art is known as premounting. It is a technique required for centering or randomly placing a print or photo to a substrate which in turn becomes a decorative backing surrounding that image.
Premounting is generally a term used in conjunction with pressure-sensitive (p-s) adhesive films and dry mount tissues and films. Since the images may be independently coated with adhesive, premounting is the mounting technique of choice for showcasing a single image, for multiple image collections, or for overlapping photo and image collages. Wet and spray adhesives are best controlled when they are applied to the substrate rather than directly to the art. This fact somewhat limits the use of wet and spray adhesives when float mounting.
Flat Mounting
In an attempt to eliminate some of the confusion between preservation float mounting and the more invasive adhesive versions mentioned above, the terms flat mounting or plain mounting have been adopted when other adhesive techniques will be used rather than hinges for float mounting. Flat mounting and plain mounting are actually two different names for the same process. Flat mounting does not allow for a raised substrate as in float mounting.It means the image is mounted flat to its decorative backing board or substrate.
Though generally dry mounted with a permanent adhesive, images may be wet glued, spray mounted or p-s mounted as long as the adhesive distribution may be controlled during application. Care must always be taken in the selection of the adhesive method to ensure compatibility between inks, printing technique, and adhesive, prior to mounting.
Flush Mounting
Flush mounting is a method of solidly bonding an image to a separate backing that is then trimmed to the edges of the art allowing the image and substrate to become the new art unit. The edge trimming may be straight blunt cut, reverse bevel cut, or traditionally bevel cut, to create the finished look (diagram 1).
The art/pedestal unit is centered within the window mat then mounted to the selected decorative substrate with a white glue or neutral pH 3M glue gun. Flush mounted art edges are not covered by the window mat surrounding it, and the image appears to float. If a contrasting color substrate has been chosen as the pedestal with a traditional bevel edge the resulting border will accent the image. A white bevel against black edged art, a black bevel against white edges may be very effective to set off a photograph, just be careful about color ghosting of black substrates through a white image.
The Original Design Project
The original piece "El Mirage" a 24"x36" limited edition (24/149) fine art digital photograph taken by Peter Vincent was brought in for framing (photo 1). The image is a photograph that had been drum scanned, color separated, proofed and digitally loaded for print. The LE run of 149 was printed on 100# McCoy Matte Cover Stock using a Heidelberg digital offset press. All the above information was gathered through the customer who contacted the artist to verify the origin of the image, and to better determine how to handle it.
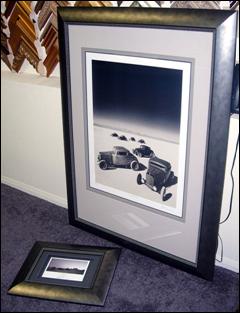 Photo 1: Limited Edition and Thank You
The finished size of framed limited edition El Mirage by the photographer Peter Vincent is 28½"x 40", while it's smaller signed, but un-numbered, thank you piece Monument Valley measures 8"x 5¼". Both have been preservationally framed.
Framed limited edition and thank you are shown courtesy of Mitchell Allen of Mitchell's Motor Cars, Redding CA.
Because of the weight of the paper stock we opted to use corner pockets and traditional preservation techniques, so all the mats, spacers and backing boards were Alpharag. The moulding was a beautiful 3" wide pewter from the Treasure Collection sold by Valley Moulding in Hollywood, CA and the image was conservation glazed.
The Design Challenge
The LE was purchased directly from the artist by my customer but we had it shipped directly to me for framing. When it arrived it came with a wonderful little thank you image also signed by the photographer, a small 8"x 5-¼" print called Monument Valley. This had been produced the same way as the larger LE and was screaming to be framed too (photo 2).
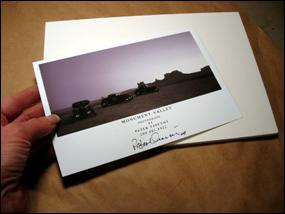 Photo 2: Materials
A slightly oversized piece of Artcare Restore™ was selected for mounting the promotional thank you digital print. Since it is reversible this was the perfect solution to be able to float the image by flush mounting with no potential water damage to the image.
I have worked with this customer for many years and knew this little piece would need to be completed as a companion piece to the larger limited edition. The problem was how to care for this image that had a narrow white border surrounding three sides which made matting it somewhat undesirable. Flush mounting was the design solution, and even though it was a signed but un-numbered print it had the look and dignity it's larger brother and needed to be respected, which meant no dry mounting tissues or p-s films.
Artcare Restore seemed to be the perfect answer to the dilemma. Since Restore is reversible the print could be mounted without harming its later value, and since Restore also mounts at 150ºF it would be safe for the digital inks. I cleared the bonding of the image to the Restore backing with my customer prior to execution.
The image was mounted to a slightly oversized piece of ³⁄₁₆" think Restore in a Seal 210M-X mechanical press for 1 minute. With the thicker paper stock and higher altitude of my studio/gallery location it took a little longer to bond. Once cooled the mounted image was reverse bevel cut at the very outermost edges of the print using my straightline mat cutter with the blade extended to accommodate the thicker foam substrate (photo 3).
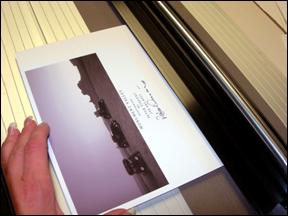 Photo 3: Trimming Edges
Having been mounted at 150°F for 1 minute in a Seal 210M-X mechanical press and cooled under a weight, the image was reverse bevel cut to the very outer edge of the image using a straightline mat cutter.
By selecting a reverse bevel rather than a traditional bevel or blunt cut there will be more illusion of the image hovering within the window (photo 4). Since Restore is ³⁄₁₆" thick, the image will be lifted above the backing board once permanently attached, so the outer window mat required ⅜" to ½" spacers in order to prevent the glazing from coming in contact with the flush mounted art (photo 5). Notice the dramatic shadows created by the flush mounted art and the raised window mat.
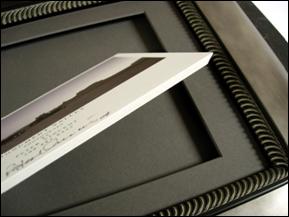 Photo 4: Reverse Bevel
By cutting a reverse bevel the pedestal of Artcare Restore is unseen when viewed from the front and the image appears to be hovering within the space.
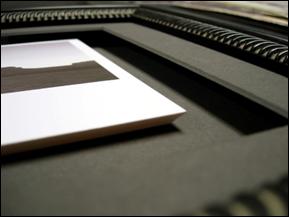 Photo 5: Design Depth
Since the foam center board was ³⁄₁₆" thick the image was lifted above the backing board once it had been permanently attached to the backing. The outer window mat required ½" spacers in order to prevent the glazing from coming in contact with the art.
The Alpharag window mat was cut, backed with reverse beveled spacers to a depth of ½", aligned, and adhered to a backing board of the same color (photo 6). The amount of horizontal space between the flush mount and the window mat is narrower than the window border, yet wider than the white trim surrounding the three upper sides of the image. Variation in proportion and design widths is always important in framing design, but in this case it helped create even more intrigue and variety in this small piece.
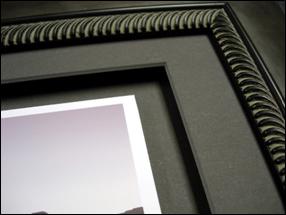 Photo 6: Placement Within Window
The amount of space between the flush mount and the window mat is narrower then the window border yet wider than the white trim surrounding the three sides of the image. Variation in proportion and widths is always important in framing design, but in this case it helped create even more intrigue and variety in this small piece.
Proportion Variations
A similar concept was used in the uneven, untraditional border widths of the larger framed image. The original print has as an outer dimension of 24"x36" while the actual photo is only 20"x28", leaving a great deal of white paper at the bottom. Since the artist obviously wanted it to be heavily bottom weighted that is what we also did with the framing. In order to maintain the rectangular nature of the original image, and accommodate the actual size of the print the mat was 5" at top and 8½" at bottom, with slightly narrower 4" sides.
The Monument Valley project has a consistent window border measurement on three sides with a very slightly narrower top. The space between the hovering image and the window is wider at the sides while slightly narrower top and bottom (photo 7). Even with the heavy 3" moulding the horizontal image maintained the visual movement by the combination of the horizon in the photograph, the wide white paper strip at the bottom and the floating image (photo 8). Once the original concept of a flush mount had been worked out, the options were then opened as to the outer window mat. In the showcased model we opted to use an unseen spacer shifted back away from the image to help accent the concept of floating.
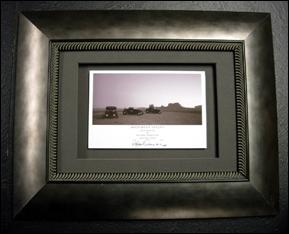 Photo 7: Completed Project
The completed small project is 12½"x9" using #84835 pewter 3" Treasure Collection moulding from Valley Moulding; a window mat and backing of #8669 Black Shadow Alpharag; and TruVue conservation glass.
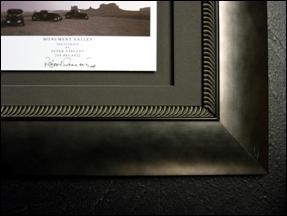 Photo 8: Project Corner
Detail of completed project.
This was done partially because of the elongated horizontal nature of the image but also because a traditional window mat bevel infringed on the art too much and made it feel claustrophobic. A deep wrapped bevel was first designed into the project, but created too much weight and bulk for the vastness of the desert image (diagram 2). In another situation with a flush mounted image a deep wrapped bevel may be ideal.

Flushing it All Out
After all was designed, executed and flushed out, the finished pair went home to live in Redding, California with a long time 20 year client of mine, Mitchell Allen. Numerous things were new to him during this project: the purchase of an expensive digital limited edition photo; oddly weighted and extremely wide mat borders; flush mounting; and dry mounting with a reversible preservation product called Restore.
The cars are restored 1932 vintage coupes and roadsters that are worth mega bucks. They are routinely raced in the deserts of the Bonneville Salt Flats and Monument Valley, Utah; El Mirage Dry Lake and the Mohave Desert, Southern California. Mitchell loves these cars, and was thrilled with his new pieces...and so was I. With wet glues out of the running on this digital, who knew we'd ever be able to do creative flush mounting with a heat activated board on a valuable print.
END
Copyright © 2005 Chris A Paschke
Note: Framed Limited Edition and Thank You are shown courtesy of Mitchell Allen, owner of Mitchell's Motor Cars, Redding CA. For additional information on any of his limited edition prints or book, please contact Peter Vincent at 208.883.8422 or by email: pvincent@hotmail.com.
Definitions
Flat Mounting
The mounting of an image or photo directly to the backing board which in turn is used as both decorative border, like a mat, and the rigid substrate beneath. This method does not allow for the image to be raised above the backing, and is also known as plain mounting.
Float Mounting
The securing of artwork to a rigid substrate within the opening of the window mat so that all of its edges are visible when viewing.
Flush Mounting
A mounting method of bonding an image to a separate backing that is trimmed to the edges of the art allowing the image and substrate to become the new art unit which is then mounted to the selected substrate centered within but not covered by the window mat surrounding it.
Plain Mounting
(See Flat Mounting)
Premounting
A method of applying pressure-sensitive or dry mount tissue adhesive first to the art then trimmed and applied to the decorative backing board.
For more articles on mounting basics look under the mounting section in Articles by Subject.
Additional information on all types of mounting is found in:
The Mounting and Laminating Handbook, Second Edition, 2002,
The Mounting And Laminating Handbook, Third Edition, 2008 and
Creative Mounting, Wrapping, And Laminating, 2000 will teach you everything you need to know about getting the most from your dry mount equipment and materials as an innovative frame designer.
All books are available from Designs Ink Publishing through this website.
Chris A Paschke, CPF GCF
Designs Ink
Designs Ink Publishing
840 Tucker Road, Suite H-190
Tehachapi, CA 93561
P 661-821-2188
chris@designsinkart.com