 Photo 1
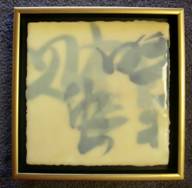
This 10x10" deckle edged, smooth surface encaustic is on a 1//4" birch wood panel. It has been lifted ½" from the back of a 2" deep Larson-Juhl Silhouette floater frame and screwed to hold. Encaustic art courtesy of Chris A. Paschke.
Encaustic is the technique of painting with melted wax colors to a rigid support that are heat fused after each applied layer. The Greek term enkaustikos, meaning "to heat" or "to burn", requires each new layer of melted beeswax and resin to be hot fused to the previous one so the wax becomes unified to the support and all previous layers (photo 1). Technically, if the layers are not heat fused it is not a true encaustic method. Contemporary encaustics come in all types and styles, on a wide assortment of surfaces. They may be smooth or textured; translucent or opaque; all wax or mixed media.
Photo 1
This 10x10" deckle edged, smooth surface encaustic is on a 1//4" birch wood panel. It has been lifted ½" from the back of a 2" deep Larson-Juhl Silhouette floater frame and screwed to hold. Encaustic art courtesy of Chris A. Paschke.
Brief History
Ancient Greek shipbuilders used beeswax to caulk joints and waterproof their ship hulls. With the addition of pigments into the melted wax, this hull sealing grew into the decoration of the surface of the hull, as referenced by Homer in 800 BC when writing of the painted warships that sailed into Troy. In 4th century BC, pigmented wax was applied to sculpture, and in Egypt from 100 BC to AD 200 wax portraitures of the dead were set into their mummy casings to help transport their bodies to the afterlife. It continued as a popular medium into the Byzantine era, but fell out of popularity by the 7th century. There was a slight revival in the late 17th and early 18th centuries, but it remained relatively dormant until Jasper Johns applied it to canvas in 1954, after becoming tired of waiting for his oils to dry.
Contemporary Images
Beeswax and damar resin crystals are melted together, thoroughly mixed then poured into small molds and hardened into blocks. These blocks may then be melted into small loaf pans and mixed with opaque pigment to make colored waxes, and are kept liquid during use by sitting the pans on an electric griddle or by melting bulk wax into a large electric pan for larger artworks (photo 2).
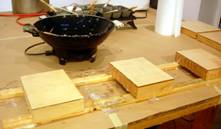 Photo 2
The electric wok has natural color melted beeswax and resin, the small loaf pans top center are colored prepared wax. The birch wood panels to the left are coated with three layers of wax base, while the three at right are still unprepared.
Contemporary encaustic art is created on paper, paper glued to rag board (photo 3), plain 8-ply rag, Gatorboard, Luan (¼" mahogany plywood), Maple or Birch panels, Masonite, or canvas applied to a rigid substrate. Most of the time an original encaustic has more thickness than a painted watercolor on paper or a pastel, up to ½" thick. If a mixed media encaustic is applied to paper alone with no rigid support beneath, the wax can easily be cracked or damaged during handling or transport. The wax surface is also very delicate, even though it has been hardened by resin, and may be easily fingerprinted, scratched or gouged. It should be handled like a surface sensitive piece of acrylic glazing.
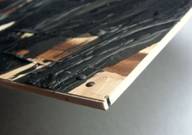 Photo 3
A 90# cold press watercolor paper was mounted to 8-ply rag with a clean blunt cut edge. This depth of art would require a sink mount.
Mounting options for these dimensional originals include: no frame; a floater frame, or a sink mount. Use of no frame is most common when encaustic is painted on a wood support wood called a panel (photo 4). Large panels are often fitted by the box maker with a bevel cut board glued inside the back as part of the hanging system. This is the very best hanging system for large, heavy encaustics.
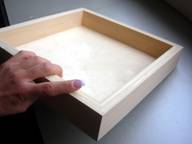 Photo 4
This is the back of a panel support box as seen sitting on the table in photo 2. It is framed with ½" birch plywood glued with PVA white glue, not nailed. This supports the ¼" maple face board.
A floater frame would be the best choice when the wax has been dripped over the edges creating a deckled appearance like the sample in photo 1. A floater frame could also be used with a scrapped or blunt edged piece (photo 5). Some artists like the cleaner look of the scrapped edge, allowing for the depth of the wax to show. The third alternative for a dimensional encaustic would be a sink mount (see "Sink Mounting", PFM November 2006). This would support the substrate with a pinwheel of foam board or 8-ply rag, overlapped ¼" with a window mat and glazed.
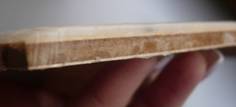 Photo 5
This ¼" birch plywood has a ⅛" thick application of encaustic to its surface, and has been trimmed clean with a hot scrapper at the edges of the board. This may be floated or placed in a sink mount.
Floater Frames
This series of nine small 4x4" smooth surface encaustics are mounted in floater frames with a gold top edge from the Larson-Juhl Silhouette series (photo 6). The wax art is on a ¼" birch wood panel with no edge supports and the delicate wax edges need to be protected during shipping and display. Two pieces of ¼" birch are glued together with PVA to raise the art from the back of the moulding. The selected moulding is 2" deep, the encaustic and wood base are almost ½" thick, so by lifting the art another ½" it really floats in the center of the field (photo 7). Floating the wax panel in a black box, as opposed to a maple or natural color floater frame, allows the dark surrounding to better showoff the dimensional quality of the art, the natural beeswax color, the uneven wax edges, and the embedded Asian characters. The gold top edge was chosen to play off the natural somewhat golden tone of the wax (photo 8).
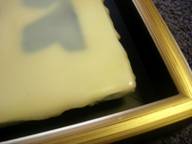 Photo 6
Larson-Juhl Silhouette #353806 was selected with two ¼" thick 3½" square raisers to lift the art from the backing.
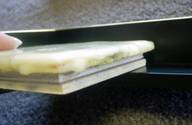 Photo 7
The nearly 1" thick art and lifter panels together placed the encaustic piece more in the center of the floater moulding.
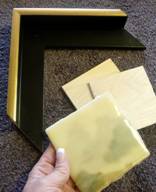 Photo 8
Floating the wax panel in a black box allowed for the dark surrounding to best showcase the wax edges and the natural beeswax color. The black embedded characters were also accented nicely.
Screw Mounting
The small 6x6" square frames are chopped, glued, and properly finished, before the artwork is installed. Small 3x3" platforms are built out of two ¼" birch scraps glued together and clamped to dry. The sides are painted black to help camouflage the raw wood platform below.
Measure across the width of the back of the frame and mark the entry points for the screws on all four sides. Placement of the screws are set at ¼" in from the opening, and since these are small frames only one screw is required for each side (photo 9). Number 6, ¾" flat head phillips metal screws are chosen because of their flat head and continuous threading for countersinking. Use an awl to depress a starter hole at each mark, this prevents the drill bit from traveling (photo 10). The selected screws must be long enough to grab the wood of the platform — or ½" plywood base — but not so long it punches through the face of the art.
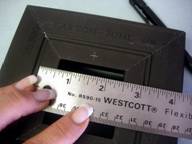 Photo 9
The entry points were to be ¼" in on all sides. Only one screw was needed each side because of the small size of the art.
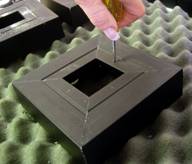 Photo 10
Use an awl to push a starter hole for the drill bit.
Drill the small pilot hole at each entry point all four sides (photo 11). Though my hand angle may seem awkward, this is the best way I can ensure a controlled perpendicular entry hole, but use whatever method works for you. A larger phillips head driver is twisted into the opening of the hole to enlarge the small pilot entry by removing additional wood, which accommodates the larger screw head (photo 12). Only small original pilot holes remain on the face side of the frame, while the back has the enlarged cone shaped holes ready to countersink the screw heads (photo 13). Install the screws from the back, all the way through the frame so that ⅛" of the threading juts out the front (photo 14). These screw tips are used to mark the platforms.
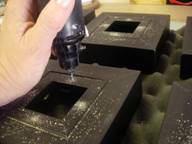 Photo 11
Though my hand angle may seem awkward, this is the best way I can ensure a controlled perpendicular entry hole. Use whatever method works for you.
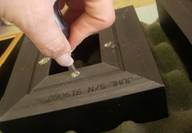 Photo 12
Use whatever method works for you. Use a larger phillips head driver to twist and enlarge the small pilot hole removing additional wood to accommodate the head of the screw.
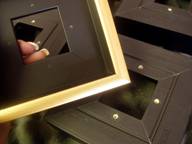 Photo 13
There are only tiny pilot holes remaining on the face side of the frame, while the verso side has enlarged cone shaped holes for countersinking the screws.
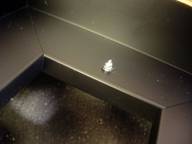 Photo 14
Install the screws all the way through the frame so that ⅛" of the threading juts out the front
Platform Placement
Make a pencil mark at the bottom of the platform and the bottom of the frame for easily realignment, then visually center the platform and push down firmly to sink the tips of the screws into the plywood to mark the location of the screw holes into the platform (Photo 15). Remove the platform, lay it so the tiny marked indentations are visible, and make larger starter holes with the awl where the screw tips marked the back of the platform (photo 16). Predrill and enlarge the starter holes in the platform using the same method as with the frame. Refit the pilot holes onto the exposed screw tips on the face of the frame.
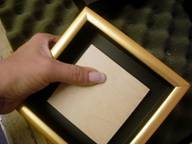 Photo 15
Visually center the platforms and push down hard to sink the tips of the screws into the plywood to mark the location of the screw holes beneath.
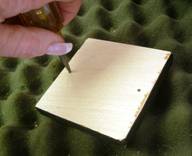 Photo 16
Once pressure market, remove the platform and press starter holes with a hand awl, then predrill the holes for easier screwing of the two pieces together.
Affix the platform to the frame by pressing firmly against the frame as you screw the remaining threads into the platform (photo 17). If you do not press firmly the screws will lift the platform away from the frame, and the point is the make the screws suck the wood platform down flush to the back of the floater frame. There should be no gap between the platform and the frame.
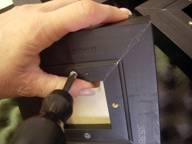 Photo 17
Firmly support the platform against the frame while sinking the screws into the frame, then proceed until the screw head is flush of slightly below the back if the frame surface.
Finishing
The backs of the frames are left open with no dust cover, the art is wired, labeled, and bumpers added prior to permanently adhering the encaustic pieces to the wooden platforms. Since this art is on raw wood and exposed to the open air it is treated like a stretched canvas. The backing or dust cover on a canvas is meant more to prevent puncture damage and to keep bugs out, and since the platform sits between the encaustic and the back of the frame, it is almost as thought he dust cover has been fitted inside the frame.
Once the fitting is complete the encaustic originals are glued to their platforms. The beauty of this screw mounted float is, although the encaustic original is hot glued to the platform, it may be unscrewed and removed for storage or to switch out the frame to another encaustic piece.
Hot Glue the Platform
This is the fastest part of this framing assembly. 3M Jet Melt #3797 and Polygun-TC, is used to hot glue the art to the platform. Jet Melt is a gentle, neutral, hot glue stick adhesive recommended for use surrounding, but not in direct contact to art. It is commonly used in museums, display, for extended-term storage and boxing of art. It bonds most polyolefins (Volara, Ethafoam), is noncorrosive and perfect for adhering these encaustic originals to their wood platforms. Jet Melt does not string like craft store hot glue and is a more rigid bond when cool.
Since the platforms are smaller than the art, apply the melted hot glue around the perimeter of the platform ¼" in from the edge, and then in an X corner to corner. This will firmly tack all four corners and the center. Do not apply adhesive hot glue to the back of the art. Hot glue cools and sets-up very quickly so work fast.
Completed pieces are ready to hang without exposing the sensitive surface of the encaustic, or the delicate edges, aggressive handling or the tortures of finishing. By floating them in this method the surface of the art never needs to contact the table (photo 19).
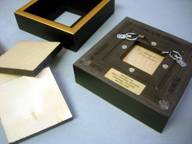 Photo 18
Because of the open air floated presentation of the encaustic, a traditional dust cover is not necessary. The finished back has wire, bumpers and shop label. The unmounted platforms on the left show the painted edges.
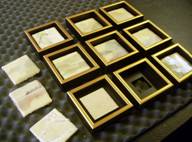 Photo 19
The center bottom piece shows the mounted platform ready to be have the art hot glued to it. Just the right shows a frame with no platform attached yet. The other seven have had the art hot glued into position and are ready to display.
Encaustic art is delicate, but may be beautifully framed if handled carefully.
END
Copyright © 2008 Chris A Paschke
For more articles on mounting basics look under the mounting section in Articles by Subject.
Additional information on all types of mounting is found in:
The Mounting and Laminating Handbook, Second Edition, 2002,
The Mounting And Laminating Handbook, Third Edition, 2008 and
Creative Mounting, Wrapping, And Laminating, 2000 will teach you everything you need to know about getting the most from your dry mount equipment and materials as an innovative frame designer.
All books are available from Designs Ink Publishing through this website.
Chris A Paschke, CPF GCF
Designs Ink
Designs Ink Publishing
840 Tucker Road, Suite H-190
Tehachapi, CA 93561
P 661-821-2188
chris@designsinkart.com