 Photo 1
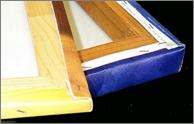
The heavy 2" strainer (right) has the strength to be used as a gallery wrap, while the thin strainer (left) requires the added support of a frame.
In February 2008 I wrote "Encaustic in Floater Frames" as a framer introduction to handling encaustic art on panels. That article stimulated many emails and much chatter over the similarities and differences between canvas and encaustic art. This column will further discuss float frames in relation to the two main mediums that prefer floats to traditional frames, and becomes a good companion piece to the original February article.
Types of Frames
Historically, an unframed painting has been considered as incomplete. A picture frame is used to improve or enhance artwork by separating it from the display wall, linking it to room décor, and/or acting as additional support and protection. In order to help prevent the warping of paintings on lightweight wood bars—stretchers or strainer—completed canvases were placed in frames to add support for hanging. During the mid 20th century the display of unframed stretched canvases became very trendy and heavier strainer bars were used to support the canvases intended for display with no frame reinforcement (photo 1). Such is the case with many of the paintings from the abstract expressionist era.
Photo 1
The heavy 2" strainer (right) has the strength to be used as a gallery wrap, while the thin strainer (left) requires the added support of a frame.
The practice of stripping was developed during that time in an attempt to help finish off the look of an unframed canvas. It is the application of thin wood strips ¼" to ⅜" thick fitted against the painting along the outside edge of the painting to add support to a lightweight stretcher (diagram 1). This type of frame trim is also called a baguette (photo 2). They are sometimes mitered, but often butt joined and nailed directly into the strainer through the canvas. Unfortunately this type of frame offers little additional support and only serves as a slight visual improvement.
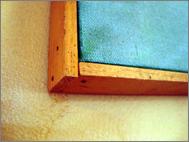 Photo 2
Lattice strips on a baguette are usually extended full top to bottom, with the horizontal strips tucking inside.
The float frame as we know it today evolved from the baguette, with more support and exterior protection, while allowing for a float space between the outer moulding and the inner canvas (photo 3).
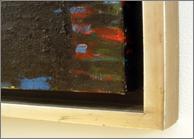 Photo 3
The float frame surrounds the canvas while allowing a gap between the frame and the canvas. The art is also attached at =the back rather than nailed through the sides. This sample—photographed in a Chinese museum—has nearly a ½" float space.
Float Frames
Float frames are available in a number of styles, heights, and depths designed to accommodate a variety of canvas and hardboard cradle depths, and the art is attached at the back rather than nailed through the sides. For the sake of clarity in this article a standard float frame is an L-shaped moulding profile, that supports the canvas from the back allowing for a variable space between the art and the side of the frame. A step float has a built-in stair step profile with a set float space set by the design of the profile. The frame face is the visible top width of the frame. The float space is the gap between the frame and canvas, cradle, or art panel, not necessarily the support platform. The base is the back width of the frame that the art actually rests on (diagram 2).
Canvas vs. Encaustic
The standard float is used most often for stretched canvases and for cradled hardboards. Many believe the surface of a canvas should be aligned ¹⁄₁₆" to ⅛" just beneath the face of the frame with a ⅛" float space, though this is variable depending on the art and the illusion being created (diagram 3). In the corner detail of photo 3 there is a ½" float space. A deep gallery wrap might look even better with a full inch float space.
Encaustic artists often work on hardwood favoring Baltic birch, white maple, or even Masonite. High quality ¼" Baltic panels are mounted atop a ¾" birch wood perimeter creating a box called a cradle (photo 4). Commercially purchased lightweight boxes with narrower side strips may warp, but reinforced custom made panel boxes often prevent warping and eliminate the need for a formal picture frame once the wax painting is complete, like a gallery wrap. Commercial hardboard panels used for encaustic are available as thin as ⅛" and as thick as ⅜". The framing of these will vary greatly depending on the application of the medium.
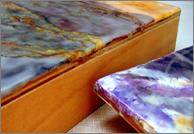 Photo 4
The top custom cradled panel is ¼" birch hardboard panel. Both are ready for framing and will require differnt float frame profiles. Encaustic original art cortesy of Gwen Walker Strahan.
Encaustic Depths and Edging
Encaustic surfaces and edging will dictate the type of float frame and the distances required from the frame face and the float space. When wax extends beyond the edges of the panel, a raised platform mount is required to protect the edges (PFM February 2008) as with the level surface encaustic in photo 5 and deckle drip samples (photo 6). The square edge panel could be fitted into a stepped profile if it were a thicker panel. The thin ¼" panel requires a lifter as in diagram 2. Then there is the uneven pour (photo 7). The ½" commercial wood panel was banded with paper and tape then melted wax was poured to embed items making the completed art about ¾" thick. This would fit into either a step profile as in diagram 4, or a standard L-float frame.
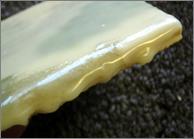 Photo 5
This smooth embedded encaustic panel cannot be placed in a step frame because the edges need to be freely suspended.
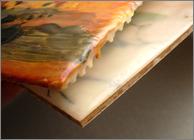 Photo 6
The top deckled drip piece also requires open space to be suspended in the frame, while the lower square-edged art could be fitted into a stepped profile if it were a thicker panel. The ¼" panel will never stand high enough without a lifter as in Diagram 2.
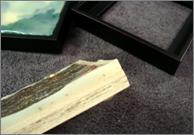 Photo 7
The ½" commercial wood panel was banded and poured with wax, making it about ¼" thick. This would fit into a step profile or standard float frame.
Float and Recess Spaces
How deep is deep enough? Pay attention to all areas of the wax or paint. If the setback is to be ¹⁄₃₂" it must be aligned from the highest point on the surface of the art. The depth, setback, or recess from the frame face is often greater for encaustic art than for canvases, but in either case it shall always be set deep enough to protect the full surface of the art if the frame were laid face down on the table (photo 8).
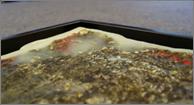 Photo 8
The single ¼" panel requires additional platforms to help lift the deckled drip panel to better fit in the desired moulding shown.
The frame profile should be selected to accommodate the full depth of the art plus substrate, not just the substrate. In opposition, add platform lifters if the panel is too thin and sets back too far from the face (photo 9). If ½" isn't adequate for the selected moulding add more. Traditional stretched canvas recesses are ¹⁄₃₂" to ¹⁄₁₆", with a float space of ¹⁄₃₂" to 1". For encaustic the recesses are ⅛" to ½" with a float space commonly ⅜" to 1" depending on the size of the panel in an L frame. The deckle edge sample in photo 10 has a ½" float space, which nicely allows the edging to show against the black long base of this Larson-Juhl Silhouette frame.
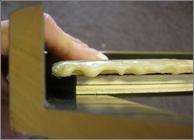 Photo 9
The deckled drip (top) has a float space of ¹⁄₁₆" at some points and nearly ¼" at others. The square-edge piece (right) is fairly evenly spaced with a ¼" face and ³⁄₁₆" float space. The uneven pour was needed to showcase the wax depth, so it is in a Nurre Caxton ¼" Antique Black frame with a ⁵⁄₁₆" float space.
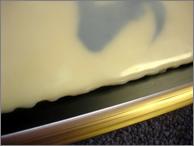 Photo 10
This deckle edge piece has a ½" float space allowing for good visual contrast against the black long base of this Larson-Juhl Silhouette moulding.
Watch the proportions of the face width to the float space. As when designing for mats and mat decoration it is important to pay attention to repetitious measurements. If the face of the profile is ¼", the float space should be less than or greater than ¼". The deckle drip art in photo 11 has a float space of ¹⁄₁₆" at some points and nearly ¼" at others, but the variation keeps it interesting. The square edge piece sample is fairly evenly spaced with a ¼" face and ³⁄₁₆" float space. The uneven pour needed to showcase the wax depth so it is in a Nurre Caxton ¼" Antique Black featuring a ⁵⁄₁₆" float space.
 Photo 11
(Top) The deckle drip has a float space of ¹⁄₁₆" at some points and nearly ¼" at others. The square edge piece (R) is fairly evenly spaced with a ¼" face and ³⁄₁₆" float space. The uneven pour needed to showcase the wax depth so it is in a Nurre Caxton ¼" Antique Black with a ⁵⁄₁₆" float space.
Assorted Profiles
There are dozens of float frame profiles and depths available with numerous possibilities. Stepped profiles vary by float space and height of the frame. L-shaped profiles are available as short base or long base and in numerous heights. Stocking two or three float mouldings may not meet your design requirements, because if the float space in a step moulding is not wide enough for an encaustic, or the profile height is either too short to protect the art or is too tall and overpowers the canvas they will never work. In fact different profiles and depths may be needed for encaustic, canvas, and/or commercial hardboards. It would not be unreasonable to stock two dozen or more float frame profiles and colors.
One final consideration. Long base profiles will allow for screwing through the frame directly into a strainer or panel, while short base profiles often require an eye screw mounted horizontally into the moulding base with a vertical round head screw through it into the panel. Refer to the diagrams for samples.
None of these are difficult to conquer. Float frames are the solution to putting a frame on a gallery wrap, and new encaustic artists are emerging every day. So order those new profiles and prepare to play with wax and canvas to bring in the dollars.
END
Copyright © 2009 Chris A Paschke
For more articles on mounting basics look under the mounting section in Articles by Subject.
Additional information on all types of mounting is found in:
The Mounting and Laminating Handbook, Second Edition, 2002,
The Mounting And Laminating Handbook, Third Edition, 2008 and
Creative Mounting, Wrapping, And Laminating, 2000 will teach you everything you need to know about getting the most from your dry mount equipment and materials as an innovative frame designer.
All books are available from Designs Ink Publishing through this website.
Chris A Paschke, CPF GCF
Designs Ink
Designs Ink Publishing
840 Tucker Road, Suite H-190
Tehachapi, CA 93561
P 661-821-2188
chris@designsinkart.com