In our custom framing world of preservation techniques and never insulting the integrity of the art, sometimes the more popular solution turns out to be the more invasive one. I continue to be the controversial advocate of mounting options for new technologies that fly in the face of industry preservationists. Many of today's preservation methods may not actually work with contemporary images. Case in point...some of the newest smooth backed digital photo papers are falling off their substrates once removed from the dry mount press.
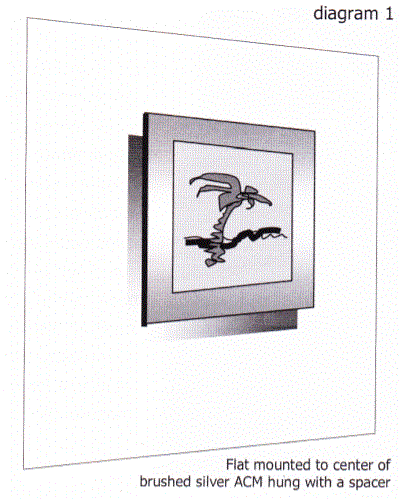
Collectors and artists today have a more contemporary eye for framing presentation, and thanks to the internet there is more international influence. Digital artists and photographers are embracing alternative framing methods that allow the mounted art a more edgy contemporary look. Often there is no perimeter frame at all such as a gallery wrapped canvas or a floating blunt edged sheet of aluminum composite (diagram 1).

Contemporary Framing
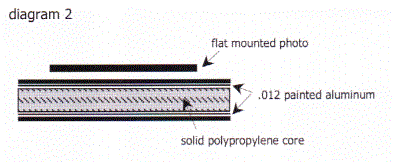
Dibond from Alcan Composites is an aluminum composite material (ACM) made of two prepainted or burnished sheets of .012" aluminum with a solid polyethylene core between them (diagram 2). Colors include white, black, brushed silver, brushed gold, and dark bronze, available 2mm to 4mm thick, from 4x8' to 5x10'. It must be sized with a power saw and is sold by suppliers of substrates for signage, display and exhibits.
ACM is requested by artists and photographers for both flat mounting to the center allowing the burnished edges to show, and flush mounting edge to edge to help eliminate orange peel. Flat mounting a photo to the center of brushed aluminum is not cheaper to produce than traditional framing, it is just another approach to display. Today's collectors are looking for the modern element, and full service custom framers need to have the knowledge of, and equipment or resources to produce this mounted option when requested.
Mounting to Aluminum
Though flat mounting the back of a photo to ACM may be manually achieved with a high tack P-S like Gudy 870 film, it is far more successful using a roller laminator. Size the ACM and deburr sharp edges. Follow manufacturer directions of the chosen adhesive film, mounting the adhesive to the back of the photo first. Peel back edge of release liner, align and press to affix. Cover with liner then burnish to activate bond. Leave under a weight 12-24 hours while it begins to cure, but remember the active bond gets stronger over time.
For more extensive step-by-step information on use of roller laminators, cold mounting to ACM, and face mounting see chapter 8, "Cold Mounting" in The Mounting And Laminating Handbook, 3rd edition, available from PubCo.
Face Mounting Basics
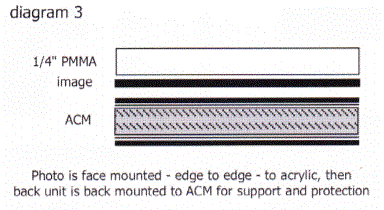
Face mounting is the permanent adhering a sheet of glass, poly (methyl methacrylate) (PMMA) - sold as Plexiglas - acrylic, clear polystyrene, or polycarbonate to the surface of a silver-halide, Ilfochrome Classic (cibachrome), or digital image with either double-sided, clear pressure-sensitive adhesive (PSA), or a silicone rubber and primer system, known as Diasec mounting. The process provides a rigid support and protective glazing, while protecting from fingerprints, mold, air-borne pollutants and ultra-violet radiation. The UV protection only occurs when the selected PMMA contains the necessary UV inhibitors. The substrate of choice then becomes both the protective glazing and the image support (diagram 3).
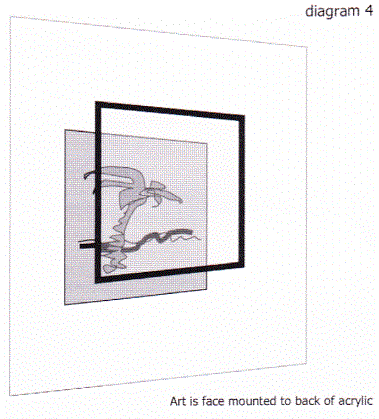
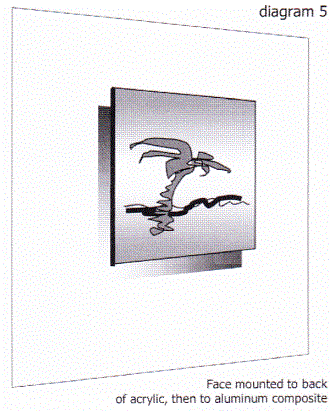
It has been used for the display of Cibachromes and Duratrans in advertising, for backlit display and lightboxes for decades. The process has been used in Europe for over 30 years and with the advent of digitals face mounting is fast becoming one of the most popular methods for exhibiting wide format and display photographs commercially, in galleries, homes and major museums (diagram 4). The fusion between the face of the art and the acrylic sheet creates a permanent, airtight bond that allows the image a high gloss wet look. Images are most often flush mounted edge to edge (diagram 5). Abrasion resistant acrylic best prevents surface scratches, and the application of a backing layer of aluminum, corrugated polypropylene, or 8-ply rag board helps protect from gouging damage to the back.
Assorted Materials
PMMA sheets are produced by either cast or extruded methods. Cast sheets are known to fracture or craze in climates of fluctuating humidity, and extruded sheets may develop stress-related cracking as they age, but this generally occurs during exterior use. Both sheets are resistant to chemicals, light, ozone, and biological degradation, but selecting the right acrylic for fine art interior vs. advertising exterior is a must.
The Diasec silicone-based adhesive has been the favored process for face mounting of fine art prints in high end European labs, though the mounting process is much more involved likely to be undertaken by more commercial operations. Most silicone rubbers are used in conjunction with a primer that enhances the adhesion between the rubber and the material to which it is applied. The primer is first applied to both surfaces, the solvents are allowed to evaporate, then the two are bonded together. For best results it requires mounting with a large, electric double-cylinder press with variable pressure adjustment in a dust-free, climate controlled room.
An optically clear, acrylic based film adhesive designed specifically for face mounting, such as Drytac Facemount UV, Neschen Gudy 909, or Seal Optimount must be used for this technique. The rolled film is a clear polyester carrier between two exterior layers of adhesive protected on each side by a clear polyester release liner. It may be applied with a manual hand crank or automatic roller laminator, and is best applied at room temperature.
Problems associated with face mounting include the susceptibility of the acrylic surface to scratches and abrasion, and its tendency to build up static and attract dust making it difficult to transport and keep clean. Most physical damage actually occurs as the result of poor handling or from accidental gouging the back side of an unbacked image. Covering the back of opaque images with sheets of clear corrugated polypropylene or ACM helps protect it from verso damage.
Preparation and Basic Steps
Always read, and follow all manufacturer guidelines for face mounting applications and acclimate all materials to room temp 65ºF-70ºF, 60-80% RH for at least 24 hours prior to sizing and bonding. Dust all equipment, release brake tension in the roller laminator (RL), and set rollers for moderate speed. Make certain the print is absolutely clean and free of dust, but be very careful about brushing as it may easily scratch. All scratches and fingerprints between the layers will become a permanent elements in the completed face mount.
Run the print through the RL to apply optically clear adhesive with release liner to the face of the print. Attach an acrylic leader board of the same thickness to the acrylic sheet at the start end to be fed into the machine first. Fold back the edge of the release liner exposing the adhesive on the back of the image and stick that oversized trim edge to leader board. The object of the leader is to straighten and remove air bubbles before the real print enters the rollers. By the time the rollers get to the clear acrylic the image will be flat, smooth and bubble free. Push board edge between rollers and begin roller rotation to nip the leader. Flip the image up towards the top roller and push the board through. Use compressed air to blow dust away from the board while feeding through the rollers during bonding.
Repeat the process of mounting the film to the polypropylene and then feeding the face mounted photo to the backing. The face mounted image is then trimmed flush to the edges of the acrylic and the sandwich is ready to attach hangers. Do not practice this technique on a customer's project. Unlike mounting to aluminum, face mounting may not be achieved manually or with heated rollers or dry mount equipment.
Hanging Methods
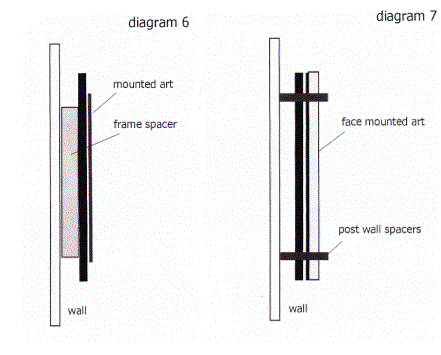
There two basic methods for hanging a face mounted image to the wall: a backing frame (diagram 6), or pipe support (diagram 7), and both allow light to freely move around and behind the display art. A backing frame of wood or metal may be glued to the center of the backing support. This should be small enough so it is not visible in order to best enhance the illusion of floating art. Select a clear industrial strength glue designed for the materials used: metal to metal, wood to metal.
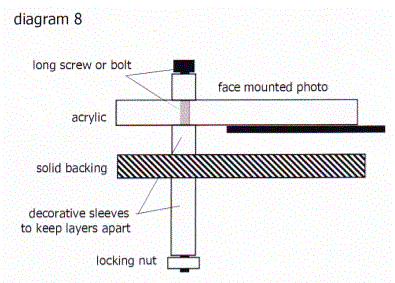
Pipe supports are the second option. Holes are drilled through the solid layers of the acrylic and backing so screws or bolts may be fed through to the back. The mounted sheets may be solidly bolted together with extension posts out the back used as the spacers, or unbonded face mounted art and rigid backing may be spaced apart by decorative pipe sleeves that do not fit through the holes (diagram 8).
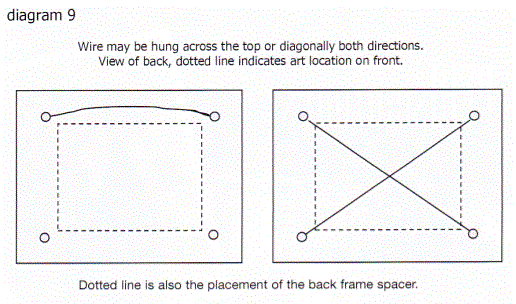
The advantage of a backing frame is the hanging hardware are the same screw eyes, D-rings, and coated wire as any wood or metal frame. If four corner pipes allow wire to be strung across the top from post to post, or diagonally in both directions (diagram 9).
Final Thoughts
Face mounting may be the current contemporary look of choice, but all deviations from the tried and true probably come with issues. Higher substrate costs, sizing difficulties, and needing a cold roller to mount might preclude face mounting from becoming part of your repertoire. But if mounting to aluminum composite and face mounting are within your capabilities, then you sound armed and ready to tackle the look of 21st century framing...without a frame.
END
Copyright © 2008 Chris A Paschke
For more articles on mounting basics look under the mounting section in Articles by Subject.
Additional information on all types of mounting is found in:
The Mounting and Laminating Handbook, Second Edition, 2002,
The Mounting And Laminating Handbook, Third Edition, 2008 and
Creative Mounting, Wrapping, And Laminating, 2000 will teach you everything you need to know about getting the most from your dry mount equipment and materials as an innovative frame designer.
All books are available from Designs Ink Publishing through this website.
Chris A Paschke, CPF GCF
Designs Ink
Designs Ink Publishing
785 Tucker Road, Suite G-183
Tehachapi, CA 93561
P 661-821-2188
chris@designsinkart.com