 Photo 1: Abused Images
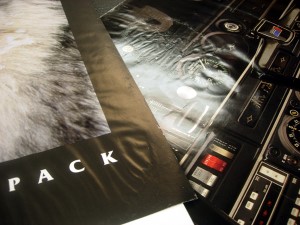
The inexpensive, 24x36" open edition poster (L) shows water damage lower right corner while the Archer II Piper instrument panel display poster (R) looks like it went through a war.
In this age of digital images, framers still do have the occasional inexpensive, open edition poster that has been folded, spindled and/or mutilated, come in for framing (photo 1). Damage most often originates from mishandling or poor storage, and comes in all types. Since the advent of digital photos, inkjet, and laser prints with basic heat sensitivity, we sometimes forget about the benefits of surface heat laminating, also known as overlamination, as a source for camouflaging paper damage. Though the application of heat can damage an inked print by mottling its surface, it is also true that vinyl heat lamination can protect and cover some surface damage from poor handling.
Photo 1: Abused Images
The inexpensive, 24x36" open edition poster (L) shows water damage lower right corner while the Archer II Piper instrument panel display poster (R) looks like it went through a war.
Wolf Pack and Instrument Panel
 Photo 2: Edge Damage
The edges surrounding the entire 24x38" poster are frayed, wrinkled and creased, and little may be trimmed without losing the control panel.
The first two samples are sentimental images from a customer that wanted them reframed but with no heroics to save them. Both had been framed unmounted, pressed between a sheet of acrylic and masonite, edged with a narrow plastic clip frame. The airplane instrument panel was the worst of the two with its edges badly worn, torn, creased and with much of the ink having been rubbed from the surface leaving raw white paper (photo 2). The water stains were both elongated strips and large 6" diameter puddles throughout the image (photo 3), with the puddles being so bad the far perimeter edges had developed a ½" row of bubbles that looked like dried foam from ocean waves (photo 4).
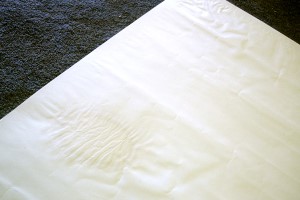 Photo 3: Water Damage
The back side of the instrument panel poster shows multiple large water spots in the center and along the edges as well as elongated folds throughout.
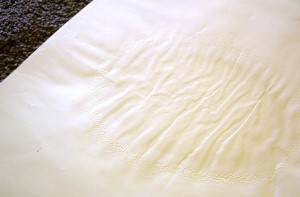 Photo 4: Bubbled Edges
The intense water damage was so discolored and intense the outer edges of the puddles had formed a ½" edge of tiny bubbles in the paper.
The wolf pack image also had water damage and rubbed ink. Once mounted to SpeedMount at 160F in a mechanical press the image mounted flat but the water damage was now seen as compressed creases (photo 5). There was visible wear along much of the outer ½" perimeter of the entire poster having had the black ink rubbed from the paper (photo 6).
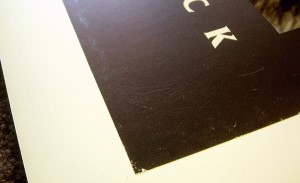 Photo 5: Mounted Wolf
Once mounted to SpeedMount at 160°F in a mechanical press the image is flat but the water damage is now seen as compressed creases in the lower right corner.
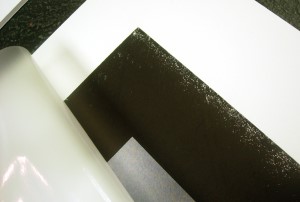 Photo 6: Edge Wear
The wolf had water damage and surface ink damage along the entire perimeter of the black edged image.
These two posters were perfect candidates for laminates. A matte or ultra matte finish would showcase the natural look of the wolf and allow for no glare when viewed from all angles. Plus, the combination of a wide rabbet moulding, matte laminate, and slight edge trim would cover most of the edge damage and the wrinkled water spot no longer visible at all (photo 7).
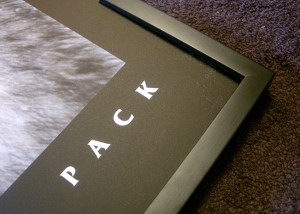 Photo 7: Matte Laminate
A wide rabbet, ultra matte laminate, and slight edge trim covered most of the edge damage and the image looks great when viewed from all angles.
Since textured laminates have a slight visual distortion because of their pattern, they are great for helping camouflage creases, folds and water stains. Linen and canvas textures are best for visual coverage of broken paper fibers, so a matte linen was selected for the airplane control panel. The poster was mounted to heat activated SpeedMount foam center board then covered with the laminate in a 40x60 VacuSeal hot vacuum press.
The finished posters look great with the control panel framed in a narrow 1" traditional rustic barnwood clearance moulding which kept the price down. The wolf is showcased by a clean ¾" square flat black lacquer Design Guild #10010 frame which is perfectly paired with the ultra matte laminate (photo 8).
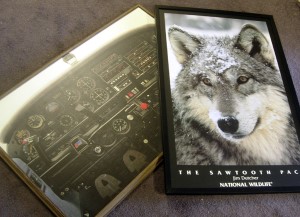 Photo 8: Completed Camouflage
The control panel is framed with a narrow 1" traditional rustic barnwood clearance moulding, while the wolf is a Design Guild #10010 ¾" black lacquer.
Vinyl Laminates
Vinyl laminates were developed specifically for use within a heat press, and feature a removable release paper backing. They come in an assortment of finishes and textures available as matte, gloss and high gloss finishes and textures with various canvas, linen and emery looks. All patterns and smooth films are used as a glass substitute and will seal and protect a paper image or photo.
They were always considered repositionable when first applied over mounted art, but could damage old style lithograph inks if left in contact too long before repositioning. Repositioning is not an option with contemporary digital images because the laminate will lift applied ink from the receptor coating when the laminate is pulled up to reposition, which will damage the image. Extreme care must be used when initially aligning vinyl laminates to digitals when they are first applied.
Outdoor Living
Family photo galleries were traditionally hung in the dining room or up the wall of the staircase, but with the current movement of expanding American living to the outdoors, it is no longer uncommon to find art on the exterior walls of the house enhancing the patio, or in a finished garage. The garage is now a location for socializing and game playing, albeit for men and boys, so framed art is now an option over the pin-up calendars of the past.
The difference between framing for the garage over the dining room is the level of activity might include a football rather than the Scrabble tiles on the dining room table. It's unlikely the framed photos in the house will end up with beer sprayed on them or worse having been knocked off the wall altogether. So, laminates and metal mouldings are perfect suggestions for the boy's playroom.
Sports Photos
With the development of digital cameras and the possibilities of all kinds of computer-generated composite imagery, 21st century framers are frequently mounting high school sports photos and memorabilia. Recently three sports photos were brought in from the local high school for simple, inexpensive frames to be hung in the finished garage. They were 16x20" digital images with wonderful visual overlays of players, titles and action.
The problems with these photos included rubbed surface damage and dirt marks. The image looked like a regular RC photo to my customer, but the composite nature told me it was of digital origin. The ink was very lightly coated on the surface and any soft erasure actually removed the ink surrounding the smudge while not cleaning the dirt at all. Since the image had many superimpositions, a layer of textured laminate could cover or at least camouflage the smudges enough to look nice once framed and a canvas laminate was chosen for maximum visual coverage (photo 9). Since the photo was to be laminated even a dye based, heat sensitive digital could be dry mounted because any surface mottling would be covered by the laminate.
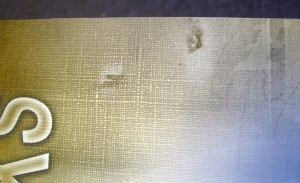 Photo 9: Dirt and Smudges
There were two smudges center top of the digital photo which could not be erased because of potential ink removal.
The photo was mounted to a sheet of HA Bienfang Step 150 for its low temperature and smooth surface and the laminate was sized and aligned at the top end. The release liner was removed from beneath the film as in any standard film application. When the top corner of the canvas laminate was lifted to allow to gently roll flat back onto the image it lifted ink from the surface of the photo. The faint white lines in the left corner of the mounted laminate are the result of lifted ink when the laminate was peeled back to reposition it (photo 10). The arched lines to the right of the lettering are a part of the photo's image crossing behind the lettering, so the established pattern and canvas texture helped camouflage the lifted ink as damage. Framers beware. All photos are not created equal.
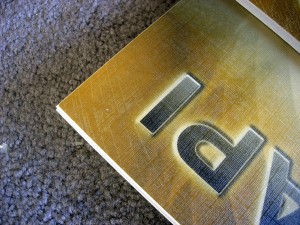 Photo 10: Peeled Ink
The faint white lines in the left corner are the result of lifted ink when the laminate was peeled up to reposition immediately after the liner had been removed.
The completed photos were all mounted, laminated and sealed with points and linen tape into a Design Guild #10010 frame (photo 11). They were simple yet classy, durable, unbreakable, and washable, which all turned out be perfect for this job, because my customer tripped over the sprinkler head on his way into the garage and dropped one of the finished frames on its corner. "Justin" is now sporting a modified Kobe, but he hangs proudly on the garage wall next to Dad's photo of the bucking bull he rode some twenty years ago.
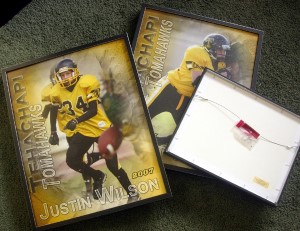 Photo 11: Ready to Hang
The completed photos were all mounted to HA foam board, laminated with canvas texture vinyl film, fitted with points and sealed with linen tape into Design Guild #10010 frames.
Home on the Plains
It is more common than not to have damaged images brought in for healing. It is our job to teach the customer we cannot mend broken fibers but might be able to help hide issues that cannot be corrected. Another customer recently brought in a 22x26" American Plains Indian poster. It had been wet mounted many years earlier onto corrugated cardboard and was still very well bonded though badly warped, dented and smudged.
Although this image could be erased with no surface damage, not even light solvent would remove the gunk on the print, and the poor Indian maiden had a massive dent across her face we could do nothing about. The frame had split at all four corners and the glass was gone, but my customer loved it and wanted it repaired. We opted to laminate with canvas texture to help camouflage the stains and spots and to cut down on the reflection from the facial dent (photo 12).
 Photo 12: Facial Dent
The backed poster reinforced to a new sheet of foam then was laminated with canvas texture film to help cut down on the reflection of the dent down her face.
The image could not be removed from the original corrugated board so the whole unit was mounted to a new sheet of foam board with pure film adhesive to help flatten it. The surface was cleaned as much as possible with erasure and solvent but many of the splotches remained, however, the laminate did cover and blend much of the background dirt (photo 13).
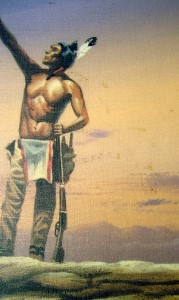 Photo 13: More Dirt
Laminating with canvas texture over the irremovable dirt spots helped blend it into the clouds better.
The frame was disassembled, remitered, nailed and braced with corner brackets because it was very twisted. Then it was coated with wax, dried, and buffed. The refurbished original frame looks quite nice with the laminated and camouflaged dented and dirty poster...mounted to corrugated cardboard, but my customer is very content (photo 14).
 Photo 14: Plains Revisited
The refurbished original frame works fine with the laminated and camouflaged dented and dirty poster...mounted to corrugated cardboard.
END
Copyright © 2008 Chris A Paschke
For more articles on mounting basics look under the mounting section in Articles by Subject.
Additional information on all types of mounting is found in:
The Mounting and Laminating Handbook, Second Edition, 2002,
The Mounting And Laminating Handbook, Third Edition, 2008 and
Creative Mounting, Wrapping, And Laminating, 2000 will teach you everything you need to know about getting the most from your dry mount equipment and materials as an innovative frame designer.
All books are available from Designs Ink Publishing through this website.
Chris A Paschke, CPF GCF
Designs Ink
Designs Ink Publishing
840 Tucker Road, Suite H-190
Tehachapi, CA 93561
P 661-821-2188
chris@designsinkart.com