 Photo 1: Types of Sawtooth
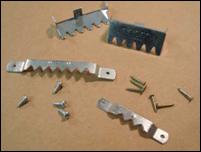
Snap-in for metal frames (top); long and short for wood frames. ¼" 3 gauge screws (L), ⅜" tacks for sawtooth (R).
I realize that framing is generally an afterthought for most artists and the hanging mechanisms on the back of the frame receive probably the least amount of thought of any other part of framing. Sad really, because if you cannot keep your piece on the wall the results can be devastating. In framing art on paper the hinges must always remain the weakest link in the package, so that if a frame falls or is dropped the hinge will break long before the art tears.
In light of last month's discussion on waxed hangers I will continue by discussing other mounting options for thick paintings on wood and framed panels. When painting on panels or hardboards we have to look at the hanger or mechanism for mounting the art to the wall as the strongest element. Depending on the attachment hardware, sawtooth hangers can end up being very strong or very iffy. It is the job of framing to protect and enhance any art and if a hanger is capable of pulling out of the wood or falling from a nail it is only marginally safe. Most often sawtooth hangers are chosen because they are the least expensive and appear to be the fastest hanger system available.
Types of Sawtooth
There are many variations but the typical sawtooth is a jagged edged metal strips from 1-2" long that resembles a saw edge. It is not the weakness of the metal strip but rather the type of wood and the way it is attached to the wood that counts. There are snap-in sawtooth that are used with metal frames. These are strong and once properly inserted cannot fall out, so they are dependable…but we rarely frame encaustic panels with metal frames.
Photo 1: Types of Sawtooth
Snap-in for metal frames (top); long and short for wood frames. ¼" 3 gauge screws (L), ⅜" tacks for sawtooth (R).
Then there is the all-in-one sawtooth called the "nailess" sawtooth that should be avoided for all art. When a wood is soft enough for a hanger to be pressed—or tacked—into it allows for it to be pulled out just as easily. Similarly, most sawtooth hardware comes with short ⅜" to ½" nails or tacks that attach it to the panel or frame. As with the all-in-one hanger, nails can fail by pulling out of the frame by weight and gravity over time allowing the art to crash to the floor.
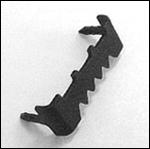 Photo 2: Nailess Sawtooth
Designed to be tacked into soft wood for light hanging.
Screws for Sawtooth
Unfortunately most saw tooth hangers are sold as all-in-one or with ¼" nails that are pushed into the wood to holds it in place. The thing to remember is that nails can pull out even easier than they push into the wood, allowing them to pull out by gravity, drying wood, or because the wood is reconstituted particle board and creates sawdust when threaded, all resulting in the art crashing to the floor.
Replace the small nails with tiny screws to better insure they will not pull out. Small ¼" long #3 gauge screws are perfect, but very tiny and a pain to get started. Use an awl to start your hole in the frame or panel and get the threads started then the PH1 tip on an 4.8V rechargeable battery screwdriver—WAX-ON February column—will set it snug. A #4 will work but you'll need to enlarge the holes in the hanger first.
Wall Nails
Finishing nails should not be used to mount to the wall, as the head is too small and slickly angled allowing for the sawtooth to slip off if bumped. When mounting to the wall use flat headed nails rather than a finishing nail or frame hook. The head needs to be broad and flat so the hanger has something to hook to, like the top nail in the photo, but the shaft shorter at 1½" long. The second and third samples have heads too small. The finish nails at the bottom should never be used for sawtooth hangers as the heads are small, slick and sloped.
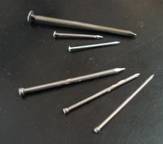 Photo 3: Nails
Headed nails (T), finish nails (B)
If you do select a sawtooth hanger, add rubber or felt bumpers to the bottom corners of the art so it is lifted to even out the distance and remain parallel to the wall surface. These also help keep the art horizontally level, which is another problem with small centrally located hangers.
END
Copyright © 2011 Chris A Paschke
For more articles on mounting basics look under the mounting section in Articles by Subject.
There is a special section in the library for all past IEA Framing Matters articles from Wax-On!
Additional information on all types of mounting is found in:
The Mounting and Laminating Handbook, Second Edition, 2002,
The Mounting And Laminating Handbook, Third Edition, 2008 and
Creative Mounting, Wrapping, And Laminating, 2000 will teach you everything you need to know about getting the most from your dry mount equipment and materials as an innovative frame designer.
All books are available from Designs Ink Publishing through this website.
Chris A Paschke, CPF GCF
Designs Ink
Designs Ink Publishing
840 Tucker Road, Suite H-190
Tehachapi, CA 93561
P 661-821-2188
chris@designsinkart.com