 Photo 1
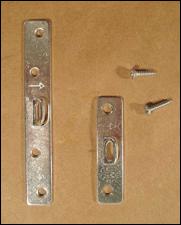
4-Hole and 2-Hole Super Steel Hangers
Steel hangers—first mentioned in my August column—are a one piece wire hanger designed for use with soft or narrow moulding, MDF, and heavy frames. They are far stronger than D-rings or strap hangers and dissipate the stress of the screws in the sides of any frame by staggering their placement in the wood. The staggered screw holes also reduce chance of splitting hardwoods. Manufactured under the name of Super Steel Hangers they are available as two hole or four hole styles having 1 or 2 screw holes—respectively—located both above and below the ring for attaching the wire. The 4-Hole Super Steel Hangers are 3½" long, ¼" wide for heavy art and support up to 100 lbs. The shorter 2-Hole Super Steel Hangers are 2" long, ¼" wide for art up to 50 lbs. The Super Steel Hanger is a good hanger choice if you want the extra holding power of a multiple screw hanger but without the bulk and size of a strap or D-ring hanger.
Photo 1
4-Hole and 2-Hole Super Steel Hangers
Screw Selection
Suggested screw size for installation is #4 x ½" flat or pan head screws, though sometimes #6 x ½" or longer #4 or #6 screws may be selected. The deeper the moulding the longer the screw should be. Regardless of selected screw length always double check to make sure that the screw will not come through the front face of the frame once installed.
Installation
Lay the frame face down on soft surface. Hangers should be installed on the frame sides, between one-quarter and one-third of the way down from the top of the frame. Measure and mark both sides of the frame the proper distance and inner edge of the frame with a pencil to verify centering of the installed plate, then also mark each hole location (photo 2). Start the holes with a pointed awl—particularly on hardwood frames—or pre-drill holes for the hanger mounting screws (photo 3). If drilling also be careful not to drill through to the front of the frame.
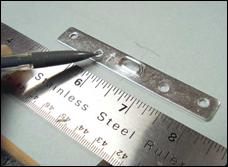 Photo 2
Measure and mark center point then also mark each hole location.
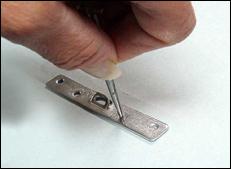 Photo 3
Start the holes with a pointed awl.
Screws may be manually installed or use the handy battery screwdriver featured in "Favorite Tool" Jan/Feb 2011 (photo 4).
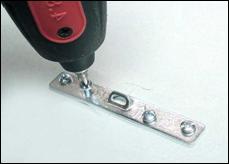 Photo 4
Attach the hangers with #4 or #6 screws.
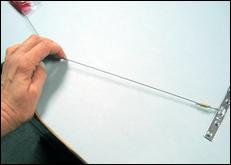 Photo 5
Slack should reach half way to top edge of frame.
Attach appropriate size picture wire to the hangers using a single loop through the eye. It is not necessary to double loop wire with this hanger as it will not slip. Leave enough slack in the wire so that when it is pulled taut up against the back of the frame, the center point of the wire reaches about half the distance between the hanger position and the top of the frame (photo 5).
The photos are showing installation on a regular 3" wide frame that has been covered with a properly paper dust cover prior to attaching hanging hardware. The plate has been set with the loop centered on 9" down from the top of the frame and set in ½" away from the inner lip of the frame moulding. Be sure to include the full measurement including width of the frame when measuring. Very often encaustic panels do not have dust covers and may be cradled boxes or panels in float frames. Regardless of the frame styling—or lack of—these steel hangers are the perfect solution to handling the weight and narrowness of an encaustic box.
END
Copyright © 2011 Chris A Paschke
For more articles on mounting basics look under the mounting section in Articles by Subject.
There is a special section in the library for all past IEA Framing Matters articles from Wax-On!
Additional information on all types of mounting is found in:
The Mounting and Laminating Handbook, Second Edition, 2002,
The Mounting And Laminating Handbook, Third Edition, 2008 and
Creative Mounting, Wrapping, And Laminating, 2000 will teach you everything you need to know about getting the most from your dry mount equipment and materials as an innovative frame designer.
All books are available from Designs Ink Publishing through this website.
Chris A Paschke, CPF GCF
Designs Ink
Designs Ink Publishing
840 Tucker Road, Suite H-190
Tehachapi, CA 93561
P 661-821-2188
chris@designsinkart.com