 Photo 1
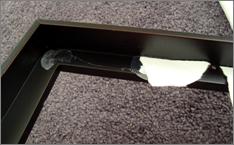
Note the silicone adhesive residue remaining on the base of the frame after removal of the art. Equal adhesive residue remains on the encaustic panel also.
Continuing the discussion from last month's article on mounting long base profiles, this month is about short base profiles. The essence of a floater frame is to mount a canvas or panel from the front by attaching it to the frame without benefit of a window overlap as in traditional framing. For years silicone adhesive was the "duct tape" of the framing industry. It has been used for everything from mounting arrowheads in a linen lined box to gluing backing board into a floater frame (see "Speaking of Silicone", WAX-ON October 2009). As with anything that seems too good to be true, use of silicone as a viable mounting adhesive in framing has proven to be too invasive and aggressive for preservation framing, and in many cases has created irreversible staining and damage to paper art.
Since framing is a very state-of-the-art industry, use of any adhesive product to affix art to a floater has been replaced with the use of screws. This method of mounting is considered non-invasive—even though there are holes created in the panel or cradle supports—and may be easily reversed by simply removing the screws.
Photo 1
Note the silicone adhesive residue remaining on the base of the frame after removal of the art. Equal adhesive residue remains on the encaustic panel also.
Long vs. Short
The lifter platform, or cradle, needs to be about ½" wider—on all sides—than the inner opening of the frame to direct mount to a float frame (photo 2).On long base profiles the screw may be threaded through the base of the frame directly into the wood (WAX-ON August 2010). With a short base frame there is typically only ¼" of panel past the opening (photo 3), so the mounting mechanism is a screw eye horizontally threaded into the inner edge of the base (diagram 1).
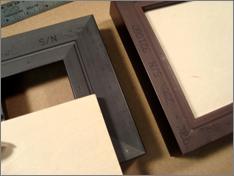 Photo 2
If the platform must be at least ½" wider than the opening for a solid float mount. The long base (L) allows the mount to screw through the frame directly into the base.
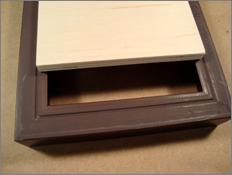 Photo 3
With many short base profiles the platform may only be ¼" wider than the base. This does not allow for a direct mount.
 Diagram 1
Install screw eye horizontally into inside edge of the frame. Feed headed Phillips screw through and into the art or platform.
Assembly
Once the horizontal screw eyes have been installed, align the art panel and mark the eyelet opening with a pencil. Make an indentation in the back of the art panel at each pencil mark with an awl to help locate the correct location for the screw and affix the panel to the frame by threading the vertical screws (photo 4).
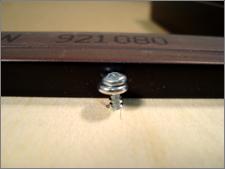 Photo 4
Headed Phillips screws are placed through the eye screws and threaded into the wood.
Enough screws or screw eyes should be used to adequately hold the board flat against the base of the frame. So one screw the center of each side is fine for a small 7x7" frame but a 14x14" frame should have two or three screw each side. Remember the frame will not prevent a thin hardboard from warping, but with an added lifter platform it will help minimize the warp. Plus a wide base profile will help support the panel much better than a short base profile.
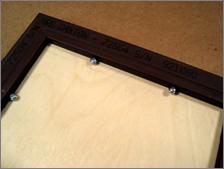 Photo 5
Place screws close enough to hold the board flush against the frame.
When selecting your floater frame you generally do get what you pay for. An inexpensive, unfinished L-shape profile made of basswood is lightweight and rather flimsy. Screws can pull out and the frames will twist and warp right along with the panel or cradle it holds. While a solid maple long base profile is a hardwood that will better hold its shape and allow for direct mounting, but will cost 2 to 3 times more.
END
Copyright © 2010 Chris A Paschke
For more articles on mounting basics look under the mounting section in Articles by Subject.
There is a special section in the library for all past IEA Framing Matters articles from Wax-On!
Additional information on all types of mounting is found in:
The Mounting and Laminating Handbook, Second Edition, 2002,
The Mounting And Laminating Handbook, Third Edition, 2008 and
Creative Mounting, Wrapping, And Laminating, 2000 will teach you everything you need to know about getting the most from your dry mount equipment and materials as an innovative frame designer.
All books are available from Designs Ink Publishing through this website.
Chris A Paschke, CPF GCF
Designs Ink
Designs Ink Publishing
840 Tucker Road, Suite H-190
Tehachapi, CA 93561
P 661-821-2188
chris@designsinkart.com