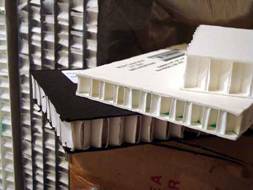
 Photo 1
Hexamount and Tycore honeycomb boards
Sometimes the best way to explain a technique is by real-life example, which allows for detail photos and an end result. Two large brightly colored Mexican rugs and a small heirloom American Indian weaving needed to be prepared for display in a mountain log home. The rugs were tourist collectibles picked up in Mexico specifically as wall décor. Since these were new construction there were many design options. The most cost effective way to display them may have been using a simple vertical hang with verso pocket and rod or Velcro and wood cleats, but since these were to be the focal point of a rustic living room they were to be displayed horizontally behind glazing.
Substrate Options
A large, rigid, archival—neutral pH—substrate strong enough to support the weight of the rugs was required. The fabric selected to cover the backing support was a dark blue suede, so in order to prevent white bleed through a black surface mount board was preferred. The frame was 38"x65" (965x1651mm) so standard 40"x60" (1016x1524mm) boards were not long enough. Black surface ½" (12mm) Hexamount was a perfect choice. Hexamount is a honeycomb constructed archival panel with 100% cotton rag surface paper that is available ½" thick up to 48x96" and ¾" (19mm) thick up to 40x60" (photo 1). Panels are lignin free, pH 8.0-9.5, buffered and pass Photos Activity Test (PAT) requirements. Honeycomb panels are great for framing, mounting, free-standing displays and packaging or storage boxes. University Products may be the only supplier of Hexamount that currently ships to the UK, but fortunately these panels are lightweight. They may be contacted at http://www.universityproducts.com.
Photo 1
Hexamount and Tycore honeycomb boards
When color is not an issue, Tycore Support Board is another fabulous rigid, neutral pH honeycomb panel available only off white, by the case. Conservation By Design Limited—a Larson Juhl Company—is the UK supplier for the 12mm, 1219x2438mm (48x96") sheets athttp://www.conservation-by-design.
Gatorboard (AKA Gatorfoam) is another rigid substrate that comes with black surface paper and is available in assorted thicknesses. Gator is not a preservation substrate because if its wood veneer layers top and bottom between the surface paper and foam center, but it's that veneer that gives the product its rigidity. Black Gatorfoam may not currently by available in UK but single sheets of white may be purchased 10mm thick, 1218x2438mm at Conservation By Design Limited. They also sell White Foam Centered Board in the limited size availability of 762x1016mm (30x40") but that would be a fair maximum as it will warp with surface tension which requires the technique of countermounting to maintain its flatness. Countermounting is covered in The Mounting And Laminating Handbook, 3rd Edition, page 52. A ½" thick substrate with structural integrity and rigidity—such as Gatorfoam, Tycore or Hexamount—will withstand the rigors of wet adhesive, dry mounting and the added surface tension or a mounted fabric, even on a 4x8' project.
Fabric & Mounting
A 4" float space was designed surrounding the rug and the perfect color match to the blue in the weaving pattern was Durango Cobalt suede from Franks Fabrics, Van Nuys CA, USA. Since fabric is prone to absorption and adhesive soak through it is best to use a wet/dry PVA mounting technique.
The board was cut to actual size and the suede fabric was cut about one inch larger around. Two coats of Franks Fabric Adhesive—a heavy body PVA—were evenly applied to the substrate with a sponge roller allowing to dry between coats. The fabric was fitted into one corner of the board—aligning one long and one short side—and dry mounted to the dried PVA in a hot vacuum press at 200ºF degrees for four minutes. After mounting, the fabric was trimmed clean-cut to the actual edge of the board and as it did not need to be wrapped around the edges.
Rug Mount
Velcro was hand sewn the full length of both top and bottom edges of each rug for stability, strength of mount, and to help secure it from touching the glazing. Because of the density and weight of the rug a black polyester thread was selected. By folding the thread in half and threading the folded end through the needle it becomes quadrupled. The four-ply thread was drawn through the edge of a cake of beeswax to unify and strengthen the threads (photo 2). Using this strengthened thread the Velcro was then whip stitched to the top edge of the back of the rug. Pliers and a metal thimble were needed to help sew through the Velcro (photo 3).
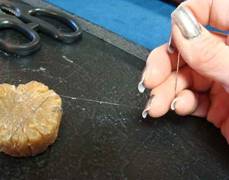 Photo 2
Waxing the thread.
 Photo 3
Whip stitching fuzzy loop side of Velcro along top verso edge of rug.
By placing the Velcro the same distance from the edge of the rug, placement of the Velcro strip glued to the fabric substrate was easily achieved. Verify rug placement on the backing and check the float space surrounding the rug. Fold back the long side the Velcro was stitched to and measure from rug edge to Velcro strip. Add that distance to the float space distance from the rebate of the frame. A faint white line was drawn on the suede to locate the placement for lower edge of hook Velcro (photo 4).
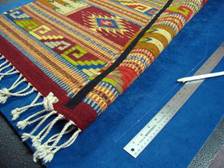 Photo 4
A fine white line is made at 4¾" from substrate edge for placement of hook Velcro.
Both PVA and 3M #3797 TC Jet-Melt hot glue—used with Polygun-TC—adhesives were tested for bond strength of the polyester Velcro to the fabric covered substrate (photo 5). Jet-Melt hot glue is a 385ºF (196°C) neutral pH high melt adhesive that is wonderful for box building and attachments not in direct contact with art. The neutral pH hot glue #3797 was chosen for speed of bond and immediate cure strength. For proper alignment, stick the two sides of the Velcro together, apply hot glue along the white line and fold the edge of the rug down to fuse loop Velcro to the adhesive. Once the top strip is applied, verify the alignment then repeat the process for the opposite long side.
 Photo 5
3M Jet-Melt glue gun with #3797 off-white, 2" glue sticks
Assembly & Fitting
For the side strip supports, suede was PVA wet/dry mounted to 3/16" black foam center board the full length of the box and wide enough to be cut into four ¾" wide strips (photo 6). This allowed for very cleanly cut strips that could easily be sized to fit snugly against the sides of the frame to hold the glazing in place (photo 7).
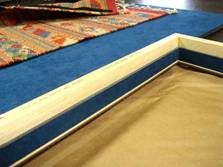 Photo 6
Side strips were 3/16" thick black foam center board.
 Photo 7
Strips were mounted, cut and fitted to hold glazing.
There were stiff little twisted tassels at either end that were allowed to remain lose giving a more natural appearance (photo 8). The 4" float space allowed plenty of room for the tassels and created a solid field of blue as a baseline for the rug to visually rest on. Larson-Juhl 423440 Chestnut Verona moulding was selected for its natural and earthy wood tones and for the twisted inner lip detail that echoes both the twisted tassels and the picket fence short stripe design in the weaving The final frames were fitted with museum glass for protection and clarity (photo 9). Though it looks a bit like the tassels in the photo are statically attracted to the glazing it is an optical illusion and they are indeed lying flat.
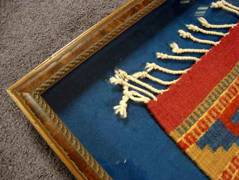 Photo 8
Verona moulding pattern matches both tassel twist and vertical stripes in rug.
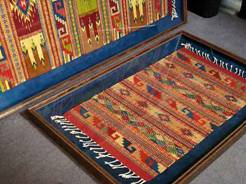 Photo 9
Finished rugs for ready for installation.
Family Heirloom
The third piece was a small, delicate, lightweight, family Indian weaving which had numerous broken fibers and worn areas. Its colors, texture, weight and condition were very different from the new rugs. The same basic techniques were employed for this piece, but being much thinner and far more delicate it needed gentle handling. LJ 350790 Onyx Lucerne and Franks Fabric's Belmont Black linen were chosen for frame and fabric (photo 10). The same wet/dry PVA mounting was used for this substrate preparation and the side glazing supports were constructed also using the same methods.
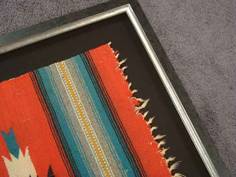 Photo 10
Black linen fabric and LJ Onyx Lucerne frame.
Velcro was hand sewn with only doubled, waxed thread and smaller stitches for a more even distribution of tension on the weaving. Since the weaving was thin it settled into a valley showing the ridges of the Velcro strips a double layer of white polyester felt was placed behind the weaving to lift and support it (photo 11). This also gave the weaving a toothy surface to sit on making it was stable and would not shift or sag. This evenly lifted and supported it giving it the appearance of floating over the linen backing (photo 12).
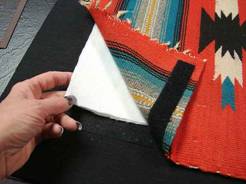 Photo 11
Polyester felt was fitted behind and between the Velcro.
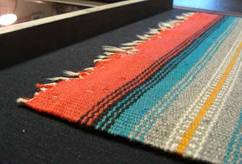 Photo 12
The final presentation had the appearance of floating.
The final shadowbox frames measuring 38x65" and 31x47" and the small weaving was 22x24" were all fitted with museum glass, delivered and installed for his housewarming party. Though there were two different challenges—one with weight, the other with delicacy—the same principles were used with only slight variations to accommodate individual issues.
END
Copyright © 2012 Chris A Paschke
For more articles on mounting basics look under the mounting section in Articles by Subject.
Additional information on all types of mounting is found in:
The Mounting and Laminating Handbook, Second Edition, 2002,
The Mounting And Laminating Handbook, Third Edition, 2008 and
Creative Mounting, Wrapping, And Laminating, 2000 will teach you everything you need to know about getting the most from your dry mount equipment and materials as an innovative frame designer.
All books are available from Designs Ink Publishing through this website.
Chris A Paschke, CPF GCF
Designs Ink
Designs Ink Publishing
840 Tucker Road, Suite H-190
Tehachapi, CA 93561
P 661-821-2188
chris@designsinkart.com