In review, time and temperature are determined by individually selected adhesives, artwork or materials to be mounted, individual substrate thickness and desired end result. Though there are loose basic standards for time and temperature, there will always be variables effecting specific selection of these two elements. Continuing with the TTPM elements, this month we're tackling "pressure".
Pressure is the exertion of force upon a surface by an object or fluid in contact with it. In framing, pressure is the force that squeezes the air from between the substrate, adhesive and artwork being mounted then holds it while the bond is created.
Wet and Spray Pressure
Use of pressure during the set-up process of wet or spray mounting encourages a good bond and helps reflatten the moistened substrate as it dries. This pressure may be as simple as a piece of ¼" plate glass or as complex as a cold vacuum frame, but is a somewhat variable portion of successful hand mounting.
There is no designated appropriate poundage established for wet glue pressure to be effective, it remains moreover simply "good technique", a good idea to maintain maximum contact while the glue dries.
Pressure Sensitive
Both pre-adhesived pressure sensitive boards and two-sided adhesive sheets such as PMA also require pressure to properly bond.The major difference being these adhesives don't need to remain under pressure as they dry.They actually require the pressure of a squeegee, rubber brayer or roller machine to activate the adhesive and create the initial bond. Although a basic bond is established almost immediately, the most long lasting one occurs after 24 hours.
Dry Mounting Pressure Variations
Whether hot vacuum or mechanical presses are used, dry mounting is by far the most predictable and reliable form of mounting available...if the elements of time, temperature, PRESSURE and moisture are properly controlled.
Both hot and cold vacuum presses are self adjusting in relation to the substrate or mounting board being used.The rubber diaphragm or bladder which forms the bottom of the unit naturally conforms to the thickness of each individual substrate during the draw of the vacuum, adjusting for pressure automatically.Therefore, it never needs to be manually adjusted.
On the other hand, dry mounting pressure required in a mechanical press is very specific. Inadequate pressure might allow air bubbles to remain within the center of a mounting, while too much pressure could create unsightly indentations in a foam board substrate during a multiple bite project.This then requires manual control.
Average pressure poundage in a vacuum press is somewhere between 11-15 pounds "per square inch" (psi) while pressure in a properly adjusted standard mechanical (aka softbed press) is 2-4 psi.Hardbed presses, used most often outside the United States, have a much higher range of psi pressure potential.
Checking Mechanical Press Pressure
Unlike the simplicity and user friendly concept of a vacuum press, a mechanical press must be manually set to apply the appropriate pressure for the thickness of substrate.Demonstrating on a Seal 210M-X, first check for proper pressure adjustments.
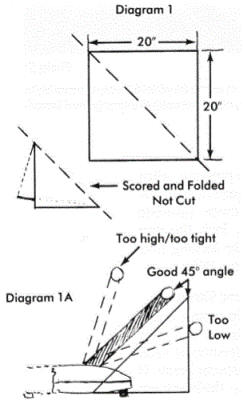
Cut a 20" square piece of foam board, join the two opposite corners by scoring the board corner to corner, but only penetrate half way through the thickness of the foam (diagram 1).Fold the square in half and you have a perfect 45 degree pattern (photo 1). By using a large piece of foam for the pattern, it is easier to compare the angle of the pattern to that of the press handle. Plus by folding the board in half rather than cutting it into an angle, it remains self-supporting.
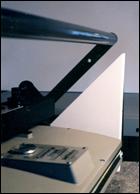 Photo 1
If the arm is higher than the 45 degrees of the foam pattern the press will be too tight for the thickness of substrate checked (photo 2). If the arm is lower than the pattern, the press will be too loose for adequate pressure to ensure proper mounting results (photo 3).
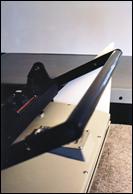 Photo 2
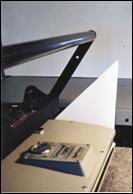 Photo 3
Arm Adjustments
If you routinely mount on ³⁄₁₆" foam, it is most time effective to adjusted a mechanical press to ³⁄₁₆" as a standard thickness. Place the board in the press with the handle at the closed, but not locked, position. Check to see if the press arm is at the proper 45 degree angle for this substrate thickness.
The "locking nuts" are the doughnut shaped outer rings which loosen when turned counter-clockwise.These nuts must be loosened to adjust the taller, inner "pressure adjusting screws".If the locking nut is too tight to loosen, insert an additional board into the press and lock the arm down to release excess pressure from the locking nuts. Unscrew them until they are out of the way or off (photo 4).
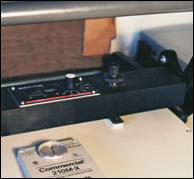 Photo 4
If the additional board was added to loosen the locking rings remember to remove it prior to setting the 45 degrees.Pop the press handle open and freely adjust the tall inner pressure screws to appropriately adjust the arm. Twist both screws at the same time in the same direction, the resistance should feel equal.
Twisting the screws evenly to the right or in a clockwise position will drop the lever arm down, lightening or decreasing the press pressure. Twisting the screws to the left or counter-clockwise will raise the arm up and increase press pressure. Align the 45 degree foam pattern with the lever arm for whatever substrate thickness is desired, lock the arm closed and replace the locking nuts snugly, but only finger tight.
Shimming for Pressure Variation
If mounting a 4-ply mount board prior to a ½" foam board and then ⅛" foam board, no adjustments need to be made with a vacuum press. If variations in substrate thickness are routinely required, constant readjusting of the pressure settings would be required when using a mechanical press. This can be a very time intensive and annoying preparation.
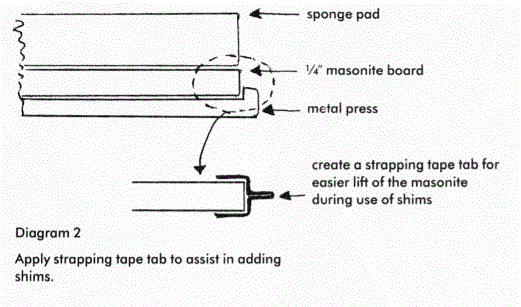
Readjustment of the press is required each time the substrate changes or the pressure will also change.Once the press is adjusted to ³⁄₁₆" substrates, as an alternative to physically readjusting the locking screws, shims may be cut to accommodate the variation in substrate thickness and placed beneath the masonite board to make up the difference in thickness. The shims must always be used beneath the Masonite, not within the platen/sponge pad mounting area.
Place a strapping tape tongue on the front edge of the lower masonite pressure board for easy accessibility (diagram 2). Cut three 4-ply equivalent scrap mat or mount boards about 1" smaller than the size of the sponge pad or masonite.Then simply slide a shim beneath the masonite whenever a thinner substrate is selected.For quick adjustments, 1 shim will be added for ⅛" foam substrates and 2 shims will be added when 4-ply mat board becomes a substrate (diagram 3).
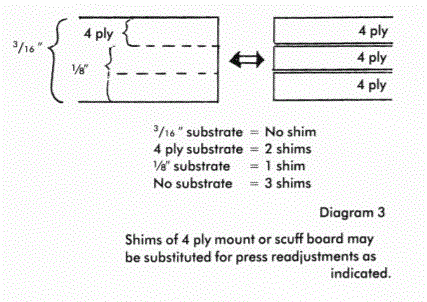
When no solid substrate is used, as in pre-mounting adhesives or canvas transferring, three shims will equal the entire ³⁄₁₆" inner press adjustment.
Predictable Results
The plates of any mechanical press must always be clean and properly adjusted in order to achieve repeatedly reliable, consistent, predictable results necessary for successful mounting. If the pressure is too light gaps or air pockets may result from the air not being squished from between substrate and artwork.If the pressure is too tight it can compress foam boards or create indentations when mounting oversized projects.Follow the standard guidelines of 45 degrees for appropriate pressure placement of the lever arm.
If problems do occur, it is rarely equipment or materials causing the deficiency, check the elements.Mounting should be routine and predictable and the only pressures associated with it should be in never forgetting the basic mounting principles of time, temperature, pressure...and next month's TTPM: moisture.
There are many types of pressure.The pressure of paying bills, the pressure of deadlines, the pressure of dealing with customers.If we can avoid creating high blood pressure over worrying about the pressure required for successful mountings, maybe life might be simpler.
END
Copyright © 1995 Chris A Paschke
For more articles on mounting basics look under the mounting section in Articles by Subject.
Additional information on all types of mounting is found in:
The Mounting and Laminating Handbook, Second Edition, 2002,
The Mounting And Laminating Handbook, Third Edition, 2008 and
Creative Mounting, Wrapping, And Laminating, 2000 will teach you everything you need to know about getting the most from your dry mount equipment and materials as an innovative frame designer.
All books are available from Designs Ink Publishing through this website.
Chris A Paschke, CPF GCF
Designs Ink
Designs Ink Publishing
785 Tucker Road, Suite G-183
Tehachapi, CA 93561
P 661-821-2188
chris@designsinkart.com