Paschke Online
Designs Ink Publishing Article Archive and Reference Library
Articles by Chris A. Paschke, CPF GCF
"Papercut Mounting Options"
July 2006
Little did I realize the depth and breadth of the art of papercutting until I began research for this article. It is probably one of the best-known yet most ignored international art forms. Having been long and well established in the realm of folk art, it roughly defines as the cutting of paper in a perfect balance of positive and negative space allowing for artistic delicacy while still holding together after being cut. It is a very exacting, time intensive skill requiring extreme care, which uses very thin delicate sheets, sometimes layered in multiple colors, sometimes metallics or even hand painted sheets.
The History of Papercuts
Papercutting is a centuries old folk art practiced in nearly culture, and in almost every country around the globe. The Chinese craft of jiezhi, is one of the oldest arts in China with the earliest samples coming from Han dynasty 206 B.C. and still today these brightly colored papers are used for lunar New Year and wedding celebrations. In Japan, Kirie (cut paper), kirigami (papercut patterns), and Katagami (stencil patterns for resist) are sophisticated techniques used in creating designs and textile motifs.
In Germany and Switzerland the art is known as scherenschnitte, where large intricate patterns depict rural scenes in traditional black and white, and portraiture. While the Swiss cutouts were only one color, in Poland, wycinanki, are bright colored, multi layered, folded and embossed papers in complex designs with repetitive symmetrical patterns and folk motifs, as a form of decoupage, used to decorate the inner walls of whitewashed homes. In Holland it is called papiersnyden (paper carving).
Jewish cultures have a long tradition of cut paper designs from ketubah wedding contracts often integrated with delicate, gilding, calligraphy and painting; to invitations, announcements and family celebrations. Typically allegorical, they include writings, quotations or idea, and until the 20th century were frequently hand colored.
In France, the cutting of inexpensive paper portraiture was named after Etienne de Silhouette, France's Minister of Finance, because he had cut so many budgets. In America we exhibit all facets of the above papercutting craft and represent every country with artisans. We are the home of the Guild of American Papercutters who publish a quarterly magazine, First Cut .
So, all cultures use these delicate paper images to decorate walls, windows and lanterns, but also to depict images of family hopes and dreams, while passing on stories and legends. Lest we never forget the folded paper snowflakes we all cut in kindergarten to decorate our walls and windows during the winter session.
What to Watch Out For
Papercuts come in a variety of paper weights, styles, shapes and theme, but the one thing they all have in common is their delicate nature (photo 1). The double happiness, center top, was cut from a sheet of white paper then hand painted (photo 2). Care needs to be taken when selecting an appropriate mounting method because of possible water sensitivity. By the way, the ten individually hand painted pieces, plus the mounted cover, sold for whopping $2.50.
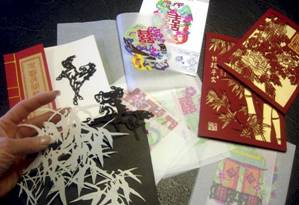 Photo 1: Assortment of Types
(Clockwise from lower left) An intricate bamboo from light off white paper; a package of horses from lighter weight black; an assortment of double happiness symbols cut and painted; and heavy stock greeting cards machine cut with gold liner.
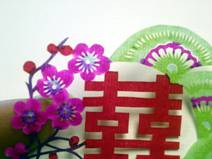 Photo 2: Dyed to Add Color
This cutting was originally white paper which was hand painted once completed. Notice the color gradations within the flower calyxes and the green of the fan.
The small back horses have been cut from lightweight paper dyed black, which has ghosted its image to the support backing in the original package (photo 3). This has nothing to do with UV rays or exposure to anything, just the nature of the dyes. Occasionally the cuttings are comprised of multiple layers (photo 4). If attached together they should not be separated but rather encapsulated as one unit. If separate, they will require individual alignment within the frame. The fishbowl in photo 5 is being cut from a sheet of red paper. The pattern was stapled to the red paper then the image is delicately cut through both layers following the lines. When done this layer will be placed with the previously cut fishbowl, sitting above it on the table, giving the bowl a more dimensional quality.
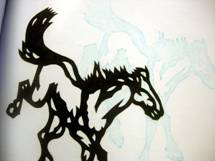 Photo 3: Blue Ghost
The black horse has ghosted itself to the white backing paper in the form of a blue duplicate image.
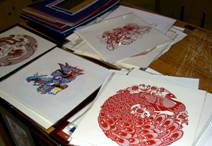 Photo 4: Shapes and Colors
The round phoenix measures 15" across out of a single sheet or red paper. The warrior in traditional dress to the left is a multi layered cutting in red, blue, yellow and black. Notice the pile of mats upper left ready to slap onto any purchased cut.
 Photo 5: Hand Cutting
It will take the artist nearly a day to complete each layer for the multi-layered fishbowl in this photo. Cut with a pointed #11 X-Acto knife through two layers, the photo copy pattern and the red paper.
Wet Mounting Methods
There are three basic ways to mount papercuts: wet, spray, or encapsulation. The wet method has two very individual versions: a time intensive wet glue method; or the scroll mounting method (photo 6). The wet glue method utilizes tiny dots of acid-free PVA, or cooked rice starch, methylcellulose, or wheat paste rather than PVA, to hold the papercut to a 100% cotton backing. Since papercuts are very delicate, too much moisture in any wet glue will easily soak into the paper and leave a water stain and bleed through spot. Tiny microdots of reversible neutral pH adhesive are applied between the papercut and the backing using a tiny metal tool. The microdots should be as small as ¼ of the head of a straight pin. Even a toothpick tip full of glue is too excessive and might saturate through the art.
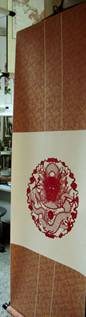 Photo 6: Scroll Mounted
The round dragon was traditionally scroll mounted to a heavier backing then a silk scroll. This is a common choice for display in Asia since scroll mounting is their framing.
The most common way to display Asian papercuts is to mount them onto scroll. The scroll mounted version requires misting a clean table, laying the papercut face down against the table, smoothing to flatten and remove air bubbles, coating the back side with thinned starch paste, aligning the new backing against it, burnishing to fuse the layers together, and transferring to a window or drying board to dry over night (see "Scrolls: Part 1", July 2005).
The small papercut double happiness was starch pasted to the outside cover package as a sample of the ten images inside using the above method (photo 7). Since papercuts are dyed papers the inks will run a little when wet, so extreme care needs to be taken when doing this. Plus the paper is so very delicate that when wet it will very, VERY easy to accidentally pull apart. The only these wet sheets can be handled is through traditional starch methods and paper backing. Using typical framing wet glues will NOT work in the same manner and you will destroy the papercut if attempting to glue, lift, and paste down. In fact these images are generally so delicate that if spray adhesives are directly applied they have been known to tear the fine connectors in the art.
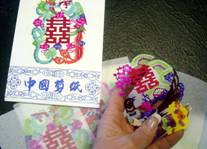 Photo 7: Mounted Sampler
The small double happiness, used in all traditional Chinese wedding celebrations, was starch pasted to the cover of the sales package using traditional methods.
Spray Mounting Methods
Regardless of spray not being a preservation approach it is another alternative though the procedure must be slightly altered for this art. It is not possible to spray directly onto the papercut because of its delicate nature. Also be careful not to puddle adhesive run allow it to under the cuts to the front of the art.
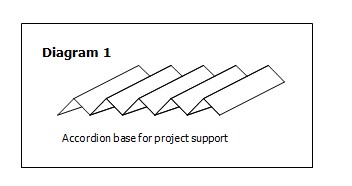
It is best to mist the spray adhesive from above, letting it gently settle onto the back of the art, which has been supported by an accordion folded piece of rigid paper stock to keep the art out of the adhesive. Be very careful when handling the sprayed artwork (diagram 1). The art may be so fragile that even the draw of a cold vacuum frame or the clamped closing of a mechanical press can tear the tiny sections apart.
Lay the papercut face down onto an accordion folded support with the accordion folds small enough to support all loose cutout portions of the art. A single sided flat sheet of release paper may be used to create this accordion which will in turn prevent additional bonding to the support piece during adhesive application. Do not use any absorbent paper for the support, for obvious reasons.
After the adhesive mist has been applied, let it sit until completely dry and no longer tacky to the touch. Place into position on mat board backing, cover with clean release paper, and press with a small tacking iron to reactivate the spray and hold it in place. Do not place in a cold vacuum frame, hot vacuum press, or mechanical press. Even the slightest shift of air during compression of the press can damage the delicate papercut.
Encapsulation is the Best
By far the easiest, reversible, most preservation sound method of mounting would be to suspend the papercut between two sheets of clear polyester film known as Mylar-D or Melinex 516 (photo 8). Static electricity will suspend the papercut centered between these sheets once they have been edge sealed with 3M #889 double sided or #888 single-sided, acid neutral pressure-sensitive tape (photo 9). The tape sealed edges will then be hidden behind the window mats. The sampler is a double mat with a ⅛" spacer between for added depth, though the papercut still is very two-dimensional in appearance. The only problem which is encountered with the encapsulation process is the gloss factor beneath the glazing (photo 10).
 Photo 8: Encapsulation
Static electricity can be our friend holding an image suspended within two sheets of polyester film.
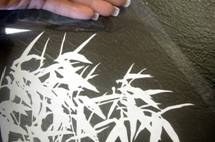 Photo 9: Edges Sealed
The polyester sheet edges should be sealed with two sided tape such as 3M #889, burnished firmly on a soft surface for maximum bond activation.
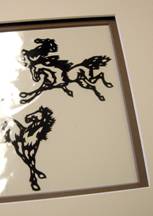 Photo 10: Flat and Glaring
The bottom and top mats are separated with a ⅛" spacer for additional depth, but even with the spacer this presentation seems flat. The polyester will always create some inner glare too as seen here.
Versatility in Design
The best part of using encapsulation is the versatility when framing a papercut. Once encapsulated, the art may be placed at any level of the mat unit, which allows the image to float within or outside of the window as desired (photo 11). The same bottom mat unit was used here but an additional top mat was applied which allowed the encapsulation to be shifted forward between the top and second mats, so the horses hover above the window opening.
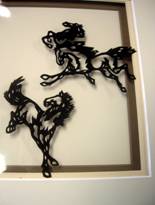 Photo 11: Floated Image
By encapsulating there is more design variation. In this sample a third window mat was added so the polyester envelope may be placed between the top and middle mat allowing for the horses to hover above the window opening.
The same papercut bamboo image made out of warm white paper is placed between the top white and second creme mat windows floated almost a full ¼" above the backing mat of the same color as the papercut (photo 12). The natural shadows help give added intensity and depth to the art, and in this case almost makes the off white papercut appear to be a frost glass etching. Personally I love this look.
 Photo 12: White on White
The same papercut bamboo out of off white paper is placed between the top and second mat windows floated almost ¼" above the backing mat of the same color. The shadows help give added intensity and depth to the art.
The exact same mat configuration is placed over an Strathmore rag ochre colored backing, which makes the bamboo appear darker, smaller, but is much more of a visual contrast (photo 13). Whether you opt for playing with the placement and floating encapsulated papercuts or not is a matter if personal design interpretation, and if remaining true to the art it ought to be flat against the backing in a very two dimensional manner. But I have never been accused of being two dimensional.
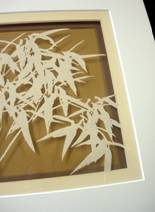 Photo 13: White over Ochre
The exact same top mat configuration is placed over an Strathmore rag ochre colored backing making the bamboo appear darker and smaller. The other mat colors appear to have changed also.
END
Copyright © 2006 Chris A Paschke
For more articles on mounting basics look under the mounting section in Articles by Subject.
Additional information on all types of mounting is found in:
The Mounting and Laminating Handbook, Second Edition, 2002,
The Mounting And Laminating Handbook, Third Edition, 2008 and
Creative Mounting, Wrapping, And Laminating, 2000 will teach you everything you need to know about getting the most from your dry mount equipment and materials as an innovative frame designer.
All books are available from Designs Ink Publishing through this website.
Chris A Paschke, CPF GCF
Designs Ink
Designs Ink Publishing
785 Tucker Road, Suite G-183
Tehachapi, CA 93561
P 661-821-2188
chris@designsinkart.com