Paschke Online
Designs Ink Publishing Article Archive and Reference Library
Articles by Chris A. Paschke, CPF GCF
"Hinges and Floated Art"
December 2004
The artwork being framed often designates the hinging and framing designs to best showcase it. Deckled, torn, uneven, or naturally feathered edges call for items not to have their edges covered or otherwise hidden by window mats. There are a number of hinging variations that allows for the full 100% visual exposure to all edges of the art: V-hinges, pass-through or S-hinges; pedestal or wrapped hinges; and Mylar encapsulation (photo 1).
 Photo 1
All of the samples are floated in the photo, all suing different techniques to show the entire piece of art. Upper right corner is a V-hinge, upper left is a pass through or S-hinge, bottom center uses hinges over a platform or pedestal float.
V-Hinges
Since there is always a window mat of some kind used in conjunction with T- or pendant hinges, the rice paper supports are hidden from sight. When full view to the very outer edges of the art is called for the hinge support system must remain out of sight behind the art. V-hinges are a hidden version of a pendant hinge illustrated last month in "Hinge Basics."
A feathered or wet separated rice paper hinge is adhered to the verso side of the artwork using starch paste (diagram 1). Apply the starch to the upper ¼" of the hinge strip, allow to lightly dry until the sheen is gone, then align the hinge onto the back top edge (verso) side of the art. This time the hinge should be set right at the top edge of the art. This type of hinge will only work for art with a straight or nearly straight top edge. Unevenness across the top of the art, or setting the hinge too low away from the edge will not allow the art to be turned face down during the hinging process.
After the hinge has dried, attach the face down art to the backing board by moistening with paste and lightly smoothing the wet hinge to remove air and feather the edges. Place a small piece of spun polyester (Pelon) over the moist hinge, then a dry blotter followed by a weight and let set.
Reinforced V-Hinge
Where the T-hinge has an extraordinary potential for weight bearing with superior T-peel and shear strength, the V-hinge sacrifices that strength for being invisibly hidden behind the art. A V-hinge should always be reinforced with a horizontal cross piece to prevent it from peeling off by gravity and the weight of the art it is hanging (diagram 2).
As with T-hinges, the reinforced horizontal strip applied over the adhered V-hinge may be of rice paper, p-s or gummed paper tape (photo 2). Unlike the pendant hinge, they are often placed horizontally with the length of the hinge pasted to the art rather than vertically with the width or narrowest portion attached to the art.
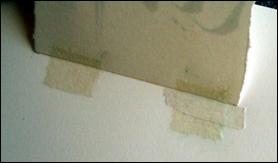 Photo 2
The V-hinge is similar to a pendant hinge but is placed on the back of the art and folded back onto itself (left hinge). If reinforced with a cross piece it is drastically strengthened (right hinge).
S-Hinges
Whether called, S-hinge, pass through, folded, suspension tab, or concealed pendant hinge, they are all names for the same type of hinging process, one that allows the art to visually float in the center of the frame. These hinges are mounted on one end to the back of the art while the other is fed through the backing board and mounted to the back of the mounting board.
The S-hinge is first mounted to the verso side of the art and allowed to dry. Slots are cut in the backing board at the proper position just slightly wider than the hinge. The sharp paper edges of the 4 ply board should be rounded to prevent cutting of the rice paper hinges either when they are being passed through or during handling of the framed image. Then they are fitted through the slots (photo 3) and glued to the back of the mount board out of sight.
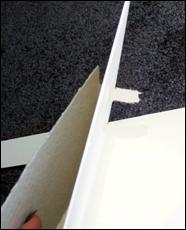 Photo 3
A pass through hinge is fitted through a slot that has been cut into the 4 ply backing board for affixing to the back of the mount board out of sight. The photo shows the rice paper hinge, already glued to the art with starch paste, after it has been fed through the prepared slot in the backing for adhering to the back side.
As with the above V-hinge, the basic pasted pendant S-hinge is subject to peel failure if the frame is rotated or mishandled and the weight of the art is allowed to pull against the hinge, peeling it off. Therefore, the S-hinge should be reinforced with a horizontal cross pieces like the T- or reinforced V-hinge. (diagram 3)
Jumbo Hinges
Another option to help with reinforcing a thin hinge is creating a jumbo hinge. The jumbo hinge is a bit of a hybrid in that it is a standard strip of mulberry rice paper that has been wet feathered 1" wide and 4-6" long. It is folded at its midpoint and glued with starch paste together to create a double thick hinge. The last ¼" ends are left unglued and flared out into a T shape for mounting to the art (photo 4).
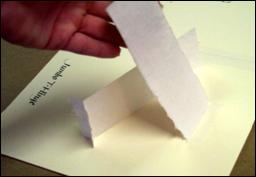 Photo 4
The hinge to the right has been securely pasted to the backing as it would to the backing board in a pass through hinge set up. The hinge laying beneath shows a readied prepasted jumbo hinge with its T shaped flange ready to be mounted to the artwork of choice.
Jumbo hinges work well with this S-hinge technique because they reinforce the rice paper and help prevent tearing at the actual pass through points of the 4 ply boards. Depending on the actual weight of the floated art, and because of their added strength, jumbo hinges may not require a horizontal cross piece to reinforce the hold.
Pedestal Hinges (also called Z-tack hinge)
Pedestal, wrapped, or float hinges are all names for the same technique. They are a hinge process that allows free floating of artwork mounted to a raised pedestal or platform surface which in turn is what is fused to the backing board. Backing boards may be fabric covered or plain mat board, in any thickness from 4 ply to ½", though 4 ply, 8 ply are most common for preservation.
The featured Bunnies sampler is an open edition 3-D paper sculpture 4½"x 4"x ¼", being framed floated for educational demonstration, so the platform is a ³⁄₁₆" acid free foam board rather than rag (photo 5). The photo illustrates the depth of the wrapped float which requires a deeper beveled mat (nearly ⅝" deep) and frame to accommodate the floated image.
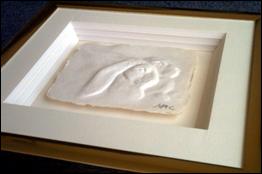 Photo 5
This is actually a work in progress shot prior to completion, hence the raw stacked foam board deep bevel mat. The small 4½"x4"x¼" three dimensional paper sculpture has been wrap hinged for added depth and intrigue. The foam mats still need to be wrapped and topped with a rag mat prior to fitting into this 9½"x9" Designer #49-13 gold metal frame.
The platform is reverse bevel cut smaller than the art so it will not be visible at the edge, and the sharp corners of the bevel edges have been rounded to soften and remove the sharp paper edge. Hinges are pasted to the back of the art, weighted and allowed to dry. The dried hinges are then pasted around the smoothed edges of the top of the platform (diagram 4).
Hinges may or may not be placed at the bottom or sides of a platform to help secure it, but never snugly, as the art must be allowed to move through natural expansion and contraction (photo 6). The hinges at the bottom of the sample are overkill on this piece because of its small size, but were a necessity on the completed original African mask painting on 100% kozo paper (photo 7).
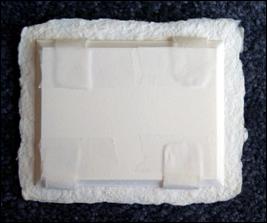 Photo 6
The hinges are loosely attached on the bottom to prevent the sculpture from pulling if turned over or inverted during handling. The top hinges are snug to the top edge of the platform that has been rounded at hinge point to prevent the hinges from being cut by the sharp edge of the platform.
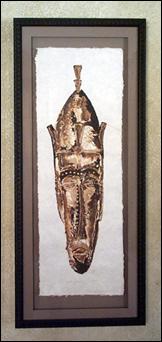 Photo 7
Here is a completed framed sample using the platform wrapped hinge technique. Framed 16"x38", original artwork on 100% kozo paper with four deckle edges 11"x31" single matted with and floated over Alpharag 8674 Heather Brown. Art is mounted with wrapped hinges over an 8 ply pedestal created from rag fallouts. Original artwork by Chris A. Paschke.
This piece was single matted with Alpharag 8675 Heather Brown and backed with the same. Modified Asian proportions were used for spacing at top and bottom of this 11"x31" original to help maintain the elongation of the paper in this design. The detail corner of the mask shows the uneven feathered and deckled edges of the paper having been floated over an 8 ply Alpharag pedestal placed in the deep frame with a ⅜" spacer under the mat which was faced with matching Alpharag (photo 8).
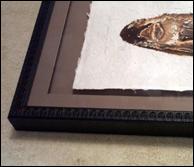 Photo 8
This corner detail better illustrates the floated nature and depth of the framed art image.
It was completed with TruVue Conservation glass, in a 16"x38" Larson Juhl Java moulding #300240 that had been lined with Lineco Rabbet Sealing Tape and finished with Lineco backing paper. We must always remember that preservation (conservation, museum) framing means using accepted preservation materials and practices at ever stage of the framing process.
Floated Encapsulation
Encapsulation is the process of placing a delicate image between two pieces of clear Mylar polyester or archival quality polypropylene so that both sides may be viewed without handling the actual art. By trapping a delicate item in an envelope or between sheets with sealed edges the art is supported, preserved, the mounting is reversible, is viewable from both sides, and may be floated to showcase the art to its outermost edges (photo 9).
 Photo 9
By trapping an item between two sheets of Mylar polyester with sealed edges the art may be floated so that all the outer edges are visible. Notice the gray carpet is visible around the outer edge of the mat as well as surrounding the artwork.
Encapsulated art may be backed with a contrasting color backing board or fabric for better viewing of irregular edges or when there is no margin. As a design option, this format may be used to allow for the framing to pick up the pattern of the wallpaper or faux finished wall behind it (photo 10). It may also be floated between two matching window mats in a recto verso presentation simply to allow for viewing from both sides.
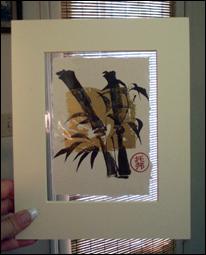 Photo 10
Encapsulated art may be backed with a contrasting color backing board or may be used to allow for the framing to pick up the pattern on the wall behind it. The bamboo window shade shows the possibilities of using the pattern as part of the framing design.
The double window mat is hinged along the longest side of the mat unit with a gummed or pressure-sensitive flange hinge the full length of the mat for better support. The Mylar envelope is attached to the inner window by a pressure-sensitive flange hinge across the entire top to help keep the polyester from buckling. This process may be used more for archival storage than framing for wall display, unless it is to be double framed for two sided viewing potential.
Hinge Removal
The removal technique is quite simple for Japanese or starch paste hinges. Remove the hinged art from its backing or platform by cutting the unpasted portion of the hinges and place it face down on a protected, clean surface. Lightly dampen the small hinge that remains on the back of the art with distilled or filtered water and a small soft brush. Wait a bit and carefully attempt to lift the softened hinge from the back of the artwork, but do not pull on it. If the hinge does not easily peel from the art apply a little more water and try again. Once removed, cover the moistened portion of the art with spun polyester/Pelon, a clean blotter and a weight to let dry.
Hinge Review
What better way to end another year of framing than with two months of hinging review? Hopefully all of this is just a polishing of what you already know, but it is always good revisit and confirm what we already know. Times change as do materials and practices. It's not so very long ago we still used masking tape for hinging. I remember those days.
END
Copyright © 2004 Chris A Paschke
For more articles on mounting basics look under the mounting section in Articles by Subject.
Additional information on all types of mounting is found in:
The Mounting and Laminating Handbook, Second Edition, 2002,
The Mounting And Laminating Handbook, Third Edition, 2008 and
Creative Mounting, Wrapping, And Laminating, 2000 will teach you everything you need to know about getting the most from your dry mount equipment and materials as an innovative frame designer.
All books are available from Designs Ink Publishing through this website.
Chris A Paschke, CPF GCF
Designs Ink
Designs Ink Publishing
785 Tucker Road, Suite G-183
Tehachapi, CA 93561
P 661-821-2188
chris@designsinkart.com