 Photo 1
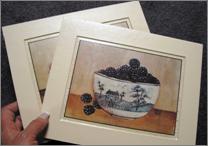
The left image was mounted first to 4-ply board with the right to foam board. Window mats were cut and aligned using ATG tape, then matte and luster laminates were applied respectively.
These days, framers need to offer new and inventive design ideas just to maintain their market share. Creativity and framing alternatives are often what sets one framer apart from the next. Since the onset of the CMC, any custom framer can offer a Kobe corner or octagon-cut window mat, but not every frame shop offers dry mounting and laminating.
Laminating and Roller Laminators
Vinyl heat activated (HA) laminates, as used in the framing industry, were developed as a protective film coating to be applied to the surface of paper images or photographs by a mechanical or hot vacuum press. Surface laminating is a permanent alternative to glass that is durable, nonbreakable, nonpermeable, washable, lightweight, and fingerprint and UV resistant. With a minimal investment in a roll of laminate and a sheet of sponge overlay, any heat press can be converted to a laminator. Though basic laminating is a must in today's market for all heat press owners, creative laminating applications are an altogether different venue.
Most pouch laminators, roller machines, and roller presses today are not designed for creative laminating. The Roller Press, ProSeal, AMS, and other closed units used in framing are modified roller laminators (RLs) that have been designed for fine mounting and laminating. Though most other models have pressure adjustment settings and forward/reverse adjustable speeds, their preset heat controls minimize creative applications and limit them to simple encapsulation. So mechanical and hot vacuums reign supreme for creative applications.
Laminated Mat Board
Surface laminates were never developed to be cheaper than glass, merely as a glazing alternative. They may often be the best alternative to using glass in a child's room, hospital, restaurant, or public facility. And using laminates on mat board is also creative.
Mats may be surface laminated with any vinyl film finish (matte, satin-matte, luster film, or gloss) or texture (canvas, linen, sand, et al.) and used in a glass-free frame. Common applications include art/mat units and laminated window mats. Embossing, resurfacing, and retexturing are also innovative ideas often popular with customers. Additional decorative laminate uses include contemporary panel designs, faux glass etching, mirror design, and leather look.
Laminated Art/Mat Unit
In display situations where glazing is undesirable, a laminated mat may be the right choice. Bonding a laminate over a mounted, matted print seals the art and creates a protected, lightweight image with a window mat that is ready for framing. In Photo 1, a sheet of perforated luster laminate was placed over the window mat and ATG taped to the mounted substrate. It was covered with a piece of ½" sponge overlay and placed in a press (Photo 2). This process works best over a single 4-ply window mat. The softened film will contour and bond into the sunken window, but it will never create crisp angular edges at the bottom of the bevel, creating small curved corners (Photo 3).
Photo 1
The left image was mounted first to 4-ply board with the right to foam board. Window mats were cut and aligned using ATG tape, then matte and luster laminates were applied respectively.
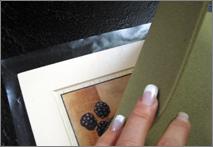 Photo 2
A sheet of perforated luster laminate from Drytac is placed over the window mat, which has been ATG taped to the substrate. It is then covered with a clean piece of overlay sponge foam and placed in a press.
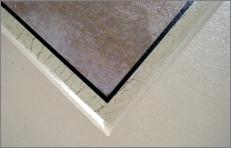 Photo 3
Curved corners and transition at the bottom edge of the bevel is the nature of laminates. The gloss reflection in the photo has been maximized to illustrate this curve, but it is barely noticeable once it is framed.
Embossed Laminates
Since vinyls are pliable when heated and easily conform to a given shape, films can be mounted over shallow items to trap them into position once they are mounted (Photo 4). This is called embossing, and it used a colored mat to coordinate with the art as the background. Two layers of ¼" overlay foam or one sheet of ½" are best for embossing. A thicker sponge helps create a more even pressure surrounding the 3-D object without leaving tunnels of unbonded film along the object edges. Since laminates require heat of 180ºF to 225ºF to bond, embossing needs to be limited to items that tolerate the required bonding temperatures.
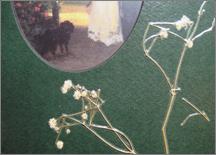 Photo 4
The mat detail shows a matte laminate over a mounted print (inside the oval) with a luster laminate over a sprig of glycerin-treated baby's breath. The oval was cut after the mat was laminated.
Wet, moist, or untreated natural materials can produce condensation under mounted films and should be avoided. If natural flowers, leaves, or grasses are used, they need to be dried with silica gel or glycerin prior to laminating. Once laminated, the already-sized board is cut into the desired window mat shape, then attached or book hinged to the mounted/ laminated print. The actual bevel in this technique won't be coated with film. This is different from creating an art/mat unit. In this case, the embossed window mat is laminated independently from the mounted print. This allows different laminate finishes to be chosen and multiple mat windows to be used (Photo 10).
Resurfacing and Retexturing Prints
Commercial laminates are purchased with specific finishes and textures provided by manufacturers. For proper application, a piece of sponge foam overlay is required to create the desired finish. There are three reasons for using foam:
1) To extend required bonding time, allowing for greater air compression
2) To aid in the elimination of trapped air from under and around the laminate to the outer edges
3) To provide a more even pressure to all the highs and lows of the laminate.
Sponges are available in ¼" and ½", and either thickness may be used on any brand of film. When vinyl film is heated and softened, it picks up the pattern of the sponge overlay. In turn, films also take on the texture or impression of any newly introduced pattern, which is called resurfacing. This allows films to be altered after bonding to remove some of the sponge pattern, to increase gloss, or to change a texture.
The process is simple.
1) Apply laminate to manufacturer specs using a sponge
2) Place a project back in the press with the gloss side of an nonperforated release liner against the face of the laminate using no sponge
3) Mount a second time at the same time and temperature (Photo 5).
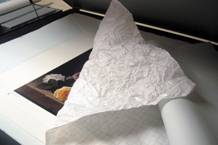 Photo 5
The right side of the image shows the traditional pattern of a sponge overlay of a gloss laminate designed by Drytac. The left side was first laminated, then retextured using a crinkled release liner.
To retexture, first mount the film using a sponge overlay on the mounted image at 185ºF to 220ºF for 5 to 10 minutes. Then place a tightly wrinkled and flattened nonperforated release liner, smooth side down, against the face of the mounted/laminated print (Photo 6). Remount with no sponge in the same temperature press for another 5 to 10 minutes. Nonperforated release liner—or Drytac single sided release paper—is required to keep the dot pattern from a perforated laminate from transferring to the image as part of the new texture (Photo 7).
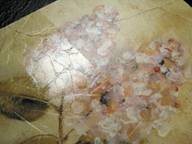 Photo 6
The mounted print was placed back into a press for a second bonding, this time with no sponge.
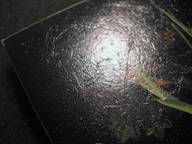 Photo 7
In the middle of the reflection, notice the set of four perfectly spaced dots from a pre-perforated commercial laminate. Use only nonperforated liners.
Resurfacing and Retexturing Window Mats
Besides laminating prints, this refinishing process is also applicable to mat boards, allowing a framed image to remain unglazed yet durable and unique. The steps are the same in refinishing a mat as for refinishing a mounted print:
1)7 Laminate with a sponge
2)7 Re-laminate with a crinkle liner and no sponge
3)7 Cut the window mat.
Closely examine the surface of selected mats for board pattern and mottled colors. Since some colored papers are not as solid as they initially appear, laminates may show mottled coloring (Photo 8). When retexturing a laminate on a hard mat board surface, the resulting crinkles may turn out differently from a print mounted on soft foam board (Photo 9). These tighter, harder-edged crinkles may also be achieved using a crushed and flattened sheet of aluminum foil.
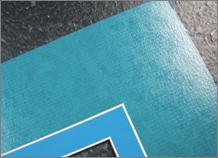 Photo 8
The resurfaced smoother laminate has enhanced the mottled coloring of the mat surface that appeared blended prior to laminating. The lumpier mat board surface is also accented by laminating.
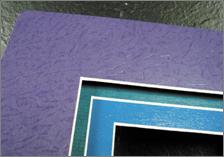 Photo 9
This corner mat detail clearly illustrates the retexturing of the matte film on the top purple mat. This may be done with either a laminate release liner or aluminum foil. There is a 3/16" foam spacer between the top and second mats. The middle teal mat has also been laminated with matte film. The bottom blue mat has been resurfaced to a smooth gloss by removing the sponge texture.
Since a sponge has already done its job during first mounting, the second mounting is only to retexture the softened laminate surface. If sponge foam were used the second time, it would contour to the highs and lows of the crinkled release liner, cushioning the unevenness and creating much less texture. Try different combinations—with and without sponge foam—to find the technique and process you like the most. The larger the mat, the longer the time it may require for bonding. These are only raw materials and will not be damaged by excessive time under heat. The large mats in the sample were completed in a 40"x60" VacuSeal hot vacuum using a release board top and paper bottom. The board helps compress the wrinkles.
Fish Sampler
The completed sample is a 24"x36" print that was mounted and laminated to foam center board (Photo 10: courtesy of Elmer's/ Bienfang). The top purple mat was both resurfaced and retextured using a matte laminate. The laminate release liner was then wadded into a tight little ball to wrinkle it, then opened flat and placed on top of the mounted film using no sponge. The middle teal mat was laminated and resurfaced with a matte laminate and smooth liner, and the bottom blue mat was mounted and then resurfaced with gloss laminate and a smooth liner.
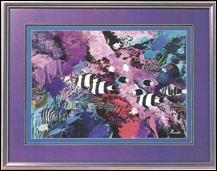 Photo 10
This 24"x36" print was mounted and laminated to 3/16" Bienfang foam board with ColorMount tissue then matted with three laminated window mats to preclude the use of glass. Framed "Mosaic Fish" image shown courtesy of Bienfang.
You can also cut unused fallouts into corner samples, use them for framed gallery art, or save them for future projects. Using laminate and 4-ply board scraps, for example, you can create 8"x10" crinkle laminated windows or embossed mats for quick sales. They also are perfect for photo frames. The bottom line is that laminates on mat board can generate additional profits while offering many creative opportunities.
END
Copyright © 2009 Chris A Paschke
For more articles on mounting basics look under the mounting section in Articles by Subject.
Additional information on all types of mounting is found in:
The Mounting and Laminating Handbook, Second Edition, 2002,
The Mounting And Laminating Handbook, Third Edition, 2008 and
Creative Mounting, Wrapping, And Laminating, 2000 will teach you everything you need to know about getting the most from your dry mount equipment and materials as an innovative frame designer.
All books are available from Designs Ink Publishing through this website.
Chris A Paschke, CPF GCF
Designs Ink
Designs Ink Publishing
785 Tucker Road, Suite G-183
Tehachapi, CA 93561
P 661-821-2188
chris@designsinkart.com