Paschke Online
Designs Ink Publishing Article Archive and Reference Library
Articles by Chris A. Paschke, CPF GCF
"Designer Laminates"
July 1999
Designer laminates are nothing more than laminating films used in creative applications, which in turn pull in more revenue. In this Mat Design and Decoration issue it is only fitting that I once again concentrate on something a little off center from more typical mounting techniques. Never forget that although mounting is the mainstay of dry mount presses, laminating makes up the other half of the profit picture, and decorative or creative aspects of both mounting and laminating can be a huge source of profits if tapped into.
Surface Laminates
Polyester laminates have been around since the 60s, were developed for the basic protection of paper (both surface and encapsulation), and were designed for use with roller/laminators found in the commercial market. Vinyl laminates were developed in the early 80s, were introduced as a glass substitute, and had been designed to be compatible with heat mounting systems specifically found in the picture framing market.
As a glass substitute laminates open a whole new world to framers when handling posters and photographs. They now can be mounted and laminated, still placed into a nice moulding with mats and hung in previously "iffy" locations, such as a child's room, day care center, or hospital. They are available in different finishes for added variation, are washable, and may be mounted over nonporous surfaces by perforating the vinyl prior to heat mounting.
Designer Applications
As wonderful as these vinyl films are when used as manufacturers' suggest, there are numerous other applications that allow them to modify and alter other framing materials besides simply protecting a poster or photo. The variations I am illustrating this month are in honor of mat decoration, and oddly enough there are far more possibilities available for mat reinvention than often considered. In fact this list and overview is only representative of a few general applications. Upcoming articles will explore these in greater depth.
I will begin by discussing basic resurfacing, retexturing (crinkle-look), contempo panel designs, leather-look concepts, and end with an explanation of the masthead featured mat by Ray Dwyer (photo 6).
Resurfacing
Often I am asked if it is possible to change the look of any given laminate from the slightly textural appearance of luster or matte finishes to a genuinely smoother look. The overlay foam that is used in the mounting package to help properly fuse a vinyl laminate is required for three basic reasons: 1) to extend required mounting time, 2) to help transport air from under and around the laminate to the outer edges, and 3) to provide even pressure to all the highs and lows of the chosen smooth to textural laminate. These are all very viable and important reasons the foam should always be used in traditional surface or over-laminating.
When foam is not used (or accidentally forgotten) during initial mounting of a laminate the surface will reflect a scuffed type of appearance which is thought to be a reaction of the vinyl to the silicone from the release paper (photo 1). The left half shows a marred surface (similar to high gloss photo scuffing), the right half illustrates the slight textural appearance that is transferred from the foam overlay to the softened heated laminate. Often (not always) this damage may be corrected by placing the project back into the press a little longer than initially laminated with the foam in place.
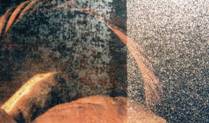 Photo 1
Left side of this laminated poster clearly illustrates the damaged surface of the film when overlay foam was forgotten during mounting. Right half shows the slight pebbly texture which occurs when the laminate picks up the texture of the foam during mounting.
In order to achieve a smoother surface the vinyl must be protected from pebbly foam texture. When layering the mounting package, place the smooth side of the laminate release liner against the surface of the unmounted laminate (nonperforated only), then the foam on top, then release paper above that (photo 2). This will still mount the laminate but will not allow the texture from the foam to embed into the soft vinyl during heat mounting. Plus the silicone on the laminate liner works with the vinyl and will not damage or scuff the surface of the film as in photo 1.
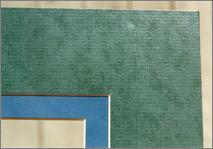 Photo 2
Top mat is a mottles Crescent laminated with matte film and resurfaced to allow the texture of the paper to show.
Over a nonporous print or photo the laminating requires two times in the press. The perforated laminate must be mounted correctly first with the foam on top to allow for air to escape and perforations to heal. Then place the project back into the press for a second cycle with a smooth, nonperforated laminate liner, topped with foam to remove some of the texture from the foam. This second mounting can be tested with or without the overlay foam using only release liners as the laminate has already been mounted.
Retexturing
Both resurfacing and retexturing are done on the top purple mat (photo 3). A Luster laminating film (Seal PrintGuard-UV) was selected and mounted onto the sized but uncut mat blank first with the foam on top. After mounting the laminate release liner was wadded into a tight little ball to excessively wrinkle it. Then it was opened flat and placed on top of the previously mounted film with regular release liner on top, using no foam.
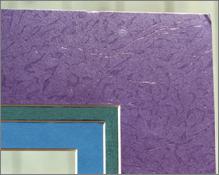 Photo 3
The wrinkled retextured purple mat was laminated first using manufacturer methods. The wrinkled release liner from the laminate was layered with top release paper and mounted again to press the retexture the soft vinyl film surface.
Since the foam had already done its job when initially mounted, the second mounting is to achieve the retextural crinkling of the mat laminate. If the foam were used during the second mounting it would contour to the highs and lows of the wrinkled release liner and create less retexturing of the film would occur. Try different combinations (with and without foam) to find the technique and process you most like. All laminates in these demos were mounted at 225ºF degrees for 5-10 minutes during each visit to the press though lower temperature films of 190ºF degrees are available and dwell times vary in vacuum systems. The larger the mat, the longer the time. These are only raw materials and will not be damaged by excessive time under heat. The large mats were completed in a 40x60" hot vacuum, using a release board top, paper bottom, the board helps compress the wrinkles.
Contempo Panel Designing
Another concept of mat design and probably the easiest of all discussed here is contempo panel designing. This is merely the process of taking cut laminate strips and patterns of Matte laminating film, removing the protective release liner from the back, positioning it onto the mat, placing in a traditional laminating package (top to bottom: release paper, overlay foam, laminate, mat, release paper) and mounting it in 190-225ºF press for 5-20 minutes to set. Dark mat boards best showcase the shadow stripe appearance.
The sample (photo 4) shows simple strips that have been cut on a professional mat cutter to —" and 1" then aligned onto the window mat with the opening already cut. The laminate is then permanently mounted to the board to set the films. Though all textures and finishes may be used for this the best visual effect is achieved using a matte or nonglossy finish laminate. Gloss or luster films give more of a wet-look than the more monotone painted panel appearance of the matte or nonglossy films.
 Photo 4
A corner detail of a simple contempo panel design mounted at 220ºF degrees for 5 minutes in a 210M-X mechanical press using traditional methods.
Both resurfacing with the smooth laminate liner and retexturing with a wrinkled liner as crinkle-look both described earlier may be done to vary the end effect (masthead/photo 6). Then taking this last project even one step further...if a perforated matte finish laminate is mounted to glass using the above contempo method the resulting faux glass etching is spectacular!
Another Article Another Time.
Leather-look
The ultimate in textural laminate achievements for use with shadowboxes on foam, wrapped foam mats, or basic 4-ply window mats, is called leather-look (photo 5). Laminate a smooth lightfast piece of art paper (Strathmore Acid Free Charcoal Paper, black, 20-28#) about an inch larger around than the completed project dimensions. Layer with overlay foam before mounting, bond at 190-225ºF degrees for 5-10 minutes.
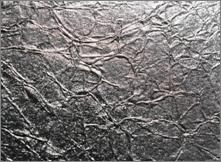 Photo 5
Detail close-up of a leather-look foam board one-piece shadowbox using laminated black Strathmore Acid Free Charcoal paper, wrinkled and mounted with film adhesive to the box blank.
Once laminated, wad the laminated paper into a tight ball as was done with the liner above. The more this sheet is wrinkled and worked the softer it will become and the better the veining of the imitation leather will look. It is also impacted by either being mounted onto a solid mat board vs. a soft pliable foam surface. The first creates veining that raises above the board, the second (as in the sample photo close-up) is more depressed into the soft surface of the foam board box.
This is very masculine design and may be done with any colored art paper that will not fade, and dark colors work best. After creating the leather-look sheet, mount it to the substrate of choice for the project using a pure film adhesive (ie: Seal Fusion 4000, Hot Press Acid Free Mounting Film) and standard times and temperatures. Both matte and gloss films may be used. Gloss film has a tendency to look most like polished leather when done.
Putting it All Together
This article was initially inspired by a mat sample designed and executed by Ray Dwyer CPF, Dwyer's Framing Gallery, Whitefish, Montana (photo 6/masthead photo). At a weekend workshop in Montana I taught the local PPFA Chapter how to resurface laminates by layering the laminate release liner over the film when mounting. The concepts of both contempo panel designing and resurfacing with release liners was added together by Dwyer to create this horizontal accent panel (photo 7/detail).
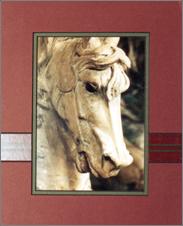 Photo 6
Designer mat by Ray Dwyer CPF, Whitefish Montana showcases the ultimate in creating design applications on a mat board.
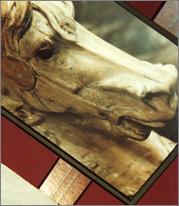 Photo 7
Close-up of Luster PrintGuard-UV mounted over a multiple inlaid v-groove of green.
Being the over-achiever he is, Dwyer not only applied the laminate in a horizontal panel across the mat, but inlaid two v-grooved strips of green board into the two center v-grooved stripes executed on the burgundy mat surface. This left the two outer v-grooves as barriers to the design and the laminate worked as a capper to trap the added inlaid v-grooves. He then used the laminate release liner to prevent added overlay foam texture which could fight with the delicacy of the v-grooved inlay. A really effective pattern.
I added the carousel horse photo (ok, not the best choice)...the mat had been designed as a sampler and had been given to me as a gift with no photo. What can I say, often the pupil outshines the teacher. It's said to be the sign of an excellent teacher! So in the age of going for it all see what you can do with these designer ideas and start thinking of your laminates than more as just a pretty glass substitute.
END
Copyright © 1999 Chris A Paschke
For more articles on mounting basics look under the mounting section in Articles by Subject.
If you already know the specific title then search under Articles by Title.
Additional information on all types of mounting is found in:
The Mounting and Laminating Handbook, Second Edition, 2002,
The Mounting And Laminating Handbook, Third Edition, 2008 and
Creative Mounting, Wrapping, And Laminating, 2000 will teach you everything you need to know about getting the most from your dry mount equipment and materials as an innovative frame designer.
All books are available from Designs Ink Publishing through this website.
Chris A Paschke, CPF GCF
Designs Ink
Designs Ink Publishing
785 Tucker Road, Suite G-183
Tehachapi, CA 93561
P 661-821-2188
chris@designsinkart.com