
Platforms, lifters and spacers are essentially all names for the same thing, a mechanism for creating a gap, opening or distance between two parts (diagram 1). A spacer—or lifter—is a small piece or strip of wood that is screwed to the base of a float frame beneath a painted panel to raise up the art. This both brings it closer to the frame face and creates the illusion of it floating within the frame (diagram 2). A block spacer is an inexpensive way to raise a painted panel, but it gives no additional support to the frame.
A solid board that is screwed to the entire inside perimeter of a frame is called a platform.It is smaller than the art panel—allowing it to float—yet larger than the opening in the bottom of the frame. Platforms help stabilize and support 8-ply rag boards or panels so they won't sag or warp with temperature and humidity. Not only does a platform support the entire painting it also adds rigidity to the frame (photo 1).
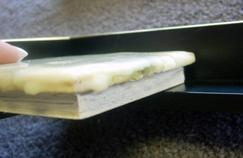 Photo 1: Platform
It supports the panel and adds strength to the frame.
The height of the platform is somewhat a matter of personal preference for encaustic art as the depth from the face of the frame to the highest point of the art can vary from ⅛" to ½". There is no set distance as long as the art remains lower than the frame.
Platform Installation
I will explain the step-by-step replacement and re-installation of a platform next month, but will run through the basics here. Always make a pencil mark at the bottom of the platform and the bottom of the frame for future alignment. Fit strips of corrugated cardboard or foam center board between the edge of the platform and the frame for placement and to help support the platform during installation (photo 2). Then screw the platform to the frame with ¾" long #4 Phillips flat head screws. This type of solid platform is meant to be a base that the art will be glued to and is generally not designed for painting or wax.
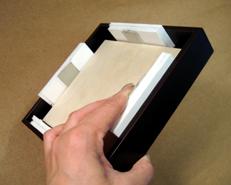 Photo 2: Platform
Center the platform with scrap pieces of board.
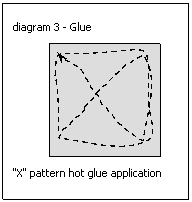
Do not apply adhesive to the back of the art. To affix the art panel apply a bead of Titebond Wood Glue around the perimeter of the platform ¼" in from the edge and then in an X corner to corner (diagram 3). This will firmly tack all four corners and the center. Lightly spread the glue to even out the adhesive and speed drying time. Align the panel and press firmly for full contact with adhesive, then keep flat when drying.
By floating panels in this method the surface of the art will never contact the table even if laid face down and will protect the delicate edges from damage.
END
Copyright © 2010 Chris A Paschke
For more articles on mounting basics look under the mounting section in Articles by Subject.
There is a special section in the library for all past IEA Framing Matters articles from Wax-On!
Additional information on all types of mounting is found in:
The Mounting and Laminating Handbook, Second Edition, 2002,
The Mounting And Laminating Handbook, Third Edition, 2008 and
Creative Mounting, Wrapping, And Laminating, 2000 will teach you everything you need to know about getting the most from your dry mount equipment and materials as an innovative frame designer.
All books are available from Designs Ink Publishing through this website.
Chris A Paschke, CPF GCF
Designs Ink
Designs Ink Publishing
785 Tucker Road, Suite G-183
Tehachapi, CA 93561
P 661-821-2188
chris@designsinkart.com