 Photo 1
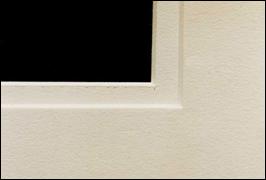
Ragged edge on inner mat window calls for burnishing of the bevel.
There's more to executing a professionally well cut mat than simply using good equipment and avoiding hooked corners. Routine servicing of your cutter by cleaning and lubricating, changing blades regularly, making certain the blade is not overly extended and checking that the slip sheet is never over-scored will all add to the accuracy and precision for which we continually strive. But, there still remains one final finishing step in the process of mat cutting that continues to set the polished professional apart from the weekend hobbiest. Use of a bone burnisher. So where is your bone anyway?
You remember....the one you bought way back when you were told you needed one, then threw in a drawer waiting for when that time came. Or worse yet, you're one of the number of framers who consider themselves top notch designers yet haven't even invested in a bone at all! It's a small inexpensive addition that should be part of every framers basic tool kit.
When To Put It To Use
When cutting most soft museum rag, 12-ply tiered mats or even if the blade is a little dull, a burnisher easily smooths down newly cut raw or ragged edges and gives the mat a more polished and completed look (photo 1). Slight imperfections in mat corners such as tiny overcuts may also be visually reduced—never healed—by using a bone. When cutting pin striped or bevel banded tiered mats of 8 to 15-ply thickness, there will appear to be a shifting of the planes at the window corner.This is merely the result of the blade being inserted then removed from a very dense, thick board. By burnishing the bottom edge of the bevel from the back of the mat, then flattening the shifted corner the mat window will appear realigned from the front.
Photo 1
Ragged edge on inner mat window calls for burnishing of the bevel.
Types of Burnishers
Burnishers, also called bone folders, come in a variety of sizes and shapes (photo 2) and are used extensively within the craft of making and restoring hand sewn books and bookbinding. Though burnishers are also available in stone, plastic, metal and wood, some can transfer a discoloration to the mat. They may also have a little more resistance to sliding along a toothed surface not allowing them to glide as smoothly as an aged or treated bone. Most alternative burnishers have actually been developed for other technical uses—vinyl transfer designs, gilding—and should only be used as a temporary substitute for bevel smoothing while you search for your neglected bone.
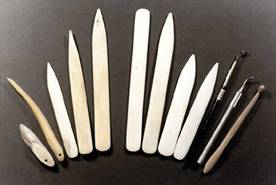 Photo 2
Burnishers come in a variety of sizes, shapes and materials.
Seasoning A New Bone
A new burnisher should be seasoned with oil prior to use, much like you would a new gourmet sautpan. Liberally apply a natural oil—such as vegetable or corn oil—to all sides of the bone and rub off any access with a clean absorbent cotton rag. Let the new bone sit at least overnight to completely absorb the oil. Since it is a natural material—this will not work with a synthetic or plastic facsimile—the oils will readily be absorbed back into the dried bone. The original white color of the newly ground and polished bone will now appear more yellowed, but will be left extremely smooth and sensual. The darkening of the bone is the direct result of oil absorption which does not leave the bone oily in any way.
In fact the reason for seasoning is to somewhat seal it from the dirt and oils found on human hands which can make dirty bones rather sticky. The benefits of a burnisher are the smooth gliding way they slip along the edge of cut paper or board. Older untreated bones will often take on the same yellowed or aged look of a freshly seasoned one. This comes from natural hand oils being transferred to the bone as it is used...along with all the dirt and other alien substances of course. This may also make the bone sticky.
Don't Muscle The Bone
Very little pressure is required to smooth the cut edge of the mat, this is an extremely important point. Too much pressure may not only dent the board but could remove the crisp, clean contrast between the mat surface and the bevel itself. The idea is not to reestablish the bevel, just to clean it up (diagram 1). Burnishers are integral in folding paper (diagram 2) and activating pressure-sensitive adhesive tapes (photo 3).
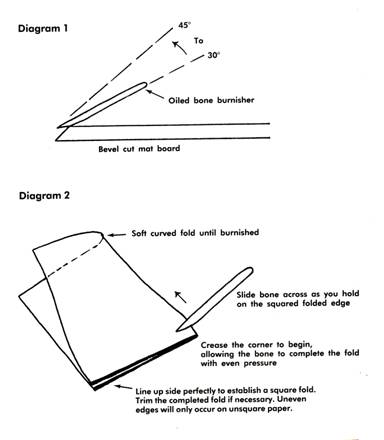
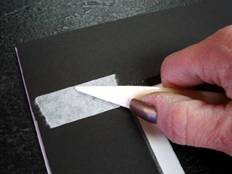 Photo 3
Burnishers should always be used to fully activate P-S adhesives.
Consider for a moment the impact all this could have on your professional image. The viewer never quite realizes why the matted picture looks better, it just does. As quality picture framers not only interested in promoting the precision of our craft, we are also always in search of the additional little elements that set us apart from "the other kids on the block". Burnishing may not only allow you to charge that extra percentage reaching the upper end client, but may also give you the edge in technical execution during a framing competition, which is also good for business.
Lightly burnished mat edges may not be the solution to a hooked corner, but they most definitely should be the professional framers finishing touch. So if that bone you bought last year is buried in the back of a drawer somewhere, maybe it's time to dig it out and put it to some good use.After all, a bone in the hand is worth two in the drawer.
END
Copyright © 1995 Chris A Paschke
For more articles on mounting basics look under the mounting section in Articles by Subject.
Additional information on all types of mounting is found in:
The Mounting and Laminating Handbook, Second Edition, 2002,
The Mounting And Laminating Handbook, Third Edition, 2008 and
Creative Mounting, Wrapping, And Laminating, 2000 will teach you everything you need to know about getting the most from your dry mount equipment and materials as an innovative frame designer.
All books are available from Designs Ink Publishing through this website.
Chris A Paschke, CPF GCF
Designs Ink
Designs Ink Publishing
785 Tucker Road, Suite G-183
Tehachapi, CA 93561
P 661-821-2188
chris@designsinkart.com